-
Notifications
You must be signed in to change notification settings - Fork 28
Running Tests for a Project
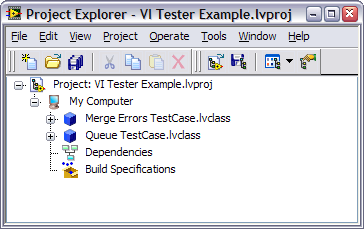
Open the VI Tester example project located at:
\examples\JKI\VI Tester\VI Tester Example.lvproj
The example project, shown below contains two TestCase classes:
Expand the "Merge Errors TestCase.lvclass" class in the tree to show the class members. You will find several member VIs whose names all begin with "test" -- these are unit tests that validate functionality of the "Merge Errors" VI that ships with LabVIEW. We'll look at these later. Now, let's run all the tests.
Launch the VI Tester user interface by selecting Tools >VI Tester > Test VIs... from the menubar of the Project Explorer window. VI Tester will then inspect the project for all unit tests and show them in the Test Hierarchy window, as shown below.
Press the 'Run All Tests' button to run all of the unit tests.
This will run all of the tests, showing the results.
The following glyphs are used to show the status of each test:
-
- Test Passed
-
- Test Failed
-
- Test Skipped
-
- Test Not Run
You can double-click any of the tests, to open it. Double-click on the "test no error in" test in the "Merge Errors TestCase". This will open "Merge Errors TestCase.lvclass:test no error in.vi", as shown below:
You can see that the "Enabled" frame of the Diagram Disable Structure calls "TestCase.lvclass:skip.vi" -- this is why the test shows the Test Skipped (Glyph___Test_Skipped.png) icon in VI Tester. Enable the other frame of the Diagram Disable Structure, as shown below:
The re-run the test to see that it is no longer skipped.
VI Tester is an open source project maintained by the VIPM Community. To submit bugs, feature requests, or contributions, please submit an issue to the project tracker.


 - Test Passed
 - Test Failed
 - Test Skipped
 - Test Not Run
