This chapter introduces the rule of view controller.
RxController provides a basic view controller RxViewController (generic classes) and a basic view model RxViewModel.
We recommend to create a BaseViewController which extends RxViewController and a BaseViewModel which extends RxViewController. Developers can customized something in the BaseViewController and BaseViewModel class.
class BaseViewController<ViewModel: BaseViewModel>: RxViewController<ViewModel> {
    // Customize somthing here...
}

class BaseViewModel: RxViewModel {
    // Customize somthing here...
}
All the view controller classes should extend the BaseViewController.
All the view model classes should extend the BaseViewModel
The code in the view controller should follow the order:
Views should be defined with private lazy var.
private lazy var nameLabel: UILabel = {
    let label = UILabel()
    label.textColor = UIColor(hex: 0x222222)
    label.font = UIFont.systemFont(ofSize: 14)
    return label
}()
A closure should be used when some properties of this view need to be set. Otherwise, we omit the type and invoke the init method directly.
private lazy var nameLabel = UILabel()The order of the views should be same as the design. The left views and top views should be in the top of the right views and the bottom views.
When a parent view is used as a container view, it should be defined after its subviews.
private lazy var nameLabel = UILabel()

private lazy var iconImage = UIImageView()

private lazy var containerView: UILabel = {
    let view = UIView()
    view.addSubview(nameLabel)
    view.addSubview(iconImage)
    return view
}()
The view definition closure does not contains the definition of subviews. The following code is not recommended.
// NOT recommended.
private lazy var containerView: UILabel = {
    let view = UIView()
    let nameLabel = UILabel()
    view.addSubview(nameLabel)
    return view
}()
The view definition closure contains the properties and methods of this view only.
We define child view controllers using private lazy var after the definition of views.
private lazy var childViewController = ChildViewController(viewModel: init())We define the data source of RxDataSources using private lazy var after the definition of child view controllers.
private lazy var dataSource = DemoTableViewCell.tableViewSingleSectionDataSource()Private properties are not recommended in the view controller. The state properties are recommened to define in the view model class. However, if needed, define them here.
Set some properties of the view controller in init method if needed.
override init(viewModel: DemoViewModel) {
    super.init(viewModel: viewModel)

    modalPresentationStyle = .overCurrentContext
    modalTransitionStyle = .crossDissolve
}

required init?(coder aDecoder: NSCoder) {
    fatalError("init(coder:) has not been implemented")
}
Just invoke fatalError method in required init?(coder aDecoder: NSCoder) because we do not support storyboard.
override var shouldAutorotate: Bool {
    return false
}

override var supportedInterfaceOrientations: UIInterfaceOrientationMask {
    return .portrait
}The following steps should be contained in the viewDidLoad method.
- Set navigation bar and navigation items.
- Set peroperties of root view.
- Add subviews.
- Create constraints.
- Add child view controllers.
- Bind data.
- Others.
override func viewDidLoad() {
    super.viewDidLoad()

    // Set navigation bar and navigation items.
    navigationItem.leftBarButtonItem = closeBarButtonItem

    // Set peroperties of root view.
    view.backgroundColor = .white
    // Add subviews.
    view.addSubview(titleLabel)
    view.addSubview(tableView)
    // Create constraints.
    createConstraints()

    //Add child view controllers.
    addChild(topViewController, to: headerView)

    // Bind data.
    disposeBag ~ [
        viewModel.title ~> titleLabel.rx.text,
        viewModel.cartSection ~> tableView.rx.items(dataSource: dataSource)
    ]

    // Others.
    // Do something here.
}
We use the operator ~> and <~> of RxBinding to bind data.
The order of the bind code is recommended be same as the order of the definition of the views.
If a view controller does not extend the RxViewController or its subclass, there is no data binding code in the viewDidLoad method.
If some lines of code for setting data of the subviews are needed, they are recommended to be written in the same position as data binding.
Add other lifecycle methods here if needed. The life cycle methods should follow the order.
- viewDidLoad
- viewDidAppear
- viewDidDisappear
- viewWillAppear
- viewWillDisappear
- viewDidLayoutSubviews
- viewWillLayoutSubviews
override func viewDidLoad() {
    super.viewDidLoad()
    // ...
}

override func viewDidAppear(_ animated: Bool) {
    super.viewDidAppear(animated)
    // ...
}

override func viewDidDisappear(_ animated: Bool) {
    super.viewDidDisappear(animated)
    // ...
}

override func viewWillAppear(_ animated: Bool) {
    super.viewWillAppear(animated)
    // ...
}

override func viewWillDisappear(_ animated: Bool) {
    super.viewWillDisappear(animated)
    // ...
}

override func viewDidLayoutSubviews() {
    super.viewDidLayoutSubviews()
    // ...
}

override func viewWillLayoutSubviews() {
    super.viewWillLayoutSubviews()
    // ...
}A contraints method contains the SnapKit constraint creators of all the views in this view controller.
private func createConstraints() {

    titleLabel.snp.makeConstraints {
        $0.centerX.equalToSuperview()
        $0.top.equalToSuperview().offset(Const.Title.marginTop)
    }

    closeButton.snp.makeConstraints {
        $0.size.equalTo(Const.Close.size)
        $0.centerY.equalTo(titleLabel.snp.centerY)
        $0.right.equalToSuperview().offset(-Const.Close.marginRight)
    }

}The private methods should be above the internal methods.
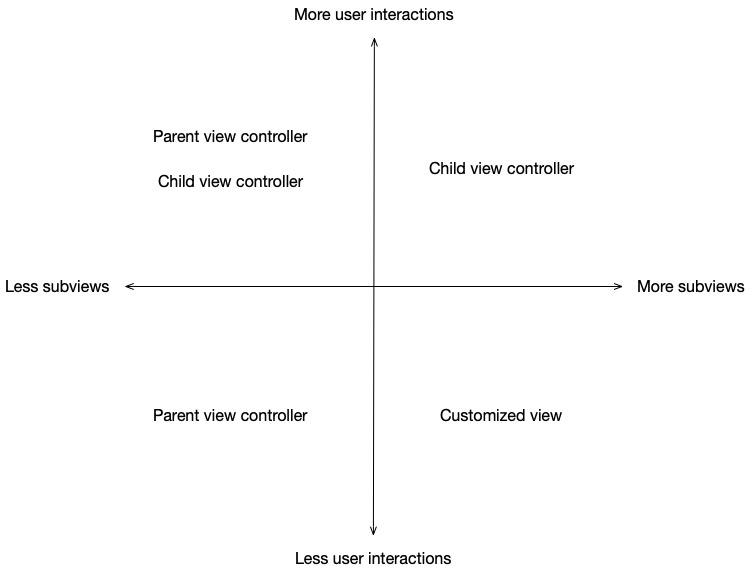
A view controller needs multiple child view controller or customized view to reduce the complexity. Generally, we consider to implements a group of subviews with relationships in a child view controller or a customized view.
Cusztomized view is recommended for showing data only, or handling a simple action like tap. We don't receommend to use RxSwift directly in a customized view. To handle complex actions, a child view controller is receommened.
To make it easy to understand this problem, we can refer to the following grpah.
In this graph, both the count of subviews and the user interactions in the group are considered. In the situation with less subviews and less user interactions, compared to add the subviews into the parent view controller directly, using a child view controller or a customized view is not recommended. In the situation with less subviews and more user interactions, developers can choose the parent plan or child plan by themselves. The parent plan is recommended with the high relevancy degree between the user interactions and the parent view controller.
A child view controller also extends the BaseViewController, so it can take advantage of view model and RxSwift.
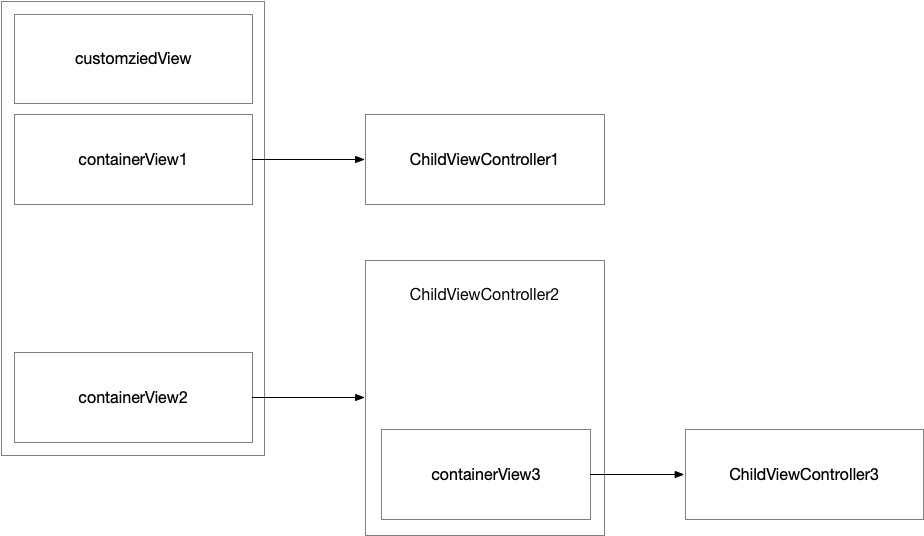
Using a container view is recommended for a child view controller.
For example, to add the childViewController1 into the parent view controller, a container view containerView1 should be prepared at first.
The constraints is applied to the containerView1.
When we invoke the addChild(childViewController1, to: containerView1), the root view of the child view controller will be added to containerView1.
The edges of the root view is same as containerView1.
A child view controller (childViewController2) may have its own child view controllers (childViewController3).
As a general rule, makeConstraints methods is recommened to be written in the createConstraints method.
Sometimes, we need to add and remove views dynamically.
In this situation, makeConstraints methods may be written in other private methods.
The constants used in the closure should be define in a private enum Const before the view controller.
The demo code of Const enum:
private enum Const {
    enum Title {
        static let marginTop = 11
        static let marginBottom = 17
    }

    enum Close {
        static let size = 24
        static let marginRight = 11
    }
}
The type of the property is recommened to be omitted if possible
The sub enum in the Const enum is corresponding to the subview, and it name is the prefix of the subview's name.
demoView -> enum Demo
demoLabel -> enum Demo
The order of the subenums should be same as the definition of the corresponding views. If there is a container view which contains multiple views, the following code is recommend.
private enum Const {
    enum Container {
        static let marginTop = 11

        enum Name {
             marginTop = 11
        }

        enum Icon {
             marginTop = 11
        }
    }

}
Making contraints in the clousre should follow the order.
We define 3 groups size, center and margin here.
- size.
- width
- height
- center
- centerX
- centerY
- margin
- left(or leading)
- top
- right(or trailing)
- bottom
Sometime, we may set multiple constraints of a same group in a single line. In this line, the multiple constraints should follow this order. For multiple lines, the first constraints should follow this order.
iconImageView.snp.makeConstraints {
    $0.size.equalTo(Const.Name.size)
    $0.top.right.equalToSuperview()
}
However, for multiple constraints of different groups, a single line is not recommended
nameLabel.snp.makeConstraints {
    $0.width.centerY.equalToSuperview()
}
Different groups of constraints should be separated to make it easier for understanding.
Sometimes, a few lines of code should be executed after updating an observable object in the view model.
Pay attention that running on the main thread is required if updating UI is needed.
For this, observing on the main scheduler is required before subscribing the observable object in the view controller.
viewModel.user.observeOn(MainScheduler.instance).subscribe(onNext: { [unowned self] in
    // ...
}).disposed(by: disposeBag)
However, such a way makes the viewDidLoad method complicated.
Although, a private method can solve this problem,
reactive extension is recommended to bind a complex observable object.
Prepare the internal method in a private extension of this view controller at first.
private extension UserViewController {

    func updateUser(_ user: User) {
        // Update user here...
    }

}
Then, write a reactive extension for this view controller to bind the observable object.
extension Reactive where Base: UserViewController {

    var user: Binder<User> {
        return Binder(base) { viewController, user in
            viewController.updateUser(user)
        }
    }

}
