Skip to content
New issue

Have a question about this project? Sign up for a free GitHub account to open an issue and contact its maintainers and the community.

By clicking “Sign up for GitHub”, you agree to our terms of service and privacy statement. We’ll occasionally send you account related emails.

Already on GitHub? Sign in to your account

React进阶,写中后台也能写出花 #28

Open
closertb opened this issue Oct 4, 2019 · 0 comments
Open

React进阶,写中后台也能写出花 #28

closertb opened this issue Oct 4, 2019 · 0 comments
Labels
react about react

Comments

@closertb
Copy link
Owner

closertb commented Oct 4, 2019

写于:2019-02-04

吐槽大会

刚接触React时,新鲜感爆棚,原来前端代码可以这样写,页面可以这样搭,事件可以这样绑定,一切的一切都是这么让人好奇。但在公司做了好几个中后台系统以后,发现自己写出的代码千篇一律,做出的页面就像多胞胎,随意从工作中截了三个页面:
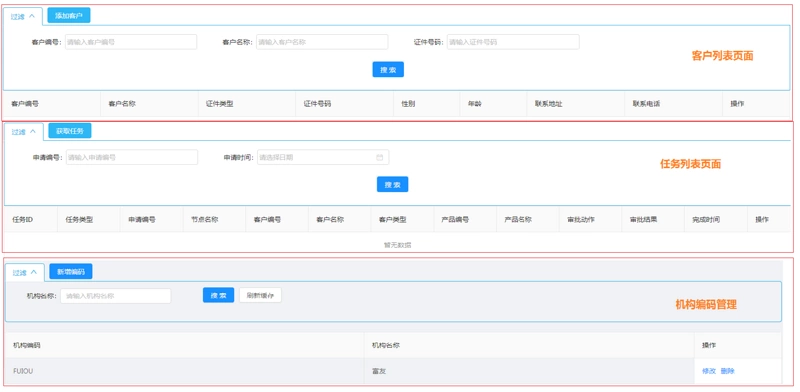
image

我工作主要围绕着React,Dva,Antd这一类框架展开,yes, you are right, 这一套组合就是为中后台系统而生的,复制粘贴,不断的重复,真的就是感觉自己在搬砖,做着体力劳动,如果日复一日的这样下去,我估计30岁就会被退(gun)休(dan),不是被公司,而是被这个圈子。

image

前端练习生

组件化的再封装

当你用着Antd的各种组件(Form, Table, Row,Button等等),省去了担忧写页面样式的烦恼,但总感觉自己干了很多重复工作,比如渲染一个列表,你需要做如下的配置,N个列表页,这样的代码你要写N次;

const pagination = {
  total,
  current: search.pageNum,
  pageSize: search.pageCount,
  onChange: page => actions.onSearch({ pageNum: page }),
  showTotal: t => `共 ${t} 条`
};
const tableProps = {
  columns,
  pagination,
  bordered: true,
  dataSource: datas,
  loading: loading.list,
  rowKey,
  scroll: { x: '120%' }
};  

你需要配置分页相关属性,翻页后调用的方法,数据源和表格项,但对于同一个中后台系统来说,他们的数据结构非常相似,各个表之间唯一不同的就是数据及表格项。所以我们可以在Table组件的基础上再封装一层变成一个EnhanceTable,然后在这个组件里加上这些通用的数据处理。使用时,我们只需要直接将整个props传递过去(虽然有一点浪费性能),附带设置一下rowKey属性,详情源码及使用请可参考示例项目
<EnhanceTable {...this.Props} rowKey="id" extraFields={this.getExtraFields()} />

组件化的进阶:配置对象搭页面

image

以前我写上面一个页面,是这样挨着一行行敲代码的。当然也不全是,ctrl + c,ctrl + v这样的基本技能也是必知必用的:

    <Form style={{ marginBottom: '16px' }} className="h-search-form">
      <Row>
        <Col span={6}>
          <FormItem label="真实姓名" {...formItemLayout}>
            {getFieldDecorator('userName', {
              initialValue: userName,
            })(
              <Input type="text" placeholder="请输入真实姓名" />
            )}
          </FormItem>
        </Col>
        <Col span={6}>
          <FormItem label="邮箱" {...formItemLayout}>
            {getFieldDecorator('mail', {
              initialValue: mail,
            })(
              <Input type="text" placeholder="请输入邮箱" />
            )}
          </FormItem>
        </Col>
        <Col span={6}>
          <FormItem label="用户ID" {...formItemLayout}>
            {getFieldDecorator('userId', {
              initialValue: userId,
            })(
              <Input type="text" placeholder="请输入用户ID" />
            )}
          </FormItem>
        </Col>
        <Col span={6}>
          <FormItem label="状态" {...formItemLayout}>
            {getFieldDecorator('enable', {
              initialValue: enable,
            })(
              <Select placeholder="不限" allowClear>
                {EnableStatus.map(({ value, label }) => (
                  <Option key={value} value={String(value)}>{label}</Option>
                ))}
              </Select>
            )}
          </FormItem>
        </Col>
      </Row>
      <Row>
        <Col span={24} className="tx-c">
          <Button type="primary" onClick={this.handleSearch}>搜索</Button>
          {permission.add &&
            <Button type="primary" className="ml-10" onClick={() => openModal('add')}>添加用户</Button>
          }
        </Col>
      </Row>
    </Form>

当后面自己写多了,厌烦了FormItem, getFieldDecorator, Input,Select这些组件之后,代码就变成了这样:

<Form className="h-search-form">
  <Row>
    {searchFields.map((field, index) => (
      <Col span={6} key={index}>
        <FormRender {...{ key, field, data: search }} />
      </Col>
    ))}
  </Row>
</Form>

解决的办法就是组件的封装加配置,详情源码及使用请参考示例项目代码:

学以致用,才能让工作更简单:高阶组件

当明白了keys,状态提升,props,state这些概念后,好像已足够让我们完成产品需求中的页面,前面组件化的封装其实仅仅仅复用了数据处理的逻辑,但有些需求,普通的组件化封装已经不足以解决,比如下面这种:
image

你一个页面有多个弹框,也许不止上面这三种,有可能十多种,刚开始工作时,我是这样写的:

<Modal {...modalProps}>
  {type === 'edit' ? <Edit {...editProps} /> : <Detail {...detailProps}/>}
</Modal>  

但当你的页面弹框有十多种时,条件表达式就显得有点无助了,可能需要if...else,或者Switch...case。但是在判断页面的动作时,可能你已经用过相似的判断逻辑,所以你的代码也许可以精简一下了。其实上面的操作,我们想做的,就是为我们想要显示的组件加一个弹框容器。盆友,高阶组件了解一下,官方文档是这样描述的

image

    const EnhancedComponent = higherOrderComponent(WrappedComponent);

用通俗的话来讲,经过高阶组件(函数)higherOrderComponent强化过的组件WrappedComponent ,新组件(EnhancedComponent)除拥有原始组件的特性外,还会拥有一些额外的能力,比如这里我们想实现的弹框容器。Redux-Router的connect就是最常见的高阶函数,它让展示组件拥有了方法和状态,还有Form.create():

    export default connect(mapStateToProps, mapDispatchToProps)(Page);

接下来,我们试着来实现这个能给普通组件加一个弹框容器的高阶组件:

import { Form, Modal } from 'antd';

// 获取函数名称
Function.prototype.getName = function () {
  return this.name || this.toString().match(/function\s*([^(]*)\(/)[1];
};
let oldChild;
let HComponent;
/**
 * description: 
 * 在Modal基础上新增加Form属性
 * 增加了子组件是否更新的判断,避免组件不必要的销毁
 * 给组件配上默认的onOk与onCancel方法
 * @param {*} Component 
 */
export default function withModal(Component){
  class HModal extends React.Component {
    constructor(props) {
      super(props);
      const { visible } = props;
      this.state = {
        visible: Boolean(visible)
      };
      this.handleCancel = this.handleCancel.bind(this);
      this.handleOk = this.handleOk.bind(this);
    }

    handleOk() {
      const { confirmLoading, form, onOk } = this.props;
      const hideModal = () => {
        // 如果没有设置confirmLoading,则直接关闭窗口
        if (confirmLoading === undefined) {
          this.handleCancel();
        }
      };

      if (onOk) {
        // 表单验证成功后才关闭表单
        form.validateFields((error, values) => {
          if (error) return;
          const res = onOk(values);
          res && hideModal();
        });
      }
    }

    render() {
      const { confirmLoading, visible, title = '弹窗容器', form, ...others } = this.props;
      const modalProps = {
        title,
        confirmLoading,
        visible: this.state.visible,
        onOk: this.handleOk,
        onCancel: this.handleCancel,
      };
      const childProps = {
        form,
        visible,
        confirmLoading,
        ...others,
      };
      
      return (
        <Modal {...modalProps}>
          <Component {...childProps} />
        </Modal>
      );
    }
  }
  // 如果原始组件类型没有改变,则返回上一次生成的组件,否则生成一个新组件
  HComponent = !HComponent || Component.getName() !== oldChild.getName() ?         
  Form.create()(HModal) : HComponent;
  oldChild = Component;
  return HComponent;
}

然后调用时,你只需要在判断动作(type)的时候,同时指定想对应的子组件,然后再这样调用:

image

要想写一个好用的高阶组件,看起来很简单,但实际上需要考虑的细节很多,就拿上面没有加入缓存的代码来说,会产生如下图所示的效果。

3465078359-5bfbfb63f17cf_articlex

探究其原因,在点击提交时,因为子组件调用了父组件的方法,改变了confirmLoading的状态,会导致父组件render方法的执行,然后const WithModal = withModal(child)会再执行一次。所以WithModal已不再是点击ok前的那个WithModal了,componentWillReceiveProps就不再适用了。所以要想保持组件原有的生命周期,我们就需要避免WithModal组件被销毁,所以使用了缓存的思路来保持这个组件。其实在官方文档中,已经特别提到了一般而言,你不需要考虑这些细节东西。但是它对高阶函数的使用有影响,那就是你不能在组件的render函数中调用高阶函数, 但实际使用时,我们有这种需求确实要用,我们就得想办法绕过这些坑,详细实现可参考示例项目代码。

能用高阶组件实现的,RenderProps都可以代替

前面提到过React官方文档对于高阶组件的使用注意,而绕开它最好的办法就是使用renderProps,React-Router作者Michael Jackson有一个演讲视频《Never Write Another HoC》。首先我们需要明白Modal本身就是用renderProps模式写的,但这里为了演示,修改一下,用renderProps模式重写弹框容器组件,改动其实很小:

// 只用改动return函数:
return (
  <Modal {...modalProps}>
    {this.props.children(childProps)}
  </Modal>
);
// 然后调用时:
<HModal {...modalProps}>
{type === 'edit' ? <Edit {...editProps} /> : <Detail {...detailProps}/>}
</HModal>

what,好像并没有改变什么,和最开始Modal的直接调用并没有多大的差别,所以有没有更好的办法呢?有,就是与高阶组件结合:

    function enhanceComponent(component) {
      return component;
    }
    const ChildComponent = enhanceComponent(child);
    return (
      <div>
        <WithSearch {...searchBarProps} >
          {props => <Search {...props} searchFields={searchFields} />}
        </WithSearch>
        <EnhanceTable {...forkProps} rowKey="id" extraFields={this.getExtraFields()} />
        <HModal  {...modalProps}>
          {props => <ChildComponent {...props} />}
        </HModal >
      </div>
    );

有可能你会问,这里也在render中使用了高阶组件(enhanceComponent),那不是也会造成子组件的重复销毁与生成,没法保持组件完整的生命周期吗?答案是否,子组件的生命周期不会被打断,因为return component;并没有重新生成一个组件,它只是改变了组件的地址指向,因为子组件是一个引用类型,而不是一个基本类型,所以render函数多次执行,只要动作是同一种,那上一次被挂起的子组件将被沿用。renderProps确实是一种很值得实践的模式,值得深究,在Graphql的Apollo框架中,这种模式被最为推荐。

后记

以上就是我工作半年,自己慢慢学习和琢磨的中后台系统开发的最佳实践。React相比于Vue和Angular,它确实要灵活好多,有多种设计模式,只要你能想,有思路,就没有没法实现的。文中所提到的所有代码都可以在示例项目中找到,并npm i,npm start跑起来:

Github:示例项目

@closertb closertb changed the title webpack与babel的深奥,渣渣的我只能做个小笔记(持续更新) React进阶,写中后台也能写出花 Oct 19, 2019
@closertb closertb added the react about react label Nov 29, 2019
Sign up for free to join this conversation on GitHub. Already have an account? Sign in to comment
Labels
react about react
Projects
None yet
Development

No branches or pull requests

1 participant