- 并发是多个事件在同一时间间隔发生。
- 并行是多个事件在同一时刻发生
- 进程是具有一定独立功能的程序关于某个数据集合上的一次活动,进程是资源分配的最小单位。
- 线程是进程的一个实体。
区别:
- 进程有独立的资源单位,线程只是一个进程的不同的执行路径。
- 线程拥有自己的堆栈和局部变量,线程之间没有独立的地址空间。
简而言之,一个程序至少有一个进程,一个进程至少有一个线程.
什么是线程守护,daemon thread,是服务框架,准确的来说就是服务其他线程,这是他的作用-而其他线程只有一种作用,就是用户线程,所以java分为两种。
- 守护进程,比如垃圾回收
- 用户线程:就是应用程序自己自定义的线程
这个就是用户自定义的线程都执行完毕,main也执行完毕以后,jvm就会立即退出,当jvm也退出以后,守护线程也会停止。
创建的四种方法:
- 通过继承Thread类创建接口
public class MyThread extends Thread{//继承Thread类

  public void run(){

  //重写run方法

  }

}
public class Main {

  public static void main(String[] args){

    new MyThread().start();//创建并启动线程

  }

}- 实现Runnable接口创建线程
public class MyThread2 implements Runnable {//实现Runnable接口

  public void run(){

  //重写run方法

  }

}

public class Main {

  public static void main(String[] args){

    //创建并启动线程

    MyThread2 myThread=new MyThread2();

    Thread thread=new Thread(myThread);

    thread().start();

    //或者    new Thread(new MyThread2()).start();

  }

}- 使用Callable和Future创建 和Runnable接口不一样,Callable接口提供了一个call()方法作为线程执行体,call()方法比run()方法功能要强大。
public class Main {

  public static void main(String[] args){

   MyThread3 th=new MyThread3();

   //使用Lambda表达式创建Callable对象

     //使用FutureTask类来包装Callable对象

   FutureTask<Integer> future=new FutureTask<Integer>(

    (Callable<Integer>)()->{

      return 5;

    }

    );

   new Thread(task,"有返回值的线程").start();//实质上还是以Callable对象来创建并启动线程

    try{

    System.out.println("子线程的返回值:"+future.get());//get()方法会阻塞,直到子线程执行结束才返回

    }catch(Exception e){

    ex.printStackTrace();

   }

  }

}-
使用线程池例如用Executor框架 1.5后引入的Executor框架的最大优点是把任务的提交和执行解耦。要执行任务的人只需把Task描述清楚,然后提交即可。这个Task是怎么被执行的,被谁执行的,什么时候执行的,提交的人就不用关心了。具体点讲,提交一个Callable对象给ExecutorService(如最常用的线程池ThreadPoolExecutor),将得到一个Future对象,调用Future对象的get方法等待执行结果就好了。Executor框架的内部使用了线程池机制,它在java.util.cocurrent 包下,通过该框架来控制线程的启动、执行和关闭,可以简化并发编程的操作。因此,在Java 5之后,通过Executor来启动线程比使用Thread的start方法更好,除了更易管理,效率更好(用线程池实现,节约开销)外,还有关键的一点:有助于避免this逃逸问题——如果我们在构造器中启动一个线程,因为另一个任务可能会在构造器结束之前开始执行,此时可能会访问到初始化了一半的对象用Executor在构造器中。
-
Executor框架包括:线程池,Executor,Executors,ExecutorService,CompletionService,Future,Callable等。
-
Executor接口中之定义了一个方法execute(Runnable command),该方法接收一个Runable实例,它用来执行一个任务,任务即一个实现了Runnable接口的类。ExecutorService接口继承自Executor接口,它提供了更丰富的实现多线程的方法,比如,ExecutorService提供了关闭自己的方法,以及可为跟踪一个或多个异步任务执行状况而生成 Future 的方法。 可以调用ExecutorService的shutdown()方法来平滑地关闭 ExecutorService,调用该方法后,将导致ExecutorService停止接受任何新的任务且等待已经提交的任务执行完成(已经提交的任务会分两类:一类是已经在执行的,另一类是还没有开始执行的),当所有已经提交的任务执行完毕后将会关闭ExecutorService。因此我们一般用该接口来实现和管理多线程。
-
ExecutorService的生命周期包括三种状态:运行、关闭、终止。创建后便进入运行状态,当调用了shutdown()方法时,便进入关闭状态,此时意味着ExecutorService不再接受新的任务,但它还在执行已经提交了的任务,当素有已经提交了的任务执行完后,便到达终止状态。如果不调用shutdown()方法,ExecutorService会一直处在运行状态,不断接收新的任务,执行新的任务,服务器端一般不需要关闭它,保持一直运行即可。
Executors提供了一系列工厂方法用于创先线程池,返回的线程池都实现了ExecutorService接口。
Runnable和Callable的区别是:
1)callable规定执行的方法是call(),Runable规定执行的方法是run(),其中Runnable可以提交给Thread来包装下直接启动一个线程
进行执行,但是callable一般是交给ExautorService来执行。
(2)callable的任务执行后可以返回值,但是Runnable是无返回值的
(3)call方法是可以抛出异常的,run不可以
(4)运行callable任务可以拿到一个Future对象,c表示异步计算的结果


/**
 * 通过简单的测试程序来试验Runnable、Callable通过Executor来调度的时候与Future的关系
 */
package com.hadoop.thread;

import java.util.concurrent.Callable;
import java.util.concurrent.ExecutorService;
import java.util.concurrent.Executors;
import java.util.concurrent.Future;

public class RunnableAndCallable2Future {

    public static void main(String[] args) {

        // 创建一个执行任务的服务
        ExecutorService executor = Executors.newFixedThreadPool(3);
        try {
            //1.Runnable通过Future返回结果为空
            //创建一个Runnable,来调度,等待任务执行完毕,取得返回结果
            Future<?> runnable1 = executor.submit(new Runnable() {
                @Override
                public void run() {
                    System.out.println("runnable1 running.");
                }
            });
            System.out.println("Runnable1:" + runnable1.get());

            // 2.Callable通过Future能返回结果
            //提交并执行任务,任务启动时返回了一个 Future对象,
            // 如果想得到任务执行的结果或者是异常可对这个Future对象进行操作
            Future<String> future1 = executor.submit(new Callable<String>() {
                @Override
                public String call() throws Exception {
                    // TODO Auto-generated method stub
                    return "result=task1";
                }
            });
            // 获得任务的结果,如果调用get方法,当前线程会等待任务执行完毕后才往下执行
            System.out.println("task1: " + future1.get());

            //3. 对Callable调用cancel可以对对该任务进行中断
            //提交并执行任务,任务启动时返回了一个 Future对象,
            // 如果想得到任务执行的结果或者是异常可对这个Future对象进行操作
            Future<String> future2 = executor.submit(new Callable<String>() {
                @Override
                public String call() throws Exception {
                    try {
                        while (true) {
                            System.out.println("task2 running.");
                            Thread.sleep(50);
                        }
                    } catch (InterruptedException e) {
                        System.out.println("Interrupted task2.");
                    }
                    return "task2=false";
                }
            });

            // 等待5秒后,再停止第二个任务。因为第二个任务进行的是无限循环
            Thread.sleep(10);
            System.out.println("task2 cancel: " + future2.cancel(true));

            // 4.用Callable时抛出异常则Future什么也取不到了
            // 获取第三个任务的输出,因为执行第三个任务会引起异常
            // 所以下面的语句将引起异常的抛出
            Future<String> future3 = executor.submit(new Callable<String>() {

                @Override
                public String call() throws Exception {
                    throw new Exception("task3 throw exception!");
                }

            });
            System.out.println("task3: " + future3.get());
        } catch (Exception e) {
            System.out.println(e.toString());
        }
        // 停止任务执行服务
        executor.shutdownNow();
    }
}

结果:
runnable1 running.
Runnable1:null
task1: result=task1
task2 running.
task2 cancel: true
Interrupted task2.
java.util.concurrent.ExecutionException: java.lang.Exception: Bad flag value!
FutureTask则是一个RunnableFuture,即实现了Runnbale又实现了Futrue这两个接口,另外它还可以包装Runnable和Callable,所以一般来讲是一个符合体了,它可以通过Thread包装来直接执行,也可以提交给ExecuteService来执行,并且还可以通过v get()返回执行结果,在线程体没有执行完成的时候,主线程一直阻塞等待,执行完则直接返回结果。
public class FutureTaskTest {

    /**
     * @param args
     */
    public static void main(String[] args) {
        Callable<String> task = new Callable<String>() {
            public String call() {
                System.out.println("Sleep start.");
                try {
                    Thread.sleep(1000 * 10);
                } catch (InterruptedException e) {
                    // TODO Auto-generated catch block
                    e.printStackTrace();
                }
                System.out.println("Sleep end.");
                return "time=" + System.currentTimeMillis();
            }
        };

        //直接使用Thread的方式执行
        FutureTask<String> ft = new FutureTask<String>(task);
        Thread t = new Thread(ft);
        t.start();
        try {
            System.out.println("waiting execute result");
            System.out.println("result = " + ft.get());
        } catch (InterruptedException e) {
            // TODO Auto-generated catch block
            e.printStackTrace();
        } catch (ExecutionException e) {
            // TODO Auto-generated catch block
            e.printStackTrace();
        }

        //使用Executors来执行
        System.out.println("=========");
        FutureTask<String> ft2 = new FutureTask<String>(task);
        Executors.newSingleThreadExecutor().submit(ft2);
        try {
            System.out.println("waiting execute result");
            System.out.println("result = " + ft2.get());
        } catch (InterruptedException e) {
            // TODO Auto-generated catch block
            e.printStackTrace();
        } catch (ExecutionException e) {
            // TODO Auto-generated catch block
            e.printStackTrace();
        }

    }
}

结果
waiting execute result
Sleep start.
Sleep end.
result = time=1370844662537
=========
waiting execute result
Sleep start.
Sleep end.
result = time=1370844672542线程的状态:新建--就绪--运行--阻塞--死亡 一共五种状态。
-
新建状态: 当使用new thread新建一个线程时,线程还没有运行,这个阶段属于新建状态,线程中的代码还没运行。
-
就绪状态: 创建一个新的线程并不自动运行,需要执行线程,必须调用start()方法运行。当线程调用start方法时开始运行,并且调度运行Run()方法运行,当stat()方法返回后,线程属于就绪状态。 处于就绪状态的线程不一定运行run()方法,线程必须还要同其他线程抢占资源,只有获取到cup时间片段后,线程才可以运行。因此在单cup中一个时刻只一个线程处于运行状态,对于处于多个cup的有专门的调度机构。
-
运行状态 当线程获取cup时间状态以后,他才可以进入运行状态,这个时候才处于真正的运行状态。开始执行run的方法。
-
线程阻塞: 线程阻塞一般分为三种:
- 等待阻塞:线程执行wait()方法,jvm会把该线程放到线程池中。(wait会释放持有的锁)
- 同步阻塞:线程在获取对象的同步锁时,若该同步锁被别的线程调用,则jvm会把该线程放到线程池中。
- 其他阻塞:运行时执行sleep()或者join()方法/线程调用一个在I/O上被阻塞,就是在输入或者输出之后不会返回到他的调用者。当sleep()结束 join()终止/超时,线程会重新执行。(sleep不会放弃锁)
-
死亡状态:执行完run()
原理:对象序列化过程可以分为两步:
第一: 将对象转换为字节数组
第二: 将字节数组存储到磁盘
序列化就是把是对象转化成字节顺序的过程,反序序列化就是把字节转化为对象的过程。
public class FlyPig implements Serializable {
    //private static final long serialVersionUID = 1L;
    private static String AGE = "269";
    private String name;
    private String color;
    transient private String car;

    //private String addTip;

    public String getName() {
        return name;
    }

    public void setName(String name) {
        this.name = name;
    }

    public String getColor() {
        return color;
    }

    public void setColor(String color) {
        this.color = color;
    }

    public String getCar() {
        return car;
    }

    public void setCar(String car) {
        this.car = car;
    }

    //public String getAddTip() {
    //    return addTip;
    //}
    //
    //public void setAddTip(String addTip) {
    //    this.addTip = addTip;
    //}

    @Override
    public String toString() {
        return "FlyPig{" +
                "name='" + name + '\'' +
                ", color='" + color + '\'' +
                ", car='" + car + '\'' +
                ", AGE='" + AGE + '\'' +
                //", addTip='" + addTip + '\'' +
                '}';
    }
}

/**
 * 序列化测试
 *
 * @author lxk on 2017/11/1
 */
public class SerializableTest {
    public static void main(String[] args) throws Exception {
        serializeFlyPig();
        FlyPig flyPig = deserializeFlyPig();
        System.out.println(flyPig.toString());

    }

    /**
     * 序列化
     */
    private static void serializeFlyPig() throws IOException {
        FlyPig flyPig = new FlyPig();
        flyPig.setColor("black");
        flyPig.setName("naruto");
        flyPig.setCar("0000");
        // ObjectOutputStream 对象输出流,将 flyPig 对象存储到E盘的 flyPig.txt 文件中,完成对 flyPig 对象的序列化操作
        ObjectOutputStream oos = new ObjectOutputStream(new FileOutputStream(new File("d:/flyPig.txt")));
        oos.writeObject(flyPig);
        System.out.println("FlyPig 对象序列化成功!");
        oos.close();
    }

    /**
     * 反序列化
     */
    private static FlyPig deserializeFlyPig() throws Exception {
        ObjectInputStream ois = new ObjectInputStream(new FileInputStream(new File("d:/flyPig.txt")));
        FlyPig person = (FlyPig) ois.readObject();
        System.out.println("FlyPig 对象反序列化成功!");
        return person;
    }
}

//结果
那这里被static修饰的变量反序列化后有值又是什么鬼 这是因为 静态变量在方法区,本来流里面就没有写入静态变量,我们打印静态变量当然会去方法区查找,我们当前 jvm 中有所以静态变量在序列化后任然有值。
- 在分布式系统中,此时需要把对象在网络上传输,就得把对象数据转换为二进制形式,需要共享的数据的 JavaBean 对象,都得做序列化。
- 服务器钝化:如果服务器发现某些对象好久没活动了,那么服务器就会把这些内存中的对象持久化在本地磁盘文件中(Java对象转换为二进制文件);如果服务器发现某些对象需要活动时,先去内存中寻找,找不到再去磁盘文件中反序列化我们的对象数据,恢复成 Java 对象。这样能节省服务器内存。
ThreadPoolExecutor线程池发现可以有两种启动线程的方法:submit(Runnable runnable),excute(Runnable runnable)

/**
     * @throws RejectedExecutionException {@inheritDoc}
     * @throws NullPointerException       {@inheritDoc}
     */
    public Future<?> submit(Runnable task) {
        if (task == null) throw new NullPointerException();
        RunnableFuture<Void> ftask = newTaskFor(task, null);
        execute(ftask);
        return ftask;
    }

    /**
     * @throws RejectedExecutionException {@inheritDoc}
     * @throws NullPointerException       {@inheritDoc}
     */
    public <T> Future<T> submit(Runnable task, T result) {
        if (task == null) throw new NullPointerException();
        RunnableFuture<T> ftask = newTaskFor(task, result);
        execute(ftask);
        return ftask;
    }

    /**
     * @throws RejectedExecutionException {@inheritDoc}
     * @throws NullPointerException       {@inheritDoc}
     */
    public <T> Future<T> submit(Callable<T> task) {
        if (task == null) throw new NullPointerException();
        RunnableFuture<T> ftask = newTaskFor(task);
        execute(ftask);
        return ftask;
    }
可以看到,submit方法是先构造出一个RunnableFuture(FutureTask) 然后调用execute方法。不管你submit的时候传入的是Runnable还是Callable最后RunnableFuture(FutureTask)里面都会生成Callable对象。任务调用的时候调用RunnableFuture(FutureTask)的run方法,run方法调用Callable对象的call方法。
submit()方法,可以提供Future < T > 类型的返回值。
ThreadPoolExecutor中的executor方法:
public void execute(Runnable command) {
        if (command == null)
            throw new NullPointerException();
        /*
         * Proceed in 3 steps:
         *
         * 1. If fewer than corePoolSize threads are running, try to
         * start a new thread with the given command as its first
         * task.  The call to addWorker atomically checks runState and
         * workerCount, and so prevents false alarms that would add
         * threads when it shouldn't, by returning false.
         *
         * 2. If a task can be successfully queued, then we still need
         * to double-check whether we should have added a thread
         * (because existing ones died since last checking) or that
         * the pool shut down since entry into this method. So we
         * recheck state and if necessary roll back the enqueuing if
         * stopped, or start a new thread if there are none.
         *
         * 3. If we cannot queue task, then we try to add a new
         * thread.  If it fails, we know we are shut down or saturated
         * and so reject the task.
         */
        int c = ctl.get();
        if (workerCountOf(c) < corePoolSize) {
            if (addWorker(command, true))
                return;
            c = ctl.get();
        }
        if (isRunning(c) && workQueue.offer(command)) {
            int recheck = ctl.get();
            if (! isRunning(recheck) && remove(command))
                reject(command);
            else if (workerCountOf(recheck) == 0)
                addWorker(null, false);
        }
        else if (!addWorker(command, false))
            reject(command);
    }
executor()方法,无返回值。
-
原子性(Synchronized, Lock)
-
即一个操作或者多个操作 要么全部执行并且执行的过程不会被任何因素打断,要么就都不执行。
-
在Java中,基本数据类型的变量的读取和赋值操作是原子性操作,即这些操作是不可被中断的,要么执行,要么不执行。
-
-
可见性(Volatile,Synchronized,Lock)
- 指当多个线程访问同一个变量时,一个线程修改了这个变量的值,其他线程能够立即看得到修改的值。
- 当一个共享变量被volatile修饰时,它会保证修改的值会立即被更新到主存,当有其他线程需要读取共享变量时,它会去内存中读取新值。
- 更新的主要步骤:设置当前线程缓存无效,然后将新的更新到主内存,当其他线程访问时,清除本地缓存更新新的数据。
-
有序性(Volatile,Synchronized, Lock) 即程序执行的顺序按照代码的先后顺序执行。
当然由于synchronized和Lock保证每个时刻只有一个线程执行同步代码,所以是线程安全的,也可以实现这一功能,但是由于线程是同步执行的,所以会影响效率。
Sycronized是重量级锁(也是悲观锁)

线程死锁是指由于两个或者多个线程互相持有对方所需要的资源,导致这些线程处于等待状态,无法前往执行。当线程进入对象的synchronized代码块时,便占有了资源,直到它退出该代码块或者调用wait方法,才释放资源,在此期间,其他线程将不能进入该代码块。当线程互相持有对方所需要的资源时,会互相等待对方释放资源,如果线程都不主动释放所占有的资源,将产生死锁。
当然死锁的产生是必须要满足一些特定条件的:
1.互斥条件:进程对于所分配到的资源具有排它性,即一个资源只能被一个进程占用,直到被该进程释放

2.请求和保持条件:一个进程因请求被占用资源而发生阻塞时,对已获得的资源保持不放。

3.不剥夺条件:任何一个资源在没被该进程释放之前,任何其他进程都无法对他剥夺占用

4.循环等待条件:当发生死锁时,所等待的进程必定会形成一个环路(类似于死循环),造成永久阻塞。
- 加锁顺序(线程按照一定的顺序加锁)
- 加锁时限(线程尝试获取锁的时候加上一定的时限,超过时限则放弃对该锁的请求,并释放自己占有的锁)
- 死锁检测
ThreadLocal 是线程本地存储,在每个线程中都创建了一个 ThreadLocalMap 对象,每个线程可以访问自己内部 ThreadLocalMap 对象内的 value。 经典的使用场景是为每个线程分配一个 JDBC 连接 Connection。这样就可以保证每个线程的都在各自的 Connection 上进行数据库的操作,不会出现 A 线程关了 B线程正在使用的 Connection; 还有 Session 管理 等问题。
Synchronized的作用主要是三个
- 确保线程互斥的访问同步代码
- 保证共享变量的修改能及时可见
- 有效解决排序问题
从语法上来看:
- 可以修饰普通方法
- 修饰静态方法
- 修饰代码块 代码解释:
public class SynchronizedTest {
    public void method1(){
        System.out.println("Method 1 start");
        try {
            System.out.println("Method 1 execute");
            Thread.sleep(3000);
        } catch (InterruptedException e) {
            e.printStackTrace();
        }
        System.out.println("Method 1 end");
    }

    public void method2(){
        System.out.println("Method 2 start");
        try {
            System.out.println("Method 2 execute");
            Thread.sleep(1000);
        } catch (InterruptedException e) {
            e.printStackTrace();
        }
        System.out.println("Method 2 end");
    }

    public static void main(String[] args) {
        final SynchronizedTest test = new SynchronizedTest();

        new Thread(new Runnable() {
            @Override
            public void run() {
                test.method1();
            }
        }).start();

        new Thread(new Runnable() {
            @Override
            public void run() {
                test.method2();
            }
        }).start();
    }
}

//执行的结果

Method 1 start
Method 1 execute
Method 2 start
Method 2 execute
Method 2 end
Method 1 end
由此可见在不使用synchronized时修饰线程启动时随机的.
当使用synchroized修饰时:
public class SynchronizedTest {
    public synchronized void method1(){
        System.out.println("Method 1 start");
        try {
            System.out.println("Method 1 execute");
            Thread.sleep(3000);
        } catch (InterruptedException e) {
            e.printStackTrace();
        }
        System.out.println("Method 1 end");
    }

    public synchronized void method2(){
        System.out.println("Method 2 start");
        try {
            System.out.println("Method 2 execute");
            Thread.sleep(1000);
        } catch (InterruptedException e) {
            e.printStackTrace();
        }
        System.out.println("Method 2 end");
    }

    public static void main(String[] args) {
        final SynchronizedTest test = new SynchronizedTest();

        new Thread(new Runnable() {
            @Override
            public void run() {
                test.method1();
            }
        }).start();

        new Thread(new Runnable() {
            @Override
            public void run() {
                test.method2();
            }
        }).start();
    }
}

//结果
Method 1 start
Method 1 execute
Method 1 end
Method 2 start
Method 2 execute
Method 2 end
明显可知:线程是顺序执行的。
静态方法同步:
 public class SynchronizedTest {
     public static synchronized void method1(){
         System.out.println("Method 1 start");
         try {
             System.out.println("Method 1 execute");
             Thread.sleep(3000);
         } catch (InterruptedException e) {
             e.printStackTrace();
         }
         System.out.println("Method 1 end");
     }

     public static synchronized void method2(){
         System.out.println("Method 2 start");
         try {
             System.out.println("Method 2 execute");
             Thread.sleep(1000);
         } catch (InterruptedException e) {
             e.printStackTrace();
         }
         System.out.println("Method 2 end");
     }

     public static void main(String[] args) {
         final SynchronizedTest test = new SynchronizedTest();
         final SynchronizedTest test2 = new SynchronizedTest();

         new Thread(new Runnable() {
             @Override
             public void run() {
                 test.method1();
             }
         }).start();

         new Thread(new Runnable() {
             @Override
             public void run() {
                 test2.method2();
             }
         }).start();
     }
 }
静态方法上的的同步实质上是对类的同步,因此执行的时候还是顺序执行。即使test和test2属于不同的对象但是,调用的还是SynchronizedTest类
代码块同步:
public class SynchronizedTest {
    public void method1(){
        System.out.println("Method 1 start");
        try {
            synchronized (this) {
                System.out.println("Method 1 execute");
                Thread.sleep(3000);
            }
        } catch (InterruptedException e) {
            e.printStackTrace();
        }
        System.out.println("Method 1 end");
    }

    public void method2(){
        System.out.println("Method 2 start");
        try {
            synchronized (this) {
                System.out.println("Method 2 execute");
                Thread.sleep(1000);
            }
        } catch (InterruptedException e) {
            e.printStackTrace();
        }
        System.out.println("Method 2 end");
    }

    public static void main(String[] args) {
        final SynchronizedTest test = new SynchronizedTest();

        new Thread(new Runnable() {
            @Override
            public void run() {
                test.method1();
            }
        }).start();

        new Thread(new Runnable() {
            @Override
            public void run() {
                test.method2();
            }
        }).start();
    }
}
//结果
Method 1 start
Method 1 execute
Method 2 start
Method 1 end
Method 2 execute
Method 2 end
虽然线程1和线程2都进入了对应的方法开始执行,但是线程2在进入同步块之前,需要等待线程1中同步块执行完成。
反编译Synchorized代码 monitorenter:
每个对象有一个监视器锁(monitor)。当monitor被占用时就会处于锁定状态,线程执行monitorenter指令时尝试获取monitor的所有权,过程如下:
1、如果monitor的进入数为0,则该线程进入monitor,然后将进入数设置为1,该线程即为monitor的所有者。
2、如果线程已经占有该monitor,只是重新进入,则进入monitor的进入数加1.
3.如果其他线程已经占用了monitor,则该线程进入阻塞状态,直到monitor的进入数为0,再重新尝试获取monitor的所有权。
monitorexit:
执行monitorexit的线程必须是objectref所对应的monitor的所有者。
指令执行时,monitor的进入数减1,如果减1后进入数为0,那线程退出monitor,不再是这个monitor的所有者。其他被这个monitor阻塞的线程可以尝试去获取这个 monitor 的所有权。
通过这两段描述,我们应该能很清楚的看出Synchronized的实现原理,Synchronized的语义底层是通过一个monitor的对象来完成,其实wait/notify等方法也依赖于monitor对象,这就是为什么只有在同步的块或者方法中才能调用wait/notify等方法,否则会抛出java.lang.IllegalMonitorStateException的异常的原因。
-
synchronized表示只有一个对象可以获取作用对象的锁,执行代码,阻塞其他线程。
-
volatile表示变量在cpu的寄存器的对象是不确定的,必须从主存中获取。保证多线程下变量的可见性,禁止指令重排序。 区别:
-
synchronized表示可以作用于方法、变量和类。volatile只可以作用于变量。
-
synchronized可以保证线程的有序性/原子性/可见性。volatile只保证了可见性和有序性。
-
synchronized是线程阻塞的。volatile线程不阻塞。
区别:
- synchronized是java中内置的关键字。lock是java的一个类。
- synchronized无法判断是否获取锁的状态。lock可以判断是否可以获取锁。
- synchronized会自动释放锁(a线程执行完会释放锁,b线程发生异常会释放锁)。lock需要在finally中手工释放锁(unlock()方法释放锁),否则容易造成线程死锁。
- 使用synchronized修饰的代码,当线程1发生阻塞,线程2会一直等待。而lock不用等待,当线程2尝试获取锁,当获取不到就可以直接停止。
- synchronized的锁可以重入、不可中断和非公平。lock锁是可重入、可中断和公平。
- lock适用于大量同步代码同步。synchroized适用于少量代码同步。
demo:
public class LockTest {
    private Lock lock = new ReentrantLock();
    /*
     * 使用完毕释放后其他线程才能获取锁
     */
    public void lockTest(Thread thread) {
        lock.lock();//获取锁
        try {
            System.out.println("线程"+thread.getName() + "获取当前锁"); //打印当前锁的名称
            Thread.sleep(2000);//为看出执行效果,是线程此处休眠2秒
        } catch (Exception e) {
            System.out.println("线程"+thread.getName() + "发生了异常释放锁");
        }finally {
            System.out.println("线程"+thread.getName() + "执行完毕释放锁");
            lock.unlock(); //释放锁
        }
    }

    public static void main(String[] args) {
        LockTest lockTest = new LockTest();
        //声明一个线程 “线程一”
        Thread thread1 = new Thread(new Runnable() {
            @Override
            public void run() {
                lockTest.lockTest(Thread.currentThread());
            }
        }, "thread1");
        //声明一个线程 “线程二”
        Thread thread2 = new Thread(new Runnable() {

            @Override
            public void run() {
                lockTest.lockTest(Thread.currentThread());
            }
        }, "thread2");
        // 启动2个线程
        thread2.start();
        thread1.start();

    }
}
public class LockTest {
    private Lock lock = new ReentrantLock();

    /*
     * 尝试获取锁 tryLock() 它表示用来尝试获取锁,如果获取成功,则返回true,如果获取失败(即锁已被其他线程获取),则返回false
     */
    public void tryLockTest(Thread thread) {
        if(lock.tryLock()) { //尝试获取锁
            try {
                System.out.println("线程"+thread.getName() + "获取当前锁"); //打印当前锁的名称
                Thread.sleep(2000);//为看出执行效果,是线程此处休眠2秒
            } catch (Exception e) {
                System.out.println("线程"+thread.getName() + "发生了异常释放锁");
            }finally {
                System.out.println("线程"+thread.getName() + "执行完毕释放锁");
                lock.unlock(); //释放锁
            }
        }else{
            System.out.println("我是线程"+Thread.currentThread().getName()+"当前锁被别人占用,我无法获取");
        }
    }
    public static void main(String[] args) {
        LockTest lockTest = new LockTest();

        Thread thread1 = new Thread(new Runnable() {
            @Override
            public void run() {
                lockTest.tryLockTest(Thread.currentThread());
            }
        }, "thread1");
        //声明一个线程 “线程二”
        Thread thread2 = new Thread(new Runnable() {

            @Override
            public void run() {
                lockTest.tryLockTest(Thread.currentThread());
            }
        }, "thread2");
        // 启动2个线程
        thread2.start();
        thread1.start();


    }
}
public class LockTest {
private Lock lock = new ReentrantLock();
public void tryLockParamTest(Thread thread) throws InterruptedException {
if(lock.tryLock(3000, TimeUnit.MILLISECONDS)) { //尝试获取锁 获取不到锁,就等3秒,如果3秒后还是获取不到就返回false
try {
System.out.println("线程"+thread.getName() + "获取当前锁"); //打印当前锁的名称
Thread.sleep(4000);//为看出执行效果,是线程此处休眠2秒
} catch (Exception e) {
System.out.println("线程"+thread.getName() + "发生了异常释放锁");
}finally {
System.out.println("线程"+thread.getName() + "执行完毕释放锁");
lock.unlock(); //释放锁
}
}else{
System.out.println("我是线程"+Thread.currentThread().getName()+"当前锁被别人占用,等待3s后仍无法获取,放弃");
}
}
public static void main(String[] args) {
LockTest lockTest = new LockTest();
Thread thread1 = new Thread(new Runnable() {
@Override
public void run() {
try {
lockTest.tryLockParamTest(Thread.currentThread());
} catch (InterruptedException e) {
// TODO Auto-generated catch block
e.printStackTrace();
}
}
}, "thread1");
//声明一个线程 “线程二”
Thread thread2 = new Thread(new Runnable() {
@Override
public void run() {
try {
lockTest.tryLockParamTest(Thread.currentThread());
} catch (InterruptedException e) {
// TODO Auto-generated catch block
e.printStackTrace();
}
}
}, "thread2");
// 启动2个线程
thread2.start();
thread1.start();
}
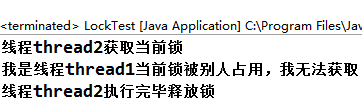
}因为此时线程1休眠了4秒,线程2等待了3秒还没有获取到就放弃获取锁了,执行结束
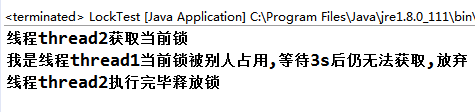
将方法中的 Thread.sleep(4000)改为Thread.sleep(2000)执行结果如下:

因为此时线程1休眠了2秒,线程2等待了3秒的期间线程1释放了锁,此时线程2获取到锁,线程2就可以执行了
ReentrantLock称为重入锁 ,位于juc的locks包下和CountDownLath、FutureTask一样基于AQS(AbstractQueuedSynchronizer)实现。能比synchronized实现更细粒度的锁。比如控制公平性,要注意调用了lock后要释放(unlock())锁,他的性能未必比synchronized高,可以重入。
-
ReentranLock公平性的设置:
ReentrantLock fairLock=new ReentrantLock(true) 当参数为true时,倾向于将锁赋予等待时间最久的线程。 公平锁:获取锁的顺序先后调用lock方法(慎用) 非公平锁:抢占的顺序不一定,看运气 synchronized是非公平锁 -
ReentrantLock可以将锁对象化
判断是否有线程,或某个特定的线程,在排队获取锁 带超时获取锁尝试 感知有没有成功获取锁 -
ReentrantLock可以将/notify/notifyAll/wait对象化
synchronized是关键字,ReentrantLock是类
ReentrantLock可以获取岁哦的锁的时间,避免死锁
ReentrantLock可以获取锁的各种信息
ReentrantLock可以灵活实现多路通知