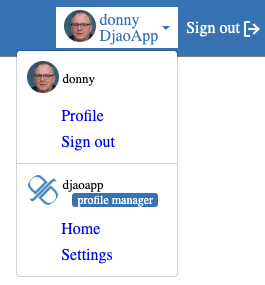
In this tutorial, we will see how to integrate the dynamic menubar item in a DjaoDjin-hosted Website.
Prerequisites:
- URL for a Website hosted on DjaoDjin (ex: livedemo.djaoapp.com) - Register
- API Key to connect the hosted Website (ex: ABC***123) - How do I get my API Keys?
On command line snippets, lines starting with a $ character indicate
a shell prompt, or a command for you to type. Lines that do not start
with a $ character show a sample output from that command.
Example:
$ whoami
ec2-user
Text edits within source files are shown in universal diff format with lines preceded by a '-' sign to be removed and lines preceded by a '+' sign to be added. Example:
 def set_default_profile():     # This line for context, to be kept as-is
-    profile = 'abc'            # This line to be removed
+    profile = 'cde'            # This line to be added
     return profile             # This line for context, to be kept as-is
The full source code for this tutorial is available on GitHub.
You should be familiar with the steps to setup your development environment, calling the hosted API from your local machine, and uploading your modifications to a live site. If it is not the case, I recommend you read the Write Javascript locally; test against hosted APIs tutorial first.
The /api/users/{user}
endpoint has the ability to return a pre-rendered HTML menu item and dropdown
when called with a Accept: text/html HTTP header.
We thus need to:
- Set an anchor HTML element, which we will replace the inner content by the dynamic menu item in the HTML file (app.html)
- Write a Javascript snipset to call the
/api/users/{user}endpoint once a user is authenticated, and to replace the anchor HTML element inner content by the response from the API call.
In base.html
+ <ul id="userMenubarItem">
+   <li class="nav-item">
+     <a id="login" class="nav-link" href="{{'/login/'|site_url}}">Sign In</a>
+   </li>
+ </ul>
In auth.js
async function getDynamicMenubarItem() {
    try {
        const userMenubarItem = document.getElementById('userMenubarItem');
        if( !userMenubarItem ) return;

        const authToken = sessionStorage.getItem('authToken');
        if( !authToken ) return;

        const user = parseJWT(authToken);
        if( !user.username ) return;

        const resp = await fetch(apiUrl + '/users/' + user.username, {
            headers: {
                "Accept": "text/html",
                "Authorization": "Bearer " + authToken,
            }});
        if( !resp.ok ) return;

        // The assignment will replace the inner content
        // of 'userMenubarItem' by HTMLElement, despite the response
        // received (`resp.text()`) looking like it is being decorated,
        // i.e. "<html><head></head><body>{{HTMLElement}}</body></html>".
        const data = await resp.text();
        userMenubarItem.innerHTML = data;

    } catch(error) {
        console.error(error.message);
    }
}

// Make sure to include this script as the last node before the closing
// `</body>` tag, such that the DOM will be available when the following
// code executes.
(function() {
    getDynamicMenubarItem();
})();
We start the local HTTP server
$ export DJAOAPP_API_BASE_URL="http://*_subdomain_*.djaoapp.com/api"
$ uvicorn main:app --reload
and browse to the URL serving the content (ex: http://127.0.0.1:8000/).
After logging in, you will see something like the following screenshots.
The code works so let's publish it.
$ djd upload _livedemo_/templates _livedemo_/publicWe have seen in this tutorial how to inject a dynamic menu item for an authenticated user into an HTML page.
To go further, you can customize the theme template used to generate
the dynamic menubar item HTML element by editing the _menubar.html
theme template. You can also build a dynamic menubar entirely from sratch
using the responses from API calls.

