Nearly everyone using *nices knows that ssh(1) is a tool able to log into remote computer running ssh server securely, and some of them knows files can be transmit from/to remote computer using scp(1), sftp(1), and FISH(mainly used by the proprietary SecureCRT, while most gui ssh clients support sftp), but fewer knows ssh is more powerful than they thought.
Options provided by ssh(1) are usually abbreviated forms of option for ssh_config(5) shared between ssh(1), scp(1) and sftp(1), which can be presented on command line using -oOPTION=PARAMETER form. For example, -oCompression=yes has the same effect of shorter command line option -C, while -oIdentityFile=$IDFILE is identical to -I $IDFILE.
Because of that, we are going to a naming scheme in the form of SshConfigOption(single-character-option-for-cli)[:]. For example, option -oIdentityFile=$IDFILE will be expressed as IdentityFile(I): identity_file, which means there is an option in ssh_config(5) called IdentityFile, which can be abbreviated as -I in the command line, and this option has a parameter for identity_file. For boolean option which has parameter yes or no in ssh_config(5), and no parameter in command line, the colon is omitted, e.g. Compression(C).
Some options could be set to no in the command line even it is set to yes in the config file, e.g. ForwardX11(X,~x), in which -X could enable this feature in the command line (-oForwardX11=yes), while -x is used to disable it (-oForwardX11=no).
We are going to introduce some powerful but useful options below.
LocalForward(L): [bindaddr:]port:host:hostport & RemoteForward(R): [bindaddr:]port:host:hostport & DynamicForward(D): [bindaddr:]port
SSH protocol has the ability to multiplex many bidirectional byte stream TCP-like connection inside one, which can be accessed via this two options.
When an SSH connection has finished creating, the sshd on the remote host will fork(2) itself twice to produce a process running under the user account to be logged in, from which the program to call or the shell is launched via fork(2) and exec(2) combination. This process and the client running on the localhost act as the two endpoints of the SSH connection.

If LocalForward is announced, the local endpoint (the client) will listen to [bindaddr:]port on local host (bindaddr is to assign the address for port to bind, if bindaddr is omitted, port will bind to localhost, unless GatewayPorts(g) is announced, in which situation port will bind to wildcard address.), once the ports get incoming connection, the remote endpoint will connect to host:hostport (in the sight of remote host), and then all data communication with [bindaddr:]port will be tunneled to the remote server listening to host:hostport, actually "PULL" the a server accessible for the remote host onto the local host in front of you.
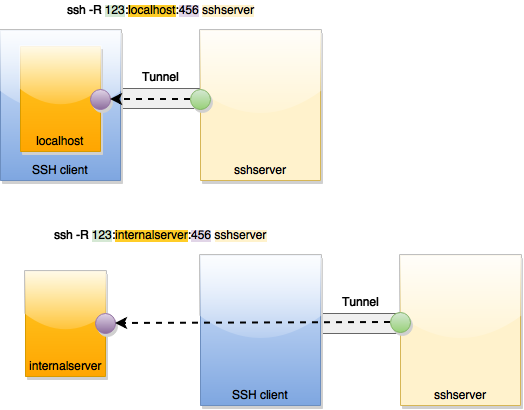
RemoteForward works in the very same concept, except that it is the remote endpoint who listens to [bindaddr:]port, and it is the local endpoint who connects to host:hostport in the sight of local host when the port gets incoming connection. It is to "PUSH" a server accessible for the local host to the remote.
Unix domain sockets can be forwarded as well. In this case, either the listening part or the connecting part can be a path to the unix domain socket. ssh can forward a unix domain socket to a TCP socket, and vice versa: [bindaddr:]port:PATH_ON_REMOTE_HOST or PATH_ON_LOCAL_HOST:host:hostport.
Assuming you, with a laptop running *nix operating system, are going to manage a MariaDB running on server db.xxx.com which is accessible for you via SSH with username dbadmin, but the server process is listening to localhost(127.0.0.1):3306 of THAT machine, so you cannnot directly access the database. With LocalForward(L), you can 'pull' the database ('s port) to the laptop just in front of you:
$ ssh -L 13306:localhost:3306 [email protected]
Now you can use local management tools to access the database by connecting to port 13306 on YOUR LAPTOP's localhost.
This time, you are going to login to a internal GNU/Linux server server.i.xxx.com via SSH for package upgrade (assuming you have the suitable permissions to invoke sudo(8) for package management) , you are feasible to access Internet via an HTTP proxy proxy.i.xxx.com:8080, but the server to upgrade not. With RemoteForward(R), you can 'push' the proxy to the server to upgrade:
$ ssh -R 8888:proxy.i.xxx.com:8080 [email protected]
then set environment variables e.g. http_proxy and the like on the SSH environment to localhost:8888, you can now invoke the frontend of package manager and pass the current environment to it via -E option of sudo(8):
[email protected]:~$ sudo -E apt-get <subcommand>
DynamicForward is to open a SOCKS server [bindaddr:]port on the local endpoint, and data will be tunneled to the remote host. Conceptually, its effect is like "PULLing" a SOCKS server running on the remote host to [bindaddr:]port with LocalForward, but the whole works are done by the SSH connection.
These forward ports can even be dynamically added after an SSH connection with pseudo-terminal is created. The escape sequence ~C can be used after a new line, and a special prompt ssh> will be given after the escape sequence gets input successfully. -L, -R and -D instructions can then be used after the prompt to add new forwardings to this SSH connection. -KL [bindaddr:]port, -KR [bindaddr:]port and -KD [bindaddr:]port can be used to cancel existing forwardings.
Several options to mention below works according to the forwarding concept.
Forward the local X11 server socket (TCP or UNIX) assigned with DISPLAY environment variable to the remote (usually a TCP one under localhost), and set DISPLAY of the remote environment to it.
This is useful to log into remote host from an environment with X11. X clients can be invoked from the shell launched by remote endpoint, e.g.
$ ssh -X [email protected]
[email protected]:~$ gnome-system-monitor
and the GUI of gnome-system-monitor(1) of remote.host.xxx.com will be displayed on the local X server.
Forward the local SSH agent socket (usually UNIX) assigned with SSH_AUTH_SOCK environment variable to the remote (usually a UNIX one), and set SSH_AUTH_SOCK of the remote environment to it.
Use this to eliminate the need to store secret keys on the remote host if we are in a scene in which we need to remotely log into a host first in order to log into more hosts only accessible from the first hosts.
Assuming you can access a.xxx.com, and a.xxx.com can access b.xxx.com, but you cannot access b.xxx.com directly. Provided that you have ssh keys to authenticate both a and b, you can now both keys to your LOCAL ssh-agent:
$ ssh-add -t 300 a.key
$ ssh-add -t 300 b.key
$ ssh -A [email protected]
Now, your socket to the local ssh-agent has been forwarded to a.xxx.com and stored to SSH_AUTH_SOCK in the environment for [email protected]. So,
[email protected]:~$ ssh [email protected]
will pass the authentication to b.xxx.com provided that a valid key has been registered to your local ssh-agent.
Connect to the target host by first making a ssh connection to the jump host and then establishing a TCP forwarding to the ultimate destination from there. Multiple jump hops may be specified separated by comma characters.
Like the last example, but this time you only want to log into b.xxx.com, so you could use a.xxx.com as a ProxyJump:
$ ssh -J [email protected] [email protected]
after you pass the authentication to both a and b, you will get a command prompt [email protected]:~$.
IdentityFile is to assign additional authentication identity files like ~/.ssh/id_dsa, ~/.ssh/id_ecdsa, ~/.ssh/id_ed25519 and ~/.ssh/id_rsa, while PKCS11Provider is to assign a pkcs11 module library, e.g. opensc-pkcs11.so. Both can be used for authentication, and PIN will be asked when needed.
Enable zlib compression on the SSH connection level, which means all multiplexed streams benefits from it.
######Reference: [1] man page ssh(1) and ssh_config(5)
[2] https://en.wikipedia.org/wiki/Tunneling_protocol#Secure_Shell_tunneling