| title | date | tags | ||
|---|---|---|---|---|
How I recovered a corrupt SD Card |
2024-11-06 |
|
Halloween was about a week ago, and my friend Sade had used their Canon point-and-shoot digital camera to take some party pictures. Somehow, the photos stored on a 16-gig SD card became corrupted. When the card was plugged into an adapter, the phone did not display anything, and alternatively, it was not recognized when inserted into our friend's MacBook.
After hearing this, I figured I might as well fool around with it and see if I could recover some, if not all, of the data. I spent an hour researching different methods and programs to use. It was imperative that I knew what I was doing, as one wrong step can easily destroy an entire drive.
I eventually settled on two software packages that I would install on my spare laptop, which was running a Linux distribution. If you have read any of my other blogs, you'll know that I am a huge FOSS advocate. I wanted to find something that was free of cost and had been around for a while, with code that was open source and trusted.
The first software that I settled on was Ddrescue, a data recovery tool that works by copying data from one device (in this case, the SD card) to another (my Linux laptop). Ddrescue attempts to read through the different memory sectors and create an image of all the good parts. I will get into more detail later.
The second software I chose was also available under the GNU license and was free to download. PhotoRec uses file carving to recover lost files from various memory types. It worked very well in my situation but if I had to do this again, I might instead opt for R-Photo, as I have read it is usually the preferred software.
When it came to plugging in my SD card, I made sure to directly SATA connect the card into my laptop. This is because a USB adapter may have slowed down the process.
Before I could begin any recovery, I obviously needed to make sure that the SD card was actually detected by the laptop, otherwise I might not be able to continue with the process.
- First, I used the command
lsblkwhich lists information about all the available block devices.- If this works correctly, you should see something like:
/dev/mmcblk0(note this down) as well as other devices or drives. Depending on how your file system is set up, you might see a/sda0or/sda1which represent drive partitions. - If the SD card does not appear, then we have a problem. Unfortunately, this is what happened to me.
- If this works correctly, you should see something like:
If you do not see the card, then you should probably start troubleshooting. The cause of this can vary greatly, and the SD card might be beyond recovery.
In my case, I was able to force a rescan of the device's by running the following:
sudo echo "- - -" | sudo tee /sys/class/scsi_host/host*/scan
sudo partprobe
Essentially the first command rescans SCSI devices by sending a signal to all the SCSI hosts, asking them to rescan for new devices. The second part, partprobe tells the system to re-read the partition table of all block devices. For me, this worked and I was now able to see the block device listed as /dev/mmcblk0😀.
- You can also use the command
dmesgwhich shows kernel-related messages that are stored in the kernel ring buffer. It contains information on hardware, drivers, and any kernel module messages that are generated during system startup.- This actually came in handy when diagnosing my issue because it gave me the following error message, which simply told me that the card was having errors when I started up the computer:
-mmc0: Card stuck being busy! __mmc_poll_for_busy
-mmc0: error -110 whilst initializing SD cardThe next step is to install the ddrescue and testdisk packages from whatever Linux package manager you use.
For Debian-based machines, run:
sudo apt install ddrescue testdisk
And for Arch-based machines:
sudo pacman -S ddrescue testdisk
Now we can go ahead and set up a place for our recovery directory. That way, we can place the disk image there.
mkdir ~/sd_recovery
cd ~/sd_recovery
After we have completed this, we can proceed with ddrescue.
Before you begin, I should mention that you should take a look at the ddrescue documentation, which explains what each option does in the command.
Let's get started. In your terminal, type out the following command:
sudo ddrescue /dev/mmcblk0 ~/sd_recovery/sdcard_backup.img ~/sd_recovery/rescue.logWhere /dev/mmcblk0 is the correct path for the drive you are trying to recover. It is imperative that you get this right; otherwise, you risk damage.
~/sd_recovery/sdcard_backup.img is the path to create the image file in. You should use the folder we created in step 2.
~/sd_recovery/rescue.log specifies the location for the log file, which is very important.
According to a post from Jared of data-medics, the log file is "a list of sector ranges which have been copied, skipped, marked as bad, etc., which the program will use on successive passes to get as much data as possible."
After running the command, you should see the following output to some degree:
In my screenshot, you will see that there are a lot of errors. This may happen to you as well, but don't worry. Ddrescue will skip over sectors with errors and then they can be tried again in reverse. In my image, you will see that 3.58% were rescued. There are obviously tons of read errors nonetheless, but hopefully you have fewer. I ended up canceling the command after around 20 minutes of different attempts, as I was never able to go above 3.58%.
Now we are ready to move onto PhotoRec.
To run PhotoRec simply call the command followed by the path to the image we just made with Ddrescue.
sudo photorec ~/sd_recovery/sdcard_backup.imgPhotoRec will hit you with some prompts that will need to be filled out. The result should look like the following:
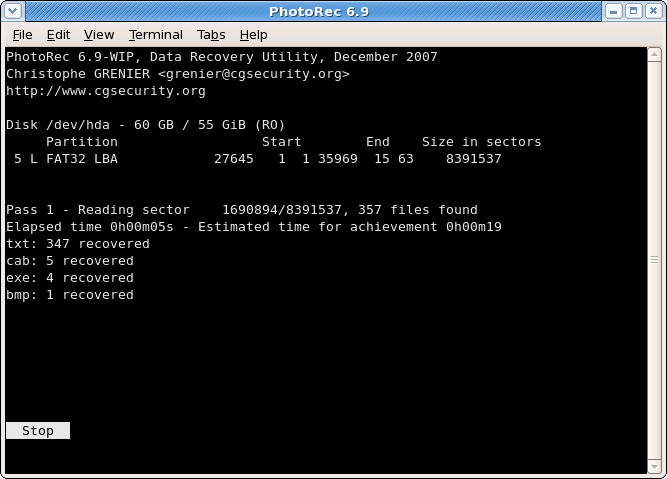
If all goes as anticipated, you will begin to see images popping up as recovered. And that's it! Now you can simply navigate to the sd_recovery directory and view the recovered files.
I hope that you learned a little something about recovering data from corrupted drives. If you have any questions or concerns, please feel free to ask me via my contact page at mikekudrik.boats.