-
Notifications
You must be signed in to change notification settings - Fork 401
Wiring_for_RC522_card_reader
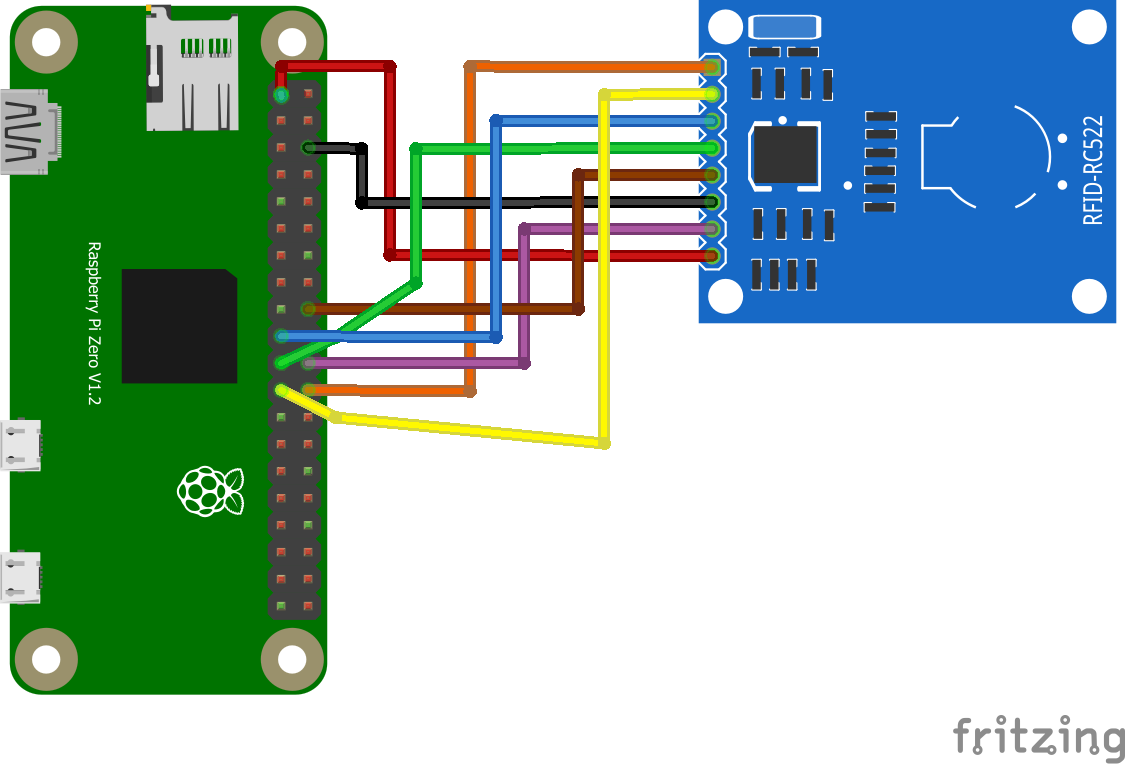
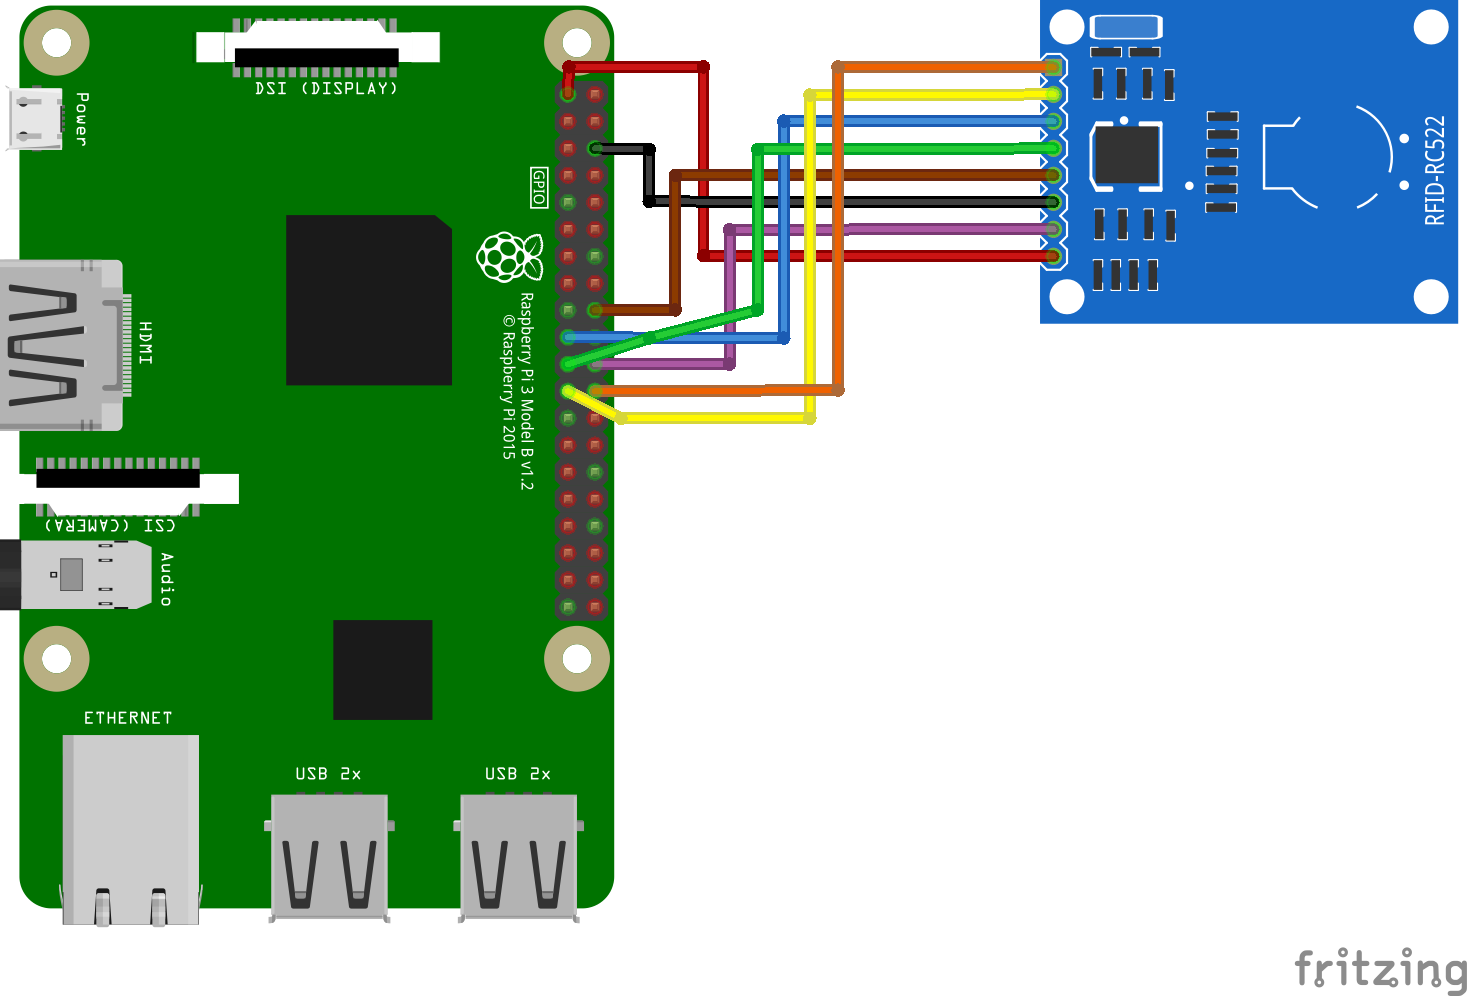
Here a fritzing layout for wire a RC522 with the Raspberry Pi incl. IRQ Pin, 2 different views (RPi3 and RPi Zero) on the same schematic in line with the recommended pinout.
You have to wire the IRQ Pin from RC522 to Raspberry Pin 18/GPIO 24. See also https://github.com/MiczFlor/RPi-Jukebox-RFID/issues/1227#issuecomment-881250852
See the fritzing Picture (brown cable is the IRQ Pin) ...you must soldering all 8 wires from the Reader...


The following table shows an alternative wiring using pins 17 and 20 for 3.3V and GND respectively instead of 1 and 6 (leftmost and rightmost columns are pins on the Raspi and RC 522). This allows to use the consecutive block from pin 17 to pin 24. In particular, one can use a ribbon cable with a 4x2 plug on the raspi end and an 8x1 plug on the RC522 end to connect the two. The middle two columns are meant to simplify building such a cable: on the raspi side "relative" = actual - 16 on the RC 522 side "relative" = 9 - actual.
| Raspi | Raspi Relative | RC 522 Relative | RC 522 |
|---|---|---|---|
| 17 | 1 | 1 | 8 |
| 18 | 2 | 4 | 5 |
| 19 | 3 | 6 | 3 |
| 20 | 4 | 3 | 6 |
| 21 | 5 | 5 | 4 |
| 22 | 6 | 2 | 7 |
| 23 | 7 | 7 | 2 |
| 24 | 8 | 8 | 1 |
If you need to change the GPIO Pins for irq or reset you only need to change one Parameter. Edit the Reader.py (original name is Reader.py.experimental)
nano /home/pi/RPi-Jukebox-RFID/scripts/Reader.py
Edit Line 55:
original:
self.device = pirc522.RFID()
New (Reset = Pin 16 / IRQ = Pin 15):
self.device = pirc522.RFID(pin_rst=16, pin_irq=15)
Pin means the physical Pinnumber and not the GPIO Number.
To see all Pinnumbers use the command gpio readall
If your RFID tags are not being read, it is possible to increase the sensitivity of the RFID reader and thus achieve a slightly higher range.
Only one parameter needs to be changed. This is also done in Reader.py (original: Reader.py.experimental).
nano /home/pi/RPi-Jukebox-RFID/scripts/Reader.py
Edit Line 55:
original:
self.device = pirc522.RFID()
New:
self.device = pirc522.RFID(antenna_gain=0x07)
| Value | Antena Gain | Default |
|---|---|---|
| 0x04 | 33 dB | Yes |
| 0x05 | 38 dB | |
| 0x06 | 43 dB | |
| 0x07 | 48 dB |
It is also possible to select an alternative pinout and increase the RFID reader sensitivity.
To do this, enter both parameter changes in line 55:
self.device = pirc522.RFID(pin_rst=16, pin_irq=15, antenna_gain=0x07)
If you like Phoniebox, consider: buy me a coffee or PayPal
- Code: https://github.com/MiczFlor/RPi-Jukebox-RFID
- Phoniebox home page: English | Deutsch
Phoniebox is a contactless jukebox for the Raspberry Pi, playing audio files, playlists, podcasts, web streams and spotify triggered by RFID cards. All plug and play via USB, no soldering iron needed. Update: if you must, it now also features a howto for adding GPIO buttons controls.
Visit Phoniebox.de
- ⭐ Releases
- 🎵 Install Jukebox Version 3
- 🐛 Report a bug
- 🚀 Propose a feature
- ☑️ Feature Status
- 📖 Documentation
- 👩💻 Development
- ✏️ Contributing
- 🦄 Code
- ⭐ Releases
- 🎵 Install Jukebox Version 2
- 🐛 Report a bug
- ☑️ Features
- 📖 Documentation
- ✏️ Contributing
- 🦄 Code
Version 2 Pages
-
Setup / Upgrades
- Synchronising Phonieboxes in a local network
- Smart Home remote control with MQTT
- Hardware Pinout Overview
- Systemwide Equalizer
- Phoniebox with read-only Filesystem
- HiFiBerry Soundcard Details
- WM8960 Hi-Fi HAT
- PAM8403 Amplifier Power Off
- TPA3118 Amplifier Power Off and EMI improvement
- External Non USB Audio DAC ES9023, PCM5102, etc.
- On-board LEDs with fibre optics
- Setting GPIOs at boot time
- Stop on removal with USB RFID Reader
- Firmware update improves audio out
- Architecture