Next Gen Github Pages Documentation
Description:
As we attempt to apply hydrological modeling at different scales, the traditional organizational structure and algorithms of model software begin to interfere with the ability of the model to represent complex and heterogeneous processes at appropriate scales. While it is possible to do so, the code becomes highly specialized, and reasoning about the model and its states becomes more difficult. Model implementations are often the result of taking for granted the availability of a particular form of data and solution -- attempting to map the solution to that data. This framework takes a data centric approach, organizing the data first and mapping appropriate solutions to the existing data.
This framework includes an encapsulation strategy which focuses on the hydrologic data first, and then builds a functional abstraction of hydrologic behavior. This abstraction is naturally recursive, and unlocks a higher level of modeling and reasoning using computational modeling for hydrology. This is done by organizing model components along well-defined flow boundaries, and then implementing strict API’s to define the movement of water amongst these components. This organization also allows control and orchestration of first-class model components to leverage more sophisticated programming techniques and data structures.
- Technology stack: Core Framework using C++ (minimum standard c++14) to provide polymorphic interfaces with reasonable systems integration.
- Status: Version 0.1.0 in initial development including interfaces, logical data model, and framework structure. See CHANGELOG for revision details.
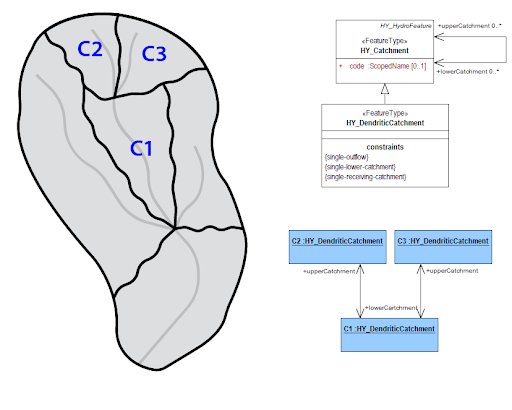
Catchments: Catchments represent arbitrary spatial areas. They are the abstraction used to encapsulate a model. The three marked catchments could use three different models, 3 copies of the same model, or some combination of the previous options.
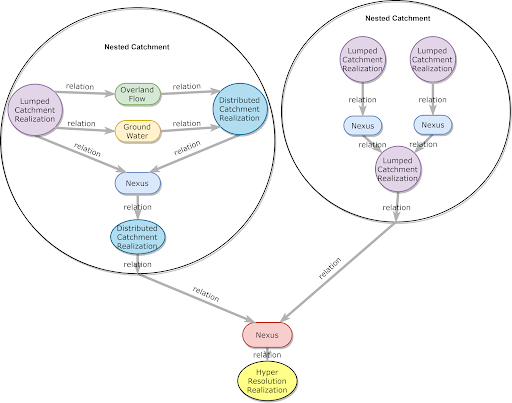
Realizations: Different kinds of catchment realizations can be used to encapsulate different types of models. These models will have different types of relations with neighbors. When a relation exists between two adjacent catchments synchronization is necessary.
Complex Realizations: An important type of catchment realization is the complex catchment realization. This allows a single catchment to be represented by a network of higher detail catchment realizations and their relationships. This allows the modeled area to be represented at multiple levels of detail and supports dynamic high resolution nesting.
See the Dependencies.
See INSTALL.
To view the compile-time configuration of an pre-compiled NextGen binary use the --info flag, as in ngen --info.
for more info see: #679
To run the ngen engine, the following command line positional arguments are supported:
- catchment_data_path -- path to catchment data geojson input file.
- catchment subset ids -- list of comma separated ids (NO SPACES!!!) to subset the catchment data, i.e. 'cat-0,cat-1', an empty string or "all" will use all catchments in the hydrofabric
- nexus_data_path -- path to nexus data geojson input file
- nexus subset ids -- list of comma separated ids (NO SPACES!!!) to subset the nexus data, i.e. 'nex-0,nex-1', an empty string or "all" will use all nexus points
- realization_config_path -- path to json configuration file for realization/formulations associated with the hydrofabric inputs
- partition_config_path -- path to the partition json config file, when using the driver with distributed processing.
--subdivided-hydrofabric-- an explicit, optional flag, when using the driver with distributed processing, to indicate to the driver processes that they should operate on process-specific subdivided hydrofabric files.
An example of a complete invocation to run a subset of a hydrofabric. If the realization configuration doesn't contain catchment definitions for the subset keys provided, the default global configuration is used. Alternatively, if the realization configuration contains definitions that are not in the subset (or hydrofabric) keys, then a warning is produced and the formulation isn't created.
./cmake-build-debug/ngen ./data/catchment_data.geojson "cat-27,cat-52" ./data/nexus_data.geojson "nex-26,nex-34" ./data/example_realization_config.json
To simulate every catchment in the input hydrofabric, leave the subset lists empty, or use "all" i.e.:
ngen ./data/catchment_data.geojson "" ./data/nexus_data.geojson "" ./data/refactored_example_realization_config.json
ngen ./data/catchment_data.geojson "all" ./data/nexus_data.geojson "all" ./data/refactored_example_realization_config.json
Examples specific to running with with distributed processing can be found here.
The project uses the Google Test framework for creating automated tests for C++ code.
To execute the full collection of automated C++ tests, run the test_all target in CMake, then execute the generated executable. Alternatively, replace test_all with test_unit or test_integration to run only those tests.
For example:
cmake --build cmake-build-debug --target test_all -- -j 4
./cmake-build-debug/test/test_all
Or, if the build system has not yet been properly generated:
git submodule update --init --recursive -- test/googletest
cmake -DCMAKE_BUILD_TYPE=Debug -DNGEN_WITH_TESTS:BOOL=ON -B cmake-build-debug -S .
cmake --build cmake-build-debug --target test_all -- -j 4
./cmake-build-debug/test/test_all
See the Testing ReadMe file and wiki/Quickstart for a more thorough discussion of testing.
This is all developed via CMake, so a specific setting must be active within the root CMakeList.txt file:
target_compile_options(ngen PUBLIC -g)
This will ensure that ngen and all of the code that is compiled with it has debugging flags enabled. From
there, the application may be run via gdb, lldb, or through your IDE.
If you do not have administrative rights on your workstation, there's a chance you do not have access to
gdb or lldb, meaning that you cannot step through your code and inspect variables. To get around this, you
can use GitPod to start an editor (based on VSCode) in your browser and edit and debug to your heart's content.
You can access an individualized GitPod environment through: https://gitpod.io/#https://github.com//ngen.
Entering it for the first time will generate a new git branch.
There are a few things required, however. When you first enter, gitpod will ask you if you want to set up your
environment. Let it create a .yml configuration file. It will then ask if you want it to create a custom docker
image. Say yes, then choose the default image. At the end, you should have a .gitpod.yml and .gitpod.dockerfile
at the root of the project.
Next, you will need to add the above target_compile_options(ngen PUBLIC -g) just about anywhere in the CMakeLists.txt
file within the root of your project.
Next, you will need to make sure that all dependencies are installed within your environment. The image GitPod supplies uses an application name HomeBrew to allow you to install dependencies. You will need to run:
brew install boost
to proceed further. Now clear all of your previously built binaries and build your application (ngen or any test routine
that you're interested in, such as test_all).
A debugging extension should be installed into your workspace. Select the bottom icon on the left hand side of your screen; it should look like a box with a square in it. CodeLLDB is a good extension to use.
Lastly, a debugging configuration must be set up. There is an icon on the left hand side of your screen that should be a
bug with a slash through it, somewhat like a 'No Parking' sign. If you click it, it will open a debugging tab on the left
hand side of your screen. Within it, you should see a play button next to a drop down menu that says 'No Configurations'.
Click on that, then click on the option named "Add Configuration...". This will create a file named launch.json. Within it,
add a configuration so that it looks like:
{
  // Use IntelliSense to learn about possible attributes.
  // Hover to view descriptions of existing attributes.
  "version": "0.2.0",
  "configurations": [
    {
        "name": "ngen",
        "type": "lldb",
        "request": "launch",
        "program": "${workspaceFolder}/<your build directory>/ngen",
        "args": [],
    }
  ]
}
You will now have the configuration named ngen after saving your launch.json file. You may now add a break point within
your code by clicking to the left of the line number within your code. This should make a red circle appear. Now, when you run
it by clicking the play button in the debugging window, your code will stop on the line where you put your break point, as long
as it executes code. It will not stop on whitespace or comments.
Document any known significant shortcomings with the software.
Instruct users how to get help with this software; this might include links to an issue tracker, wiki, mailing list, etc.
Example
If you have questions, concerns, bug reports, etc, please file an issue in this repository's Issue Tracker.
This section should detail why people should get involved and describe key areas you are currently focusing on; e.g., trying to get feedback on features, fixing certain bugs, building important pieces, etc.
General instructions on how to contribute should be stated with a link to CONTRIBUTING.
- Projects that inspired you
- Related projects
- Books, papers, talks, or other sources that have meaningful impact or influence on this project


