Why Docker?
- Development/production parity
- Different environments for running applications across different operating systems
- Decoupling infrastructure from application development
- Debugging capabilities
Pro-tip: watch this video for a quick introduction
- Open PWD Platform on your browser
First we'll pull a Docker Image from the Docker Registry. This can be done by using pull, but we can also use docker run as it will checkout both local files and the Docker Hub:
docker run hello-worldLet's check it out:
docker images
docker ps # hello world closes in on itself
docker ps -a
Inspect the image:
docker inspect <first unique characters of the image id>docker stop <id>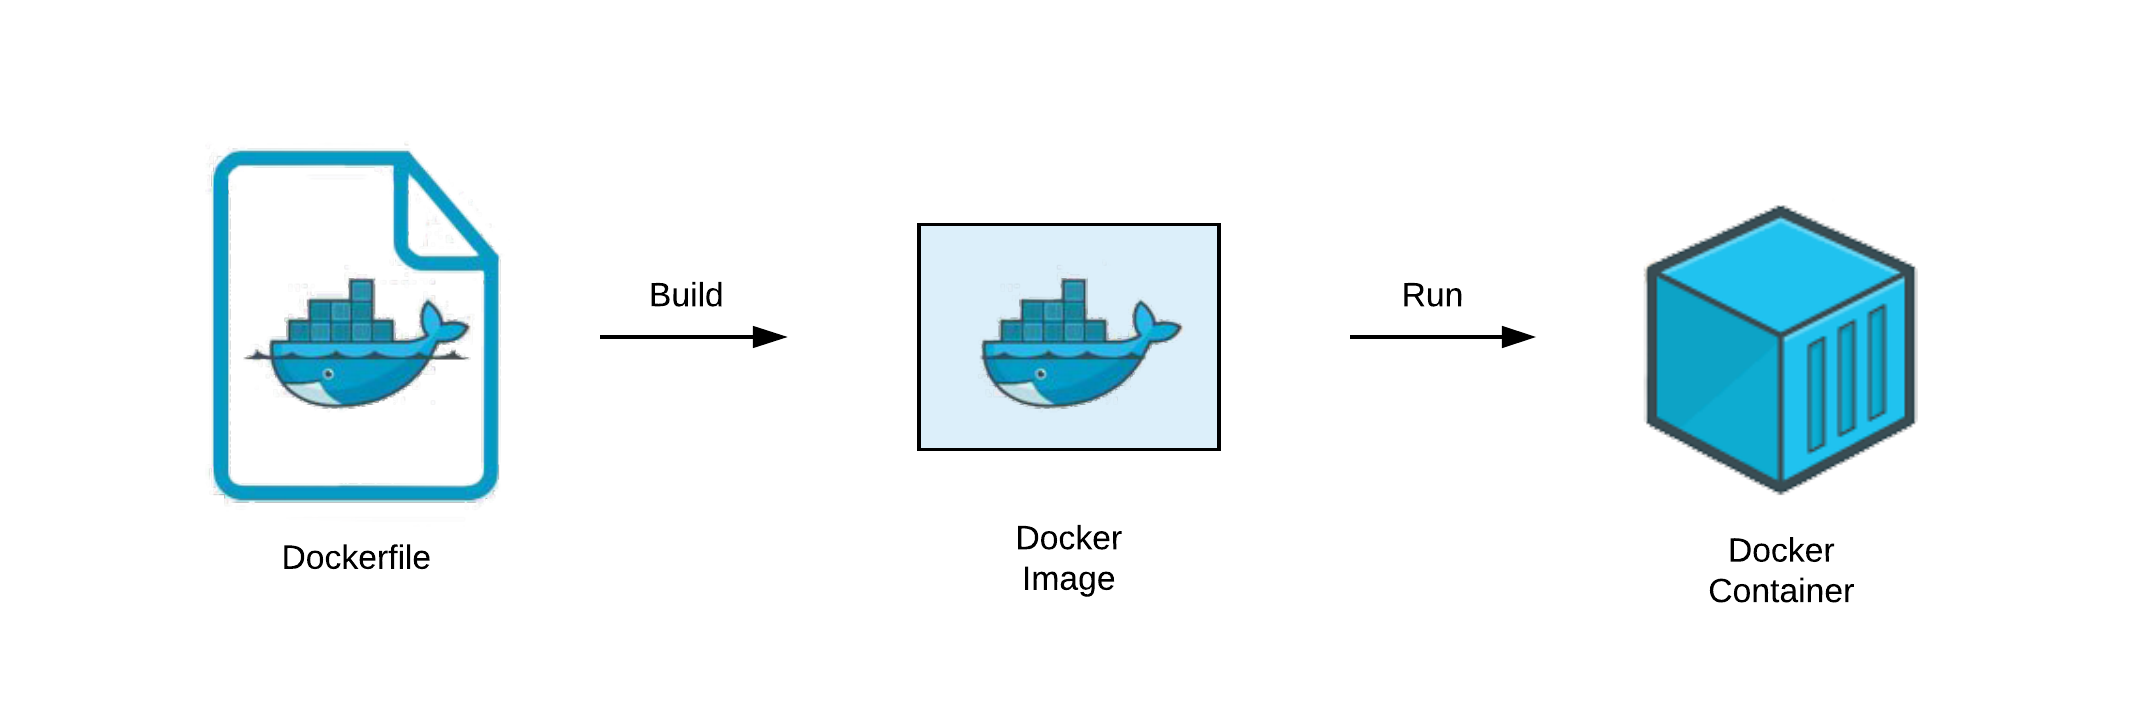
let's steer clear from PWD to start our own project!
- Download Docker Desktop
Docker Desktop installs a few things under which the Docker Command Line Interface (CLI). The Desktop version has some useful features, but we'll mostly be using the CLI.
Before we can use the CLI, we will need to create an account with DockerHub
Let's spin up a new Next.js project:
npx create-next-app@latest
docker-workshop
cd docker-workshop
In our project, we're going to manage our CI/CD with Configuration as Code (CaC). With a CaC approach, you'll configure the settings for your servers, code and other resources into a text (YAML) file. This file will be checked in version control, which will be used for creating and updating these configurations.
Let's start by creating our Dockerfile. Docker was writtin in GO, but a Dockerfile is actually a simple textfile.
touch Dockerfile# Use a compact Linux distribution called Alpine with node installed in our image. Each Dockerfile must begin with a FROM instruction.
FROM node:21-alpine
# Setting a working directory for the image. All **image** paths will be relative to WORKDIR
WORKDIR /app
# Copy both the package.json and package.lock from our project root to destination WORKDIR
COPY package*.json ./
# Check https://blog.npmjs.org/post/171556855892/introducing-npm-ci-for-faster-more-reliable why we're using npm ci
RUN npm ci --only=production
# Copy all source files from root to destination WORKDIR
COPY . .
# Build app
RUN npm run build
# Tell everybody what port we will use. Note - this does not actually expose the port and is meant as indication. We will set the port when running the docker container.
EXPOSE 3000
# Specifies what command to run within the container
CMD ["npm", "start"]A note about why we're not simply copying over our
node_modules: The core of this issue for Node.js is that node_modules can contain binaries compiled for your host OS, and if it’s different then the container OS, you’ll get errors trying to run your app when you’re bind-mounting it from the host for development.
Another note about why we copy our package.json and package-lock.json before we copy our code into the container: Docker will cache installed node_modules as a separate layer, then, if you change your app code and execute the build command, the node_modules will not be installed again if you did not change package.json.
Let's add some files to our project we don't want to include in our Docker image
touch .dockerignoreDockerfile
.dockerignore
node_modules
All right, we've created the recipe for our cake. Now we're going to actually put the cake together and put it in the oven 🍰
The Docker Image will not be included in your project as a file. Instead, these are stored on your OS.
docker build -t docker-workshop:latest .
# --tag , -t		Name and optionally a tag in the 'name:tag' format
# The . to reference the repository of a Dockerfile.
Let's run our image 🏃♀️
docker run -d -p 3000:3000 docker-workshop
# -detached is still running in the background, whether you like it or not;)
# -p map port 3000 to 3000. Without this, our container will be sealed!
Are you running? 💦
docker logs abc
docker ps
Ok, good workout! 🤾♂️
docker stop abc
docker ps -a
We can also name our tagged container for a better development experience since we can start using that name rather than the randomly generated one. This will also prevent running duplicates.
docker run -d -p 3000:3000 --name=docker-workshop docker-workshopAlright, We've had our fun. Now let's kill it 🔪🩸
docker images
docker images ls
docker ps
docker images -a

docker stop abc && docker rm $_

# _$ outputs the last field from the last command executed, useful to get something to pass onwards to another commandSo, usually you want your image to be hosted somewhere. This way something like hosting can access it. Docker has its own registry, but Git providers often have their own too. For example: GitHub, GitLab and Azure all have their own container registry.
Create the image like we did before 👷
Now, let's retag our image so we can push it to the Docker Hub registry.
docker tag docker-workshop rubenwerdmuller/workshopThe image is tagged with my username on purpose. This makes it easy for Docker Hub to recoginise the account and it will instantly publish it. I do need to be logged in though:
docker login
docker login -u your_dockerhub_username
Now push it like it's hot:
docker push rubenwerdmuller/workshopDocker images can take up quite some space on systems. Let's destroy all non running containers 🪚🔨
docker system prune -aSince we uploaded our image, we can also pull it!
docker pull rubenwerdmuller/workshopFinally, let's automate our flow!
Let's create a project which we can automate:
First, we'll want to add our GitHub token (add as GITHUB_TOKEN) as a secret to GitHub secrets. This will be used to login to our Docker Registry.
Then create a file called .github/workflows/deploy.prod.yml
name: Push Docker image to Docker Hub

on:
  push:
    branches:
      - '**' # Will fire on every possible branch
      # - '*/*' # Will fire on every branch that has a single slash in it
      # - '*/**' # Will fire on every branch that has a slash in it
      # - 'main' # Will fire on the branch named `main`
      # - '!main' # Will not fire if the branch name is `main`

jobs:
  test:
    runs-on: ubuntu-latest #GitHub virtual machine uses the latest version of Ubuntu
    steps:
      - name: Login to GitHub Container Registry
        uses: docker/login-action@v3
        with:
          registry: ghcr.io
          username: ${{ github.actor }}
          password: ${{ secrets.GITHUB_TOKEN }}

      - name: Build and push
        id: docker_build
        uses: docker/build-push-action@v2
        with:
          push: true
          # Update the latest image and create a back-up
          tags: |
            ghcr.io/${{ github.repository }}:${{ github.ref }}
            ghcr.io/${{ github.repository }}:latest
more information about logging in with Docker here.
Say we'd want to add some possible variants to our recipe (Docker image). They're not secret ingredients, so we can input these freely.
Using the Docker build
During the build we can add environment variables. This requires one simple addition to our regular flow. Add the variable as a docker CLI flag:
docker build --build-arg APP_ENVIRONMENT=preview --no-cache -t our_app_name .When using ci/cd and next.js
You can also add public information through your ci/cd flow which has the benefit that the flow act as a single source of truth.
In the next example, after the script: line, a shell script is used to pass an environment variable to a newly created .env.production fle.
Build and push develop:
  extends: .build
  variables:
    ORY_SDK_URL: https://acc.id.commondatafactory.nl
  script:
    - echo "ORY_SDK_URL=$ORY_SDK_URL" > .env.production
    - docker pull --quiet $CI_REGISTRY_IMAGE:develop || true
    - docker build --build-arg RUNNING_ENV=staging -t $IMAGE_TAG -t $CI_REGISTRY_IMAGE:develop .
    - docker push --quiet $CI_REGISTRY_IMAGE:develop
  only:
    - branches
  except:
    - main