Key Operations Overview
Agile is the ability to create and respond to change. It is a way of dealing with, and ultimately succeeding in, an uncertain and turbulent environment.
The authors of the Agile Manifesto chose “Agile” as the label for this whole idea because that word represented the adaptiveness and response to change which was so important to their approach.
It’s really about thinking through how you can understand what’s going on in the environment that you’re in today, identify what uncertainty you’re facing, and figure out how you can adapt to that as you go along.
Agile software development is more than frameworks such as Scrum, Extreme Programming, or Feature-Driven Development (FDD).
Agile software development is more than practices such as pair programming, test-driven development, stand-ups, planning sessions, and sprints.
Agile software development is an umbrella term for a set of frameworks and practices based on the values and principles expressed in the Manifesto for Agile Software Development and the 12 Principles behind it. When you approach software development in a particular manner, it’s generally good to live by these values and principles and use them to help figure out the right things to do given your particular context.
One thing that separates Agile from other approaches to software development is the focus on the people doing the work and how they work together. Solutions evolve through collaboration between self-organizing cross-functional teams utilizing the appropriate practices for their context.
There’s a big focus in the Agile software development community on collaboration and the self-organizing team.
That doesn’t mean that there aren’t managers. It means that teams have the ability to figure out how they’re going to approach things on their own.
It means that those teams are cross-functional. Those teams don’t have to have specific roles involved so much as that when you get the team together, you make sure that you have all the right skill sets on the team.
There still is a place for managers. Managers make sure team members have, or obtain, the right skill sets. Managers provide the environment that allows the team to be successful. Managers mostly step back and let their team figure out how they are going to deliver products, but they step in when the teams try but are unable to resolve issues.
When most teams and organizations start doing Agile development, they focus on the practices that help with collaboration and organizing the work, which is great. However, another key set of practices that are not as frequently followed but should be are specific technical practices that directly deal with developing software in a way that helps your team deal with uncertainty. Those technical practices are essential and something you shouldn’t overlook.
Ultimately, Agile is a mindset informed by the Agile Manifesto’s values and principles. Those values and principles provide guidance on how to create and respond to change and how to deal with uncertainty.
You could say that the first sentence of the Agile Manifesto encapsulates the whole idea: “We are uncovering better ways of developing software by doing it and helping others do it.”
When you face uncertainty, try something you think might work, get feedback, and adjust accordingly.
Keep the values and principles in mind when you do this. Let your context guide which frameworks, practices, and techniques you use to collaborate with your team and deliver value to your customers.
If Agile is a mindset, then what does that say about the idea of Agile methodologies? To answer this question, you may find it helpful to have a clear definition of methodology.
Alistair Cockburn suggested that a methodology is the set of conventions that a team agrees to follow. That means that each team will have its own methodology, which will be different in either small or large ways from every other team’s methodology.
So Agile methodologies are the conventions that a team chooses to follow in a way that follows Agile values and principles.
“Wait,” you’re probably saying, “I thought Scrum and XP were Agile methodologies.” Alistair applied the term framework to those concepts. They certainly were born from a single team’s methodology, but they became frameworks when they were generalized to be used by other teams. Those frameworks help inform where a team starts with their methodology, but they shouldn’t be the team’s methodology. The team will always need to adapt its use of a framework to fit properly in its context.
An example

As Agile Software Development became more popular, people involved with software development activities but who didn’t personally develop software looked for some way to figure out how these Agile ideas applied in their line of work.
The Agile Manifesto and the 12 Principles were written by a group of software developers (and a tester) to address issues that software developers faced. When you think of Agile as a mindset, that mindset can be applied to other activities.
When you do that, Agile becomes an adjective. It describes how you perform some activity. It does not create a new methodology for the reasons explained above.
When you want to understand Agile project management, ask “How might we perform project management in a way that allows us to create and respond to change and deal with uncertainty?” Agile Alliance and Project Management Institute (PMI) explored this question through a joint effort to create the Agile Practice Guide (Available to Agile Alliance Members).
When you want to understand Agile business analysis, ask “How might we perform business analysis in a way that allows us to create and respond to change and deal with uncertainty?” Agile Alliance and International Institute of Business Analysis (IIBA) explored this question through a joint effort to create the Agile Extension to the Business Analysis Body of Knowledge (Available to Agile Alliance Members).
The two concepts noted above are examples of an attempt to move Agile “outside of software.” Those efforts have resulted recently in the Business Agility movement.
If you extend the idea of Agile as a mindset, then people seeking Business Agility ask themselves, “How might we structure and operate our organization in a way that allows us to create and respond to change and deal with uncertainty?”
You might say that business agility is a recognition that in order for people in an organization to operate with an Agile mindset, the entire organization needs to support that mindset. Agile software development was never truly Agile until the organization changed its structure and operations to work in an uncertain environment.
In consultation with the customer or product owner, the team divides up the work to be done into functional increments called “user stories.” Each user story is expected to yield a contribution to the value of the overall product.
Each day at the same time, the team meets so as to bring everyone up to date on the information that is vital for coordination: each team members briefly describes any “completed” contributions and any obstacles that stand in their way.
When the project calls for it – for instance when user experience is a major factor in project outcomes – the team crafts detailed, synthetic biographies of fictitious users of the future product: these are called “personas.”
A “team” in the Agile sense is a small group of people, assigned to the same project or effort, nearly all of them on a full-time basis. A small minority of team members may be part-time contributors, or may have competing responsibilities.
Nearly all Agile teams favor an incremental development strategy; in an Agile context, this means that each successive version of the product is usable, and each builds upon the previous version by adding user-visible functionality.
Agile projects are iterative insofar as they intentionally allow for “repeating” software development activities, and for potentially “revisiting” the same work products.
Once a project has been underway for some time, or at the end of the project, all of the team’s permanent members (not just the developers) invests from one to three days in a detailed analysis of the project’s significant events.
"We are uncovering better ways of developing software by doing it and helping others do it." Through this work we have come to value:
Individuals and interactions over processes and tools
Working software over comprehensive documentation
Customer collaboration over contract negotiation
Responding to change over following a plan
"That is, while there is value in the items on the right, we value the items on the left more."
1. Our highest priority is to satisfy the customer through early and continuous delivery of valuable software.
2. Welcome changing requirements, even late in development. Agile processes harness change for the customer’s competitive advantage.
3. Deliver working software frequently, from a couple of weeks to a couple of months, with a preference to the shorter timescale.
5. Build projects around motivated individuals. Give them the environment and support they need, and trust them to get the job done.
6. The most efficient and effective method of conveying information to and within a development team is face-to-face conversation.
8. Agile processes promote sustainable development. The sponsors, developers, and users should be able to maintain a constant pace indefinitely.
12. At regular intervals, the team reflects on how to become more effective, then tunes and adjusts its behavior accordingly.
User stories are the list of functions that a product does, whether it is a mobile app or a website. User stories are one of the main methods of control in Agile, for example, Extreme Programming (XP) features such processes as continuous planning (from Scrum) and customer involvement that are the necessary parts of user stories creation.
A user story answers the following questions:
- who?
- does what?
- does it get what?
“Who” is an actor who stands for a website or a mobile app user. This user is either a guest or a developer/product admin.
“Does what” is an action the user does in order to reach his / her goal.
“Does it to get what” is the user’s goal of interaction.
For instance, a website visitor (who) may want to fill in a contact form (does what) to get in touch with a company regarding a project (goal).
I advise you to separate all actors into the groups: a target audience, the main group, the group of secondary importance, and others. After this action, you should give unique names to all actors from the groups. Then you need to write stories from the perspective of these actors, indicating their unique names. It will help you to realize which stories are necessary only for the actors from the target audience, which stories are necessary for each group. You will be able to build a priority more correctly since the stories of the actors of the target group are more important for us.
Such user stories are better to write on the small sticky pieces of paper and keep within a reach of eyesight while developing. If there are many user stories it’s strongly recommended to keep the user stories in the electronic device.
You can use the user stories online tools such as Online Visual Paradigm, Realtime Board, StoriesOnBoard. These services are a way to organizing stories that gives a broader context and helps in planning releases, in other words, these tools of user stories mapping.
The most important part of the user story is a goal. The goals are actions that the company wants its target audience to perform. If the company doesn’t understand which processes lead to these main actions, so the product won’t work properly.
Let’s expand on the reasons why we should pay attention to user stories.

As was said before user stories are a list of product functions. If a client doesn’t know exactly how a product should work, the user stories are to help to comprehend. If the client has an idea of the product’s work and the list of specs, a development team must anyway hold a meeting regarding a vision of the product. The client and the team should be on the same page about goals of product development and ways of achieving these goals. Otherwise, misunderstanding can happen and a developer will create a feature nobody actually needs. Time loss, budget loss.
The user stories are aimed at:
- delivering a product that the client really needs;
- budget estimation;
- time estimation;
- saving time on coding and giving clear tasks to developers;
- UI design.
The user stories writing is a great service to offer to the client. If the client doesn’t have time for the user stories and for defining so-called “use cases”, the development team in general and internet marketer, in particular, can deliver this service.
The mentioned term “use cases” is the scenario that users are likely to follow when using the product. They give a general overview of the product. For example, one can use Facebook for reconnecting with mates and another for doing business.
The user stories clarify and detail how these use cases are implemented in terms of user actions.
User stories writing involves several parties: a client, a development team, and customer representatives. It’s necessary that everybody stays in touch permanently. If the client doesn’t have time for a constant involvement, this role can be reassigned to the Product owner (in Scrum) or to an internet marketer from either a client or a developer side. Anyway, the client / stakeholder must revise these stories since he/she is the only person who knows a product market best.
A user story answers the following questions:
- who?
- does what?
- does it get what?
The formula for the good user story looks like: “As a (user) I want to (goal) in order to (benefit)”.

Bear in mind, that there could be several roles and then you have to write the user story for all the roles separately. Let’s imagine a situation when somebody wants to fill in the contact form. It is a user with an account we have one story, and if it’s an anonymous user - the story is different.
The user stories are written at all the development stages: before development, while shaping a product idea, during development itself, especially when a developer finds out that the story is actually an epic (large user story), and at the release stage for the reason that there could be unexpected difficulties during the transition.
A good user story matches the following model called “INVEST” created by Bill Wake:
- Independent. Reduced dependencies = easier to plan;
- Negotiable. Details added via collaboration (with all parties mentioned above);
- Valuable. Provides value to the customer;
- Estimable. Too big or too vague = not estimable;
- Small. Can be done in less than a week by the team;
- Testable. Good acceptance criteria.
Use a rule of thumb to estimate a story’s size: if any single story takes more than 50% of an iteration (2 weeks/10-days sprints) it should be broken into substories.
The last criteria are tricky enough, too. Let’s see what would be an acceptance criterion in the example given earlier.
“An anonymous website visitor wants to fill in a contact form to get in touch with a company regarding a project”.
The acceptance criteria here would be a possibility to fill in and send the contact form. Developers and clients could add extra technical criteria. Say, the user can be allowed to submit up to N contact forms a day.
- Write user stories engaging the whole “team” which consists of a product manager/client/stakeholder or even end-users of your product.
- Start writing stories from epics and then break them into smaller stories step by step.
- Identify user stories with numbers or letters.
- Indicate how much time is allocated for this story.
- Indicate priority, if needed. If a client needs to release a high fidelity prototype soon, put the highest priority to the main functions. Use cases will help you to find out which user stories form the base of the product.
- Clarifying user stories from a technical point of view (do not include technical features in the story!), for example, how the product’s bugs should be displayed and processed. Usually, it’s a product owner who sets technical requirements and acceptance criteria.
- Using epics for tasks. Break them into substories.
- Using the stories that were not approved by a customer group representative. Hold focus groups, ask for a consultation.
- Disaggregating low priority epics into user stories. The chances are that it will be a waste of time.
- Including technical requirements.
- Making approximations about a target audience.
As a <user> I want <goal> so that <benefit>.
Above is a very simple user story template. How can something so simple be so hard to get right? User stories make up the heart of agile development. They are the primary input to the team. The team takes the user stories and creates product increments based on completing those stories. Unfortunately, getting user stories “right” is difficult to do right away. The Product Owner (or other product facing role) needs to learn how to create user stories which meet the needs of the team. This is a skill which can be learned over time, but I’m about to save you a bit of learning curve.
In order to create good user stories, start by remembering to INVEST in good user stories. INVEST is an acronym which encompasses the following concepts which make up a good user story:

Let’s cover each of them with a simple explanation.
Stories should be as independent as possible. When thinking of independence it is often easier to think of “order independent.” In other words, stories can be worked on in any order. Why is this important? It allows for true prioritization of each and every story. When dependencies come into play it may not be possible to implement a valuable story without implementing other much less valuable stories.
A story is not a contract. A story IS an invitation to a conversation. The story captures the essence of what is desired. The actual result needs to be the result of collaborative negotation between the customer (or customer proxy like the Product Owner), developer and tester (at a minimum). The goal is to meet customer needs, not develop something to the letter of the user story if doing so is insufficient! Remember, you can always ask the magic question to help drive the conversation.
If a story does not have discernable value it should not be done. Period. Hopefully user stories are being prioritized in the backlog according to business value, so this should be obvious. Some people say each story should be valuable to the customer or user. I don’t like that way of thinking because business value encompasses more than just customer or user facing value. It includes internal value which is useful for things which are normally called “non-functional requirements” or something similar. I prefer to say the story has value to the “user” in the user story. In this way it is clear who is to be satisfied. Finally, remember the “so that ” clause of the user story. It is there for a reason – it is the exact value we are trying to deliver by completing the story!
A story has to be able to be estimated or sized so it can be properly prioritized. A value with high value but extremely lengthy development time may not be the highest priority item because of the length of time to develop it. What happens if a story can’t be estimated? You can split the story and perhaps gain more clarity. Sometimes splitting a story doesn’t help though. If this situation occurs it may be necessary to do some research about the story first. Please, please, please timebox the research! If you do not, it will take all available time thereby depriving the product of something else which could have been done instead.
Obviously stories are small chunks of work, but how small should they be? The answer depends on the team and the methodology being used. I teach agile and suggest two week iterations which allow for user stories to average 3-4 days of work – TOTAL! This includes all work to get the story to a “done” state. Also remember not to goldplate user stories. You should do the simplest thing that works – then stop!
Every story needs to be testable in order to be “done.” In fact, I like to think of testable meaning acceptance criteria can be written immediately. Thinking this way encourages more collaboration up front, builds quality in by moving QA up in the process, and allows for easy transformation to an acceptance test-driven development (ATDD) process. As with negotiable above, asking the magic question can help ensure the user story is testable as well.
“A Story Point is a relative unit of measure, decided upon and used by individual Scrum teams, to provide relative estimates of effort for completing requirements“
Story Points are intended to make team estimating easier. Instead of looking at a product backlog item and estimating it in hours, teams consider only how much effort a product backlog item will require, relative to other product backlog items.
Ok, so it makes estimating easier but how is that useful? Story Points are of no value whatever to a business because they can’t be used to predict cost or delivery dates. Even the Scrum team cannot make any predictions as to how many Story Points it can complete in a sprint (velocity) until it’s got a few sprints under it’s belt, some months down the road.
For hundreds of years we’ve had standard units of time. Why can’t we use hours or days? Well, in a nutshell, because your hour is not the same as my hour.
If you ask two developers to estimate the same task, you’ll get two different answers. While some of the difference might be explained by gaps in the specification or understanding, the fact is that developers have different knowledge and experiences so it will take more or less time to do the same work.
Ask those same two developers to rate the amount of effort required to complete one product backlog item relative to another product backlog item and you’re far more likely to end up with a consensus.
So, up until now, you may have been unconvinced about the need to use Story Points. Ok, they show the relative effort to complete work on different product backlog items but how does that help anything? Until we understand what the team’s velocity is, we still can’t predict when product backlog items are likely to be completed. Worse, if the membership of the team changes, the velocity will change and we won’t know what that new velocity is until some time down the road.
But to try and match Story Points to hours is missing the point. What’s important is how many Story Points a team can complete in a sprint, known as the velocity. When you know this, you can make some predictions and you know what, they’re likely to be good. Very good.
The real reason for using Story Points is that they’re accurate
Chances are that you’ve had the experience of being given an estimate that turned out to be completely wrong—the car wasn’t repaired in two days or the table at the restaurant wasn’t ready in 15 minutes.
If estimates can be inaccurate, why are they important to project planning?
It’s a matter of setting the right expectations and determining how much work is realistic to complete in a given timeframe—teams need to account for a project’s complexity in order to decide the amount of effort required, the number of resources needed, and ultimately, how much time it will take to complete the project.
Many developers in Agile environments have successfully improved the estimation process using the Fibonacci scale or a modified Fibonacci sequence to estimate the work that needs to be completed in an iteration.
Learn what the Fibonacci sequence is and how you can apply it to Agile estimations.
Fibonacci was an Italian mathematician in the Middle Ages who wrote a book called Liber Abaci (Book of Calculation). This book introduced and popularized the Hindu-Arabic numeral system in the Western world. In Liber Abaci, Fibonacci also presented the following problem:
A certain man put a pair of rabbits in a place surrounded on all sides by a wall. How many pairs of rabbits can be produced from that pair in a year if it is supposed that every month each pair begets a new pair which from the second month on becomes productive?
To estimate the answer, Fibonacci introduced an exponential sequence of numbers, now known as the Fibonacci number or Fibonacci sequence. In the sequence, each number is the sum of the preceding two numbers:
0, 1, 2, 3, 5, 8, 13, 21…
The Fibonacci sequence is found in many different disciplines and in nature. For example, it has been used to describe plant life growth, estimate population increases over a specified timeframe, model virus breakouts, and predict the behavior of financial markets.
But what does this long string of numbers have to do with Agile planning?
Essentially, the Agile Fibonacci scale gives teams a more realistic way to approach estimates using story points. Story points are used to represent the size, complexity, and effort needed for completing or implementing a user story. Each story point is assigned a number from the Fibonacci scale. The higher the number, the more complex the story point, and presumably, the amount of effort it will take to complete.
As discussed previously, estimates can often be inaccurate—and that happens because people tend to be overly optimistic.
For example, instead of making an estimate based on a similar project we completed in the past, we believe we can get it done faster because we are more experienced and we are sure that this time there won’t be any problems that cause delays.
Because the Agile Fibonacci Scale is exponential rather than linear, it helps teams to be more realistic when looking at larger, more complex tasks.
To help you understand why the exponential nature of the Fibonacci series is helpful, we’ll paraphrase an analogy used by Mike Cohn, one of the founders of the Scrum Alliance:
Imagine holding a one-pound weight in one hand and a two-pound weight in the other. Without looking, you are likely able to determine which is which because the 2-pound weight is noticeably heavier—the two-pound weight is 100% heavier than the 1-pound weight).
If you were to hold a 20-pound weight and a 21-pound weight, it is harder to determine which is heavier because the difference between the weights is not that significant—the 21-pound weight is only 5% heavier.
Each number in the Fibonacci scale is exponentially larger (by about 60%) than the previous number. Teams can more easily recognize the differences and define the complexity of each story point.
Many Agile teams use the planning poker technique for estimating story points.
This technique involves card decks with Fibonacci numbers starting with zero (0, 1, 2, 3, 5, 8, 13, 21, etc.) or a modified version of the sequence (0, .05, 1, 2, 3, 5, 8, 13, 20, 40, 100). Your team can use any number sequence with a fixed ratio (e.g., 1, 2, 4, 8, etc.) as long as the team understands and agrees with what the ratios mean.
Each member of the estimation team, aside from the moderator, needs their own deck of cards, and the planning poker technique proceeds with these steps:
- The product owner gives the team an overview of a user story.
- The team is given time to discuss and ask questions to get a better understanding of risks and assumptions. Team members should not mention any estimation numbers so that estimates are not biased. The moderator should record a summary of the discussion and can use a timer to limit the discussion time.
- Each team member chooses a card to represent their estimate of the story and places it facedown on the table.
- Team members turn over their cards simultaneously.
- If everybody selects the same number, you’re done. That number is used for the estimate, and you can move on to the next story.
- Individuals who have selected numbers that are significantly higher or lower than other numbers are given time to justify their estimates. For example, the task may be simple for a developer to complete (such as adding a field to a form), but that simple addition could turn out to be more complex for testers later.
- The process repeats from step 3 until the team reaches a consensus.
- The next user story is introduced for estimation and the entire process repeats.

When using the Fibonacci scale in Agile settings, your team can experience the following benefits
It is important that every member of the development team is included in the Agile estimation process. Each member gives a different perspective that helps to hone in on a more accurate and realistic estimation of the work required to complete a user story.
For example, before declaring that building a web page should only take four hours to complete, you’ll want to get input from UX, design, development, and quality assurance.
Assigning story points with linear numbers makes it difficult to determine how much weight each story point should carry.
For example, you can reasonably estimate that a story point assigned the number two is twice as complex as a story point assigned the number one. But, how much more complex is a number 12 compared to a number 11?
The exponential nature of the Fibonacci Scale makes it easy for the entire team to understand what the assigned numbers mean.
For example, a 1 could mean that complexity is minimal, and the story point can be delivered quickly (within an hour). Several of these tasks can be completed in a day. A 13 means the story point is very complex and could take weeks to complete.
By assigning story points higher numbers, it forces the team to realistically look at the complexity and effort required to complete the task, which can lead to more accurate estimates.
Something so big it probably won't fit into a sprint, is not clearly understood in terms of customer requirements and should be broken down into stories. T-shirt sizing is a common way to size epics. Another way is to say we think it could take X to Y iterations to do this work. Epics are usually defined during initial product roadmapping and decomposed into stories in the product backlog as more is learned.
Something actionable and small enough to fit in a sprint. These are story pointed and defined using INVEST criteria. Stories should deliver a vertical slice of functionality to the customer that is valuable and complete by the end of an iteration. Stories are usually created throughout product development, more so leading up to iteration planning and also during higher level product roadmapping.
Decomposed parts of a story that get into HOW the story will be completed. Tasks can be hour estimated if desired. Tasks are usually defined by the people doing the work (developers, QA, etc), whereas stories and epics are generally created by the customer or the product owner representing the customer. Tasks are created within the bounds of an iteration because they are short-lived. There is very little value is tasking out stories that won't be worked on in the upcoming iteration.
A Product Owner puts an epic on the backlog that says: "Simple website for the HR department".
As it approaches the top of the backlog they break it down in to stories that include:
As an employee I want to see the latest news from HR so that I am informed of what is going on.
As an employee I want to know the contact names of all the people in HR so that I know who to phone/email when I have a question.
As an employee I want to have access to HR policy documents so that I can be sure I am following policy.
The Product Owner talks the team through these stories and describes how they see this information being displayed on the home page of the site.
The team takes the first story and breaks it down in to tasks:
Create a basic home page layout
Make a CSS that follows the company style guide
Make the news story list update from a file that can be edited by the HR team
etc.
A sprint is a short, time-boxed period when a scrum team works to complete a set amount of work. Sprints are at the very heart of scrum and agile methodologies, and getting sprints right will help your agile team ship better software with fewer headaches.
“With scrum, a product is built in a series of iterations called sprints that break down big, complex projects into bite-sized pieces," said Megan Cook, Group Product Manager for Jira Software at Atlassian.
Many associate scrum sprints with agile software development, so much so that scrum and agile are often thought to be the same thing. They’re not. Agile is a set of principles and scrum is a framework for getting stuff done.
The many similarities between agile values and scrum processes lead to a fair association. Sprints help teams follow the agile principle of "delivering working software frequently," as well as live the agile value of "responding to change over following a plan." The scrum values of transparency, inspection, and adaptation are complementary to agile and central to the concept of sprints.

The scrum folks really did think of everything. In order to plan your upcoming sprint, you use the sprint planning meeting! Sprint planning is a collaborative event where the team answers two basic questions: What work can get done in this sprint and how will the chosen work get done?
Choosing the right work items for a sprint is a collaborative effort between the product owner, scrum master, and development team. The product owner discusses the objective that the sprint should achieve and the product backlog items that, upon completion, would achieve the sprint goal.
The team then creates a plan for how they will build the backlog items and get them “Done” before the end of the sprint. The work items chosen and the plan for how to get them done is called the sprint backlog. By the end of sprint planning the team is ready to start work on the sprint backlog, taking items from the backlog, to “In-progress,” and “Done."
During a sprint, the team checks in during the daily scrum, or standup, about how the work is progressing. The goal of this meeting is to surface any blockers and challenges that would impact the teams ability to deliver the sprint goal.
After a sprint, the team demonstrates what they’ve completed during the sprint review. This is your team’s opportunity to showcase their work to stakeholders and teammates before it hits production.
Round out your sprint cycle with my favorite meeting, the sprint retrospective. This is your teams opportunity to identify areas of improvement for the next sprint. With that, you’re ready to start your next sprint cycle. Onward!
Even with the basics down, most teams will stumble as they start to run sprints. Megan Cook rounds out this discussion with some Do's and Don’ts she's picked up over the years.
Do:
- Make sure the team sets and understands the sprint goal and how success will be measured. This is the key to keeping everyone aligned and moving forward toward a common destination.
- Do ensure you have a well-groomed backlog with your priorities and dependencies in order. This can be a big challenge that could derail the process if it’s not properly managed.
- Ensure you have a good understanding of velocity, and that it reflects things like leave and team meetings.
- Do use the sprint planning meeting to flesh out intimate details of the work that needs to get done. Encourage team members to sketch out tasks for all stories, bugs, and tasks that come into the sprint.
- Leave out work where you won’t be able to get the dependencies done, like work from another team, designs, and legal sign-off.
- Finally, once a decision or plan is made, make sure someone captures that information in your project management or collaboration tool, like your Jira tickets. That way, both the decision and the rationale are easy for everyone to see later.
While you’re working on being a scrum all-star with these “do’s,” watch out for a few red flags too:
Don't:
- Don’t pull in too many stories, overestimate velocity, or pull in tasks that can’t be completed in the sprint. You don’t want to set yourself or your team up for failure.
- Don’t forget about quality or technical debt. Make sure to budget time for QA and non-feature work, like bugs and engineering health.
- Don’t let the team have a fuzzy view of what's in the sprint. Nail it down, and don’t focus so much on moving fast that you forget to make sure everyone’s moving in the same direction.
- Also, don’t take on a large amount of unknown or high-risk work. Break down stories that are large or have high uncertainty, and don't be afraid to leave some of that work for the next sprint.
- If you hear concerns from the team, whether it’s about velocity, low-certainty work, or work they think is bigger than what they estimated, don’t ignore it. Address the issue, and recalibrate when necessary.
Jira will turn your dev team into one of the most productive in your industry. Want proof? It’s trusted by 65,000+ organizations worldwide, including innovative leaders like Cisco, Square, Spotify, eBay, and Airbnb.
In addition to project management, Jira is also known for its bug tracking functionality. That’s one of the many reasons why this tool is popular amongst software development teams.

Compared to other agile project management solutions for IT teams and developers, Jira is second to none. Recently, Jira has attempted to pivot some of its products for all types of teams and organizations. This includes project management solutions for marketing, operations, HR, finance, legal, and other use cases.
But the project management and issue tracking solutions for software developers remain Jira’s top software offering. We recommend Jira for technical-minded project teams.
This is the project management and issue tracking solution that makes project management a breeze. When most people refer to “Jira” they’re referring to Jira Software, even though there are several other Jira products.

Again, this solution is designed specifically for agile software development teams. It helps agile teams plan sprints, allocate tasks, and prioritize work with total transparency and team visibility.
Most team members will spend the majority of their time on the Kanban and scrum boards. However, the issue tracking functionality will likely be a close second.
Jira Software makes it easy for development teams to plan, track, and manage releases of software versions. Project managers love Jira’s total transparency and custom reporting options. The customized workflow tools help teams improve efficiencies at every level as well.
Here are some of Jira Software’s top features and highlights at-a-glance:
- Scrum and Kanban boards
- Bug and issue tracking
- 3,000+ app integrations
- Agile reporting
- Custom workflows
- Roadmaps
- Advanced permissions
- Project roles and project archiving
- Audit logs
Overall, Jira Software is the gold standard in the world of agile project management for software development teams. There’s really nothing else on the market today that comes close. But for non-technical users and general project management, Jira Software will be too complicated to accommodate those needs. There are better solutions out there for use cases other than software development.
-
Powerful Agile Tools: Jira is built for agile and Scrum project management. The software comes with scrum boards and Kanban boards so teams can visualize workflows and see the progress of tasks in real-time. It’s easy for managers to understand which tasks are doing well and which ones are delayed. Jira supports agile sprints and multiple project views, like user stories and story points.
-
Bug Tracking and Issue Management: Atlassian initially developed Jira to track bugs in software projects. This functionality remains a core component of Jira’s project management solution today. The tool makes it easy for developers to locate, track, and record bugs within the software. All bugs and issues can be viewed in the backlog. With all issues in a single view, Jira makes it easy for teams to prioritize which bugs should be addressed first.
-
Fantastic Reporting: The software comes out-of-the-box with 12+ reports. These allow managers to gain actionable insights into their team’s performance in real-time. Burndown charts, sprint reports, velocity charts, version reports, burnup charts, and cumulative flow diagrams are just a handful of examples of the agile reports offered by Jira.
-
Highly Customizable: Custom workflows allow teams to create a visual representation of their processes. This helps improve accountability and transparency throughout a project. Aside from the workflows, other areas of Jira, like reports and scrum boards, can be fully customized as well. Developers can even use Jira to create custom filters using JQL (Jira Query Language). Jira integrates with 3,000+ third-party apps, so teams can truly extend the software’s functionality.
-
Supports Multiple Use Cases: Jira is definitely geared toward software development teams. But with that said, there are some versions of Jira designed to support other departments in an organization. Marketing teams can use this software to plan complex product launches and large-scale events. Human resources teams can create custom workflows to improve their hiring and onboarding process. The software can even be used to measure operational performance. Jira has an extensive list of product offerings, covering everything from agile project management to ITSM.
-
Safe and Secure: In today’s day and age, data security can’t be overlooked. Jira allows admins to create custom roles for team members with full control over who has access to what. The software is compliant with GDPR, PCI DSS, ISO/IEC 27001, ISO/IEC 27018, SOC 2, SOC 3, and more. All data is encrypted using TLS 1.2+, and servers containing user data use AES 256 encryption.
-
Designed for Technical Users: Non-technical users will likely struggle with Jira. It doesn’t have the friendliest user interface, and the setup can be a bit challenging. Developers and software engineers won’t have any problems here, but the average person will find Jira confusing.
-
Limited Collaboration Tools: Aside from the scrum and Kanban boards, Jira doesn’t really support team collaboration. You can always integrate Jira with a third-party app like Slack or another collaborative tool, but the software is limited out of the box. Atlassian offers other solutions for collaboration, such as Confluence and Trello.
-
No Timeline Views: Lots of project management software comes with a Gantt chart or timeline view. Jira does not. Timelines are useful for seeing which tasks and subtasks are connected with one another. With a timeline view, project managers can adjust schedules if a problem arises in one task that will impact others. To get this type of functionality, you’d have to get a separate Gantt chart app and connect it to Jira through the Atlassian marketplace.
*This process is subject to change
Typically, your Development Manager will have already created a Scrum or Kanban project, and populated the backlog with issues. There are a number of ways to navigate around your project, but the easiest way to view information is by using boards. A board displays issues from one or more projects – it gives you a flexible way of viewing, managing, and reviewing your work. In this step, we describe how you would typically find an issue to work on, in the active sprint of the board of a Scrum project.
- Select Boards from the top menu, and then select a board from the drop-down list.
- Select Active sprints to see the issues in the sprint of the selected board.
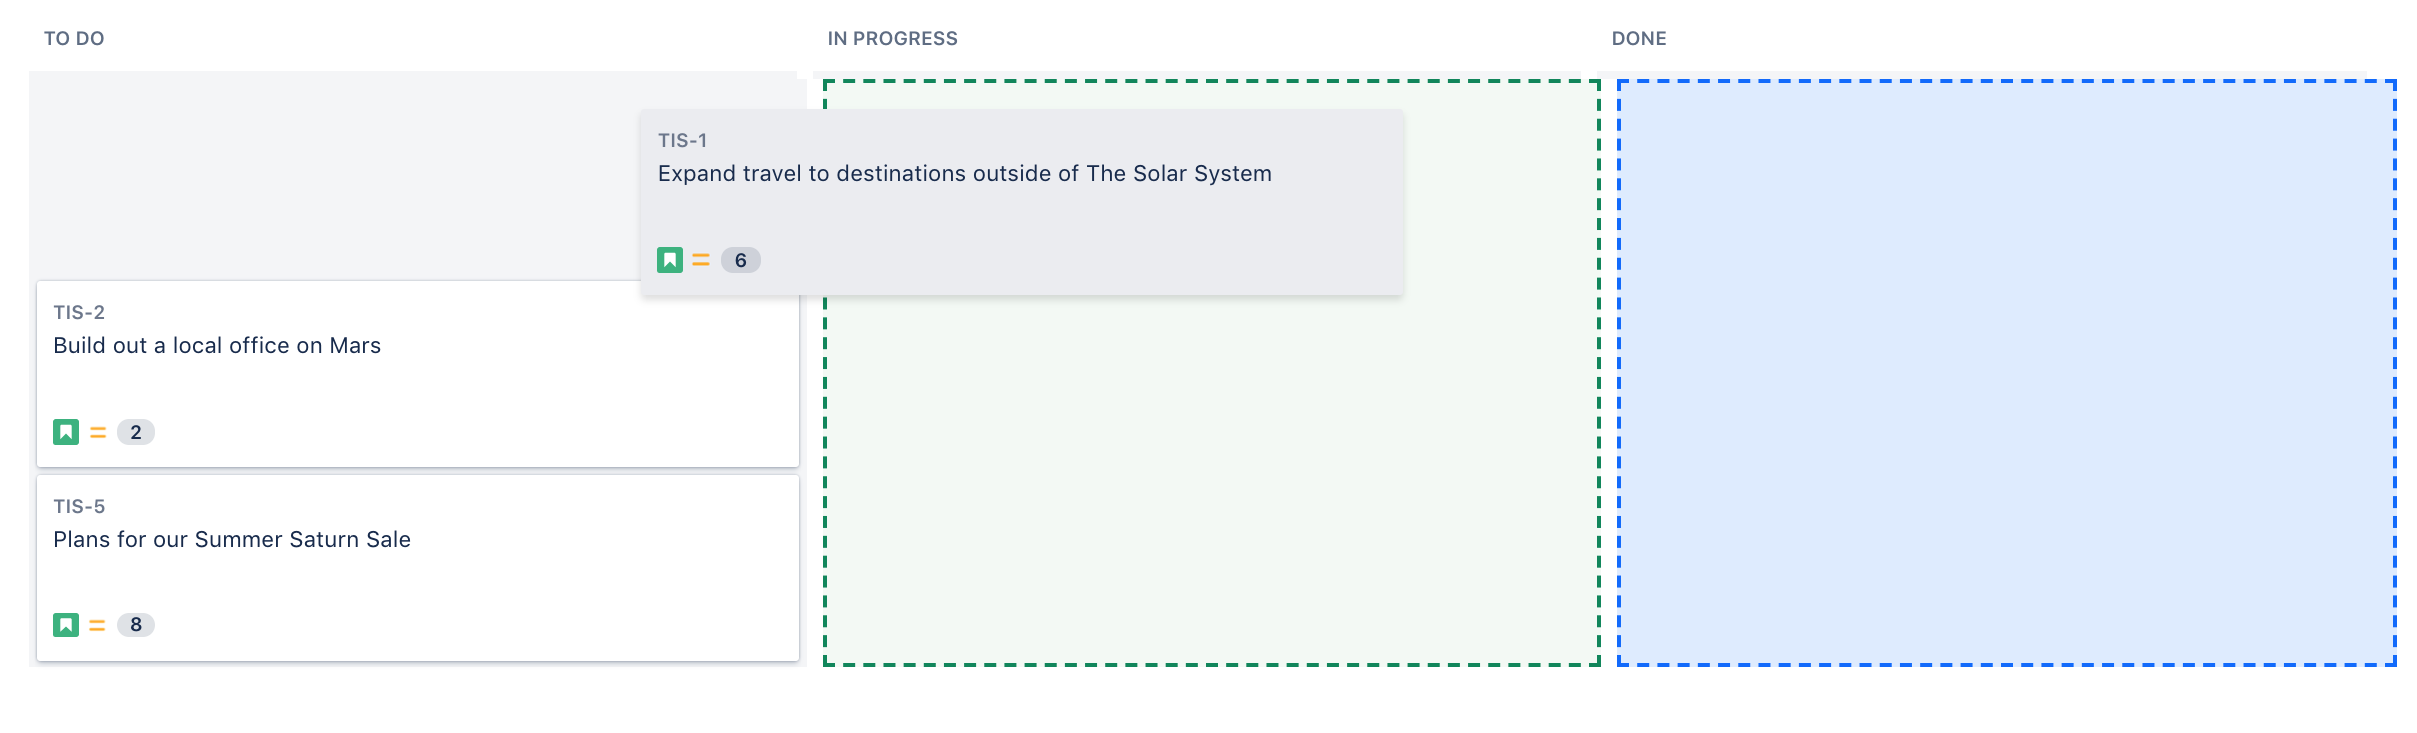
- Issues are represented by issue cards in the Active sprints of your board. The cards show quick reference information, like issue keys, assignees, and descriptions. Locate the top card in the To Do column and drag it to the In Progress column. By doing this, you are actually moving to assign the issue to yourself, and start working on it.
By moving an issue to In Progress, you are indicating that work has started on it. At this stage, you will need to assign it to yourself, so that everyone knows who is working on it. You may also want to add some technical details about the issue – it's helpful for your teammates to know as much information as possible about the issues you're working on.
- In the Active sprints of your board, select the issue in the In Progress column. The issue is displayed in the Issue Detail view.
- In the Issue Detail view, select Edit from the 'cog' drop-down. The 'Edit Issue' dialog will be displayed.
- If the issue is not assigned to you yet, type your name in the Assignee field.
- Add some technical details about the issue as necessary. Note, you may want to specify a component or a version (if components and versions have been configured for your project), or add attachments as needed, etc.
- When you're done adding technical details, click the Update button.
After assigning an issue to yourself and entering technical details about the issue, you're ready to do some coding. It is recommended that you create a branch when you start working on an issue. This way, you'll have your own stream of work that won't interfere with the rest of the team's work. It also ensures that your changes get reviewed before being merged back into the master branch.
Before creating a branch, you should already know how to use branches in GitKraken.
- Select the issue for which you want to create a branch.
- In the Issue Detail view, locate the Development panel, and click Create branch. The Create branch dialog will be displayed.
- Include the issue key in the branch name.
- Enter other details for the branch as necessary.
- Click the Create branch button. Your branch will be created in your source repository.

Implement code, art, fixes as necessary. Update your task in Jira with screenshots and important details as you work(where applicable)
For programmers Move your task to For Review. Create a pull request for your feature/fix branch.

Once your work/pull request is approved...
Move your task to Deployed
A “commit” in github is essentially just making a save point in your work. Commits should happen often, for any small step you take that you’d like to come back to. If you’ve ever had something go wrong while playing a game and had to reload the save, only to lose like 2 hours of progress, you can understand why you would want to make lots of small, frequent save points.
To make your commits, follow these steps:
- Make sure that everything you’re committing is saved. It’s usually best to close out of the engine to be sure you didn’t miss anything.
- On GitKraken, familiarize yourself with the panel below.
- A. This shows the number of files changed since the last commit. The trash can button will delete all changes made, rolling your work back to the last commit.
- B. This shows all “unstaged” files. These are files that have been changed, but have not been selected to have those changes committed. You can stage each file individually or stage all of them at once.
- C. This area will list all “staged” files. Files here have been selected to go into the commit, to have their changes saved. You can unstage files if needed.
- D. The commit message/summary is mandatory, and should be a very brief description of the changes. The description is optional, and is for if you need to add more notes/explanations to your commit summary.
- E. This is the button to finalize your commit. Once you have files staged and a summary for them, you’ll be able to click it and commit your changes.
- Stage the files you want to save the changes to
- NOTE: Sometimes Unreal makes changes to files you didn’t mean to change. Only stage the files that you intentionally changed
- If there are files that you don’t want to save the changes to, after your commit you can hit the delete button (A) to undo the changes to them.
- Give your commit a summary to describe what the changes are
- Commit your files!

The first thing to do when you’re ready to put up your pull request (PR) is to make sure everything is in order on your end. Check that you’ve got everything saved and close out of Unreal Engine. Go over your commits and make sure that you’ve only changed the files you intended to mess with. Check that all of the files and changes conform to the style guide. Test your changes so that you can be sure everything works properly.
Once you’re confident that everything is ready, follow these steps:
-
Push your branch up to the origin (the button is in the top-middle of GitKraken)
- Do this so that there is a finished version of your branch saved somewhere other than just your personal computer, just in case something happens during the merging process
- Once this is done, don’t push anything else until the very end
- Swap to the dev branch and pull it to make sure it’s up to date
- You can swap branches by double clicking on their name, either in the sidebar on the left or in the flow chart in the middle
- The pull button is next to the push button, in the top-middle of the screen
- Once dev is up to date, there are two options
- If you’re concerned about potential merge conflicts (i.e. if you think you’ve been working on the same files as another branch, etc.), go to step 4
- Otherwise, go to step 5
- [If you’re worried about merge conflicts] Swap back to your working branch and make a new branch from it. The name of the branch isn’t important, it’s basically a burner branch. Something like “merge-testing” would be appropriate
- The branch button is next to the push button as well (top-middle area)
- Merge dev into your branch. If you’re using a testing branch, merge it into that one. Otherwise, merge it into your working branch.
- To do this, while on the branch you’re merging into, right-click on the dev branch
- Choose the option that says “Merge dev into [branch name]”
- If no changes have been made to dev since you made your branch, the option may say “Merge [branch name] into dev” instead. If it does, DO NOT CLICK IT. Only ever merge dev into your branch
- Work through any merge conflicts that happen. Most of the time, as long as you’re careful not to work on the same files as someone else, there won’t be any. But if there are conflicts, don’t hesitate to reach out and ask for help working through them. You may need to work with whoever was also working on the conflicted files to get it fixed.
- After you’re done with the merge, open the engine back up and check that all of your work is how it’s supposed to be. Make sure everything is still there and working properly. Test as much as you need to.
- If something’s not okay, reach out immediately for help. Just don’t commit any changes that aren’t good.
- If you made a testing branch for this PR, once everything is good you should either merge that testing branch into your original working branch, or (if nothing went wrong in the merge) just merge dev into your original branch
- Push your branch up to the origin again, and go make your pull request!
After following the above steps for committing your changes and preparing for your pull request, you’re now ready to actually make the pull request. To do so:
- Navigate to the project repository on github’s website
- Under the project’s name, go to the “Pull requests” tab and click the green “New pull request” button on the right side
- When you get to the repo initially, there may be a banner that says that your branch had recent pushes to it. If so, you can just click the button on that to start the PR
- Under the heading “Comparing changes”, there will be a banner with two dropdowns. Before starting your PR, set the base branch to “dev” and the compare branch to the one you’re making the PR for, then click “Create pull request”
- On the “Open a pull request” page, the fields for the title and the body of the pull request should automatically fill with the name of your branch and our pull request template, respectively
- Reformat the title. It must start with the tag for the Jira card associated with the changes you’ve been working on
- It should be formatted as “ATJ-###” followed by a name for the work in title-case, i.e. “ATJ-1234 Park Foliage Placement”
- Fill out the body template with each step:
- Description: Give a rundown of all of the changes that you made
-
Checklist: Check that each of these items is true/do the task required of them, and once they’re good you can replace the space inside the square brackets with an x to check them off (“[ ]” → “[x]”)
-
“Pull Request target branch is NOT #main” means to make sure the branch selected for the base branch of the PR is set to dev, not main
-
To request a reviewer, click the gear icon on the right sidebar next to “Reviewers” and select the person or people who would be most appropriate to review your work. Usually, this would be the project manager, producer, and/or your team lead
-
- Related Card: If your PR closes out more than one Jira card, paste a link to the one(s) not included in the title here
- Context, Testing, Screenshots: Exactly as described in the template, just answer the questions asked. Filling out each of these is important! If you’ve got anything at all visual, add screenshots or even a video recording
- Once everything is filled out, create the pull request!
- At least one of your reviewers should look over it soon and leave a response. If everything’s good, they’ll approve it to be merged. If not, they’ll request changes or clarifications on things. Read their feedback, and respond appropriately
- In the case of requesting changes, make those changes and respond back to let them know
- Usually the reviewer will go ahead and merge your branch once they approve it. If your PR is approved but not merged, you can merge it yourself

The basic building block of working with github. A commit saves a snapshot of the project that you can go back to if needed. It’s stored on your local branch until pushed.
Sending the local version of your branch, with each commit, to be stored on the origin. This means that there is a version of your work hosted remotely, rather than it only being stored on your local machine.
Grabbing the files from the origin version of the branch you’re pulling, and storing them on your local machine. This only updates a single branch with a new version of that branch; it doesn’t merge two different branches.
This is a formal request to have the changes made in your branch merged into the base branch of the project.
Selecting files to be committed. Only staged files will be included in a commit.
Removing files from the list of changes that will be committed.
Merging takes two branches of the repository and combines them together. The base branch takes on the new changes from the compared branch, and the compared branch is left unchanged. You merge a compared branch into the base branch.
A conflict occurs during a merge if a file has had conflicting changes made to it on the two branches. To resolve the conflict, you decide which changes or version of the file to keep. If both sets of changes are equally important, you may need to redo one set of changes in the other version of the file. Never try to resolve merge conflicts without consulting the team, so we can be sure no one loses their work.
Something that is saved on your local machine.
AKA remote. The version of the repository stored on Github. Not local.
Create a branch in your repository.
By creating a branch, you create a space to work without affecting the default branch. Additionally, you give collaborators a chance to review your work.
On your branch, make any desired changes to the repository.
Your branch is a safe place to make changes. If you make a mistake, you can revert your changes or push additional changes to fix the mistake. Your changes will not end up on the default branch until you merge your branch.
Commit and push your changes to your branch. Give each commit a descriptive message to help you and future contributors understand what changes the commit contains.
Ideally, each commit contains an isolated, complete change. This makes it easy to revert your changes if you decide to take a different approach. For example, if you want to rename a variable and add some tests, put the variable rename in one commit and the tests in another commit. Later, if you want to keep the tests but revert the variable rename, you can revert the specific commit that contained the variable rename. If you put the variable rename and tests in the same commit or spread the variable rename across multiple commits, you would spend more effort reverting your changes.
By committing and pushing your changes, you back up your work to remote storage. This means that you can access your work from any device. It also means that your collaborators can see your work, answer questions, and make suggestions or contributions.
Create a pull request to ask collaborators for feedback on your changes. Pull request review is so valuable that some repositories require an approving review before pull requests can be merged. If you want early feedback or advice before you complete your changes, you can mark your pull request as a draft.
When you create a pull request, include a summary of the changes and what problem they solve. You can include images, links, and tables to help convey this information. If your pull request addresses an issue, link the issue so that issue stakeholders are aware of the pull request and vice versa. If you link with a keyword, the issue will close automatically when the pull request merges.
Reviewers should leave questions, comments, and suggestions. Reviewers can comment on the whole pull request or add comments to specific lines. You and reviewers can insert images or code suggestions to clarify comments.
You can continue to commit and push changes in response to the reviews. Your pull request will update automatically.
After your pull request is merged, delete your branch. This indicates that the work on the branch is complete and prevents you or others from accidentally using old branches. For more information, see "Deleting and restoring branches in a pull request."
Don't worry about losing information. Your pull request and commit history will not be deleted. You can always restore your deleted branch or revert your pull request if needed.
Giflow is an alternative Git branching model that involves the use of feature branches and multiple primary branches. It was first published and made popular by Vincent Driessen at nvie. Compared to trunk-based development, Giflow has numerous, longer-lived branches and larger commits. Under this model, developers create a feature branch and delay merging it to the main trunk branch until the feature is complete. These long-lived feature branches require more collaboration to merge and have a higher risk of deviating from the trunk branch.
Gitflow can be used for projects that have a scheduled release cycle and for the DevOps best practice of continuous delivery. This workflow doesn’t add any new concepts or commands beyond what’s required for the Feature Branch Workflow. Instead, it assigns very specific roles to different branches and defines how and when they should interact. In addition to feature branches, it uses individual branches for preparing, maintaining, and recording releases. Of course, you also get to leverage all the benefits of the Feature Branch Workflow: pull requests, isolated experiments, and more efficient collaboration.
Gitflow is really just an abstract idea of a Git workflow. This means it dictates what kind of branches to set up and how to merge them together. We will touch on the purposes of the branches below.

Instead of a single main branch, this workflow uses two branches to record the history of the project. The main branch stores the official release history, and the develop branch serves as an integration branch for features. It's also convenient to tag all commits in the main branch with a version number.

Each new feature should reside in its own branch, which can be pushed to the central repository for backup/collaboration. But, instead of branching off of main, feature branches use develop as their parent branch. When a feature is complete, it gets merged back into develop. Features should never interact directly with main.
Note that feature branches combined with the develop branch is, for all intents and purposes, the Feature Branch Workflow. But, the Gitflow workflow doesn’t stop there.
Feature branches are generally created off to the latest develop branch.

Once develop has acquired enough features for a release (or a predetermined release date is approaching), you fork a release branch off of develop. Creating this branch starts the next release cycle, so no new features can be added after this point—only bug fixes, documentation generation, and other release-oriented tasks should go in this branch. Once it's ready to ship, the release branch gets merged into main and tagged with a version number. In addition, it should be merged back into develop, which may have progressed since the release was initiated.
Using a dedicated branch to prepare releases makes it possible for one team to polish the current release while another team continues working on features for the next release. It also creates well-defined phases of development (e.g., it's easy to say, “This week we're preparing for version 4.0,” and to actually see it in the structure of the repository).

Maintenance or “hotfix” branches are used to quickly patch production releases. Hotfix branches are a lot like release branches and feature branches except they're based on main instead of develop. This is the only branch that should fork directly off of main. As soon as the fix is complete, it should be merged into both main and develop (or the current release branch), and main should be tagged with an updated version number.
Having a dedicated line of development for bug fixes lets your team address issues without interrupting the rest of the workflow or waiting for the next release cycle. You can think of maintenance branches as ad hoc release branches that work directly with main.
Some key takeaways to know about Gitflow are:
- The workflow is great for a release-based software workflow.
- Gitflow offers a dedicated channel for hotfixes to production.
The overall flow of Gitflow is:
- A develop branch is created from main
- A release branch is created from develop
- Feature branches are created from develop
- When a feature is complete it is merged into the develop branch
- When the release branch is done it is merged into develop and main
- If an issue in main is detected a hotfix branch is created from main
- Once the hotfix is complete it is merged to both develop and main

- Practical Studio Information
- Company Strategic Documents
- Dress Code
- Working Hours Strategy
- Personal and Company Devices
- HR Policies
- Management Structure
- Employee Org Chart
- Resource Setup
- Key Operations Overview
- Repository Guidelines
- Project Board Guidelines
- Pull Request Guidelines
- Issue Submission Guidelines