WEContentExtension is extension SDK on WebEngage to support Rich push layouts inside iOS Applications
Click to Expand
- WebEngage SDK needs to be integrated inside project
- Basic knowledge of Service Extension and Content Extension
- Basic knowledge about push notification , swift / Objc Programing Langage
-
This guide provides step-by-step instructions for integrating a content extension into your iOS project. Content extensions allow you to extend the functionality of your app by providing additional content that can be displayed in various contexts, such as the Today view or Messages app.
-
Open your Xcode project.
-
From the menu, select
File>New>Target.... -
Choose
App Extensionfrom the list of templates. -
Select the type of extension you want to create (e.g., ContentExtension).
-
Provide a name for your extension and click
Finish.
-
-
There are 2 common methods for integrating a library inside a Content Extension:
It's recommended to choose either Swift Package Manager or CocoaPods for integrating the library into your Content Extension. Mixing both methods might lead to conflicts or inconsistencies in your project setup.
-
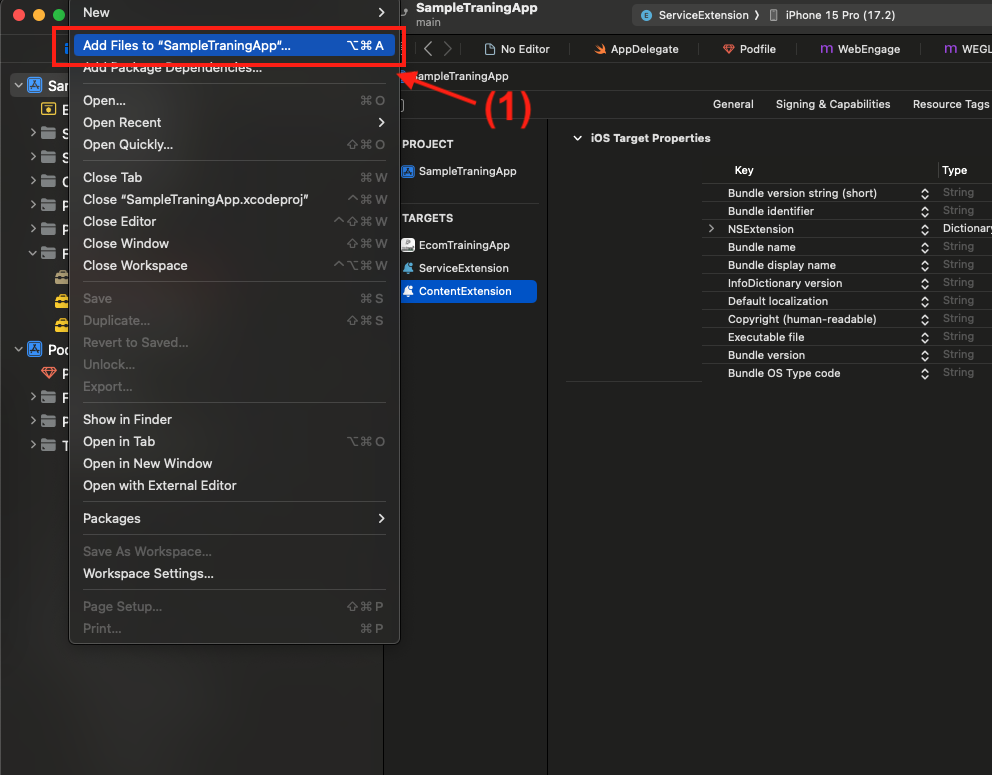
- Navigate to
File>Swift Packages>Add Package Dependency....
-
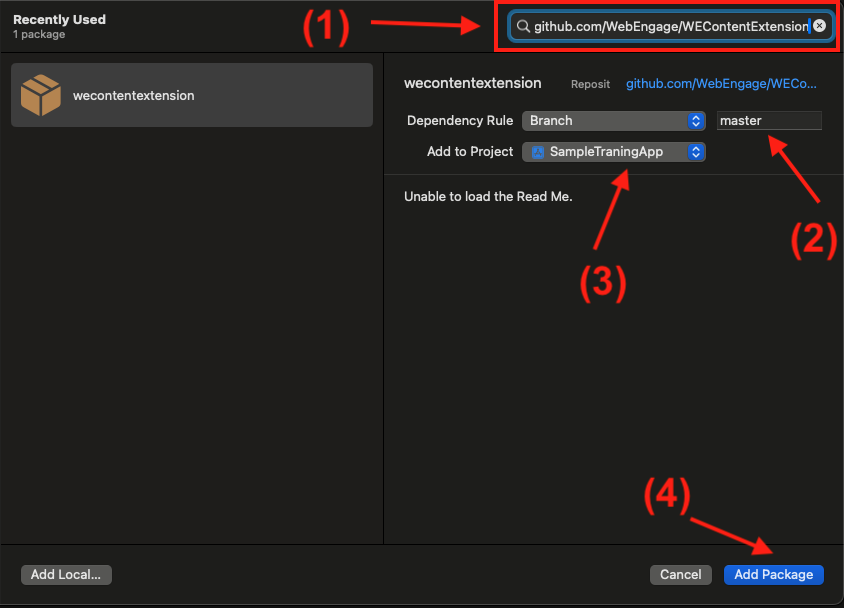
Enter the URL of the library's repository:
https://github.com/WebEngage/WEContentExtension. -
Click
Next. -
Select the branch to use or enter a specific branch requirement (master).
-
Click
Next.
-
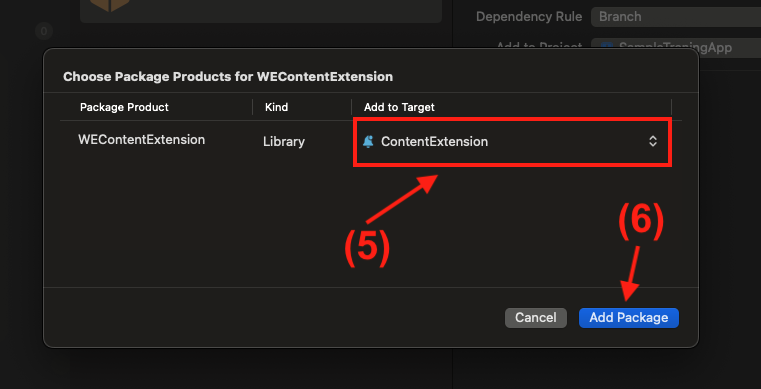
Choose the target to which you want to add the dependency, i.e., your Content Extension target.
-
Click
Finish.
- Navigate to
-
-
Cocoapods should be installed inside your system
-
podfile should be available for your project
-
-
-
Open the Podfile using a text editor.
-
Add the library dependency to the Podfile. For example:
# this target name should be your ContentExtension Name
target 'ContentExtension' do
  pod 'WEContentExtension'
end
Note : Your target name should be the Content Extension name which you have entered while creating ContentExtension, Over here refer screenshot 3
-
-
-
Save the changes to the Podfile.
-
Install the pods by running the following command:
pod install
-
-
-
-
-
Open NotificationViewController.swift
-
Import WEContentExtension by adding code
import WEContentExtension -
Remove all existing code from the class
NotificationViewController -
Add subclassing to
NotificationViewControllerwithWEXRichPushNotificationViewController
NotificationViewController.swiftwill look like above below code snippetimport UIKit import UserNotifications import UserNotificationsUI // Import WebEngage Extension SDK import WEContentExtension // Subclassing current class with WebEngage provided class class NotificationViewController: WEXRichPushNotificationViewController { // remove all existing code inside this class }
-
-
-
Open NotificationViewController.m
-
Import
WEContentExtension -
Create Object of
WEContentExtension -
Pass necessary information to
WebEngagethrough above created object
NotificationViewController.mwill look like above below code snippet#import "NotificationViewController.h" #import <UserNotifications/UserNotifications.h> #import <UserNotificationsUI/UserNotificationsUI.h> // Step 1 : Importing WEContentExtension #import <WEContentExtension/WEContentExtension-Swift.h> @interface NotificationViewController () <UNNotificationContentExtension> @property IBOutlet UILabel *label; // Step 2 : Creating Object of content Extension @property WEXRichPushNotificationViewController *weRichPushVC; @end @implementation NotificationViewController // Step 3 : Pass necessary information to WebEngage - (void)viewDidLoad { if (_weRichPushVC == NULL){ _weRichPushVC = [[WEXRichPushNotificationViewController alloc]init]; } [_weRichPushVC setUpViewsWithParentVC:self]; [super viewDidLoad]; } - (void)didReceiveNotification:(UNNotification *)notification { [_weRichPushVC didReceiveNotification:notification]; } - (void)didReceiveNotificationResponse:(UNNotificationResponse *)response completionHandler:(void (^)(UNNotificationContentExtensionResponseOption))completion{ [_weRichPushVC didReceiveNotificationResponse:response completionHandler:completion]; } @end
-
-
-
Here's how you can go about it:
-
Open the
Info.plistfile forNotificationViewController -
Expand
NSExtension>NSExtensionAttributes -
Look for UNNotificationExtensionCategory under
NSExtensionAttributes. Add it if it is not present and set the type as Array In the Array items, add:- WEG_CAROUSEL_V1
- WEG_RATING_V1
- WEG_RICH_V1
- WEG_RICH_V2
- WEG_RICH_V3
- WEG_RICH_V4
- WEG_RICH_V5
- WEG_RICH_V6
- WEG_RICH_V7
- WEG_RICH_V8
-
Set
UNNotificationExtensionDefaultContentHiddenunderNSExtensionAttributestoYES -
Add App Transport Security Settings key under Information Property List in NotificationViewController
Info.plistfiles. Set Allow Arbitrary Loads toYESunder App Transport Security Settings in both these files.(Note : Above step Not required if you are sure that image URLs provided for push on WebEngage dashboard will always use https.)
-
Source code snippet for
Info.plist<key>NSExtension</key> <dict> <key>NSExtensionAttributes</key> <dict> <key>UNNotificationExtensionCategory</key> <array> <string>WEG_CAROUSEL_V1</string> <string>WEG_RATING_V1</string> <string>WEG_RICH_V1</string> <string>WEG_RICH_V2</string> <string>WEG_RICH_V3</string> <string>WEG_RICH_V4</string> <string>WEG_RICH_V5</string> <string>WEG_RICH_V6</string> <string>WEG_RICH_V7</string> <string>WEG_RICH_V8</string> </array> <key>UNNotificationExtensionDefaultContentHidden</key> <true/> <key>UNNotificationExtensionInitialContentSizeRatio</key> <real>1</real> </dict> <key>NSExtensionMainStoryboard</key> <string>MainInterface</string> <key>NSExtensionPointIdentifier</key> <string>com.apple.usernotifications.content-extension</string> </dict>
-
Info.plistshoul look like below screenshot
-
-
App Groups allow your app and the WebEngageNotificationContentExtension to communicate when a notification is received, even if your app is not active. This is required for Confirmed Deliveries.
- Select your
Main App Target>Signing & Capabilities >+ Capability>App Groups. - Within
App Groups, click the+button. - Set the App Groups container to be
group.YOUR_BUNDLE_IDENTIFIER.WEGNotificationGroupwhereYOUR_BUNDLE_IDENTIFIERis the same as your Main Application "Bundle Identifier". - Press
OKand repeat for theNotificationViewControllerTarget. -
- Select your
-
-
Build your project to ensure that the library integrates successfully.
-
Test your Content Extension to ensure that it functions as expected with the integrated library.
-
-
-
If you've been using the old content extension and want to switch to the new one, just stick to these instructions in the documentation:
-
Below are the steps to migrate from WebEngageAppEx to the WEContentExtension:
-
Remove
pod 'WebEngageAppEx/ContentExtension'from the Content Extension TargetNotificationViewControllerin the podfile. -
Then Perform
pod install -
Then Follow Step Approach 2 : Cocoapods
-
After successfully completing the above step, let's move to the code section:
-
- Open the
NotificationViewController.swiftfile. - Replace
import WebEngageAppExwithimport WEContentExtension. - Done
- Open the
-
- Open the NotificationViewController.h file.
- Remove the import statement
#import <WebEngageAppEx/WEXRichPushNotificationViewController.h>. - Replace
WEXRichPushNotificationViewControllerwithUIViewController. - Open the
NotificationViewController.mfile. - Replace the code as given in Step Objective C
-
-
-
WEContentExtension is available under the MIT license. See the LICENSE file for more info.


