


The MEAN Framework that doesn't suck.
What is the MEAN stack? Read More
The acronym stands for:
- (M)ongoDB – a noSQL document datastore which uses JSON-style documents to represent data,
- (E)xpress – a HTTP server framework on top of Node,
- (A)ngular – as you know, the JS framework offering declarative, two-way databinding for webapps and
- (N)ode – the platform built on V8’s runtime for easily building fast, scalable network applications.
Where is yeoman? See generator-anyandgo
To start working you can simply run:
$ gruntThis will:
✓ Lint the js code
✓ Run the tests
✓ Start the server
✓ Open a web browser
✓ Watch for files changes, to trigger several tasks
To add front-end libraries you can simply run:
$ bower install --save jqueryThis will:
✓ Register the dependency into bower.json
✓ Download the library inside ./public/components/
✓ Append the script into ./views/layout.jade
✓ Trigger page reload
$ gruntThe default grunt task will start the server for you.
$ grunt jshintLint javascript files under models, routes and test folders
$ grunt mochaTestsExecute all mocha tests and display the specs report
$ grunt doccoCreates documentation functionallity under models, routes and test folders and put it inside docs folder
$ grunt wiredepAppends javascript and css dependencies
$ grunt create:model:SampleWill create model and tests:
#	models/sample.js
#	test/unit/models/sample-tests.js
Will modify ./routes/main.js to append the model as dependency
   // ## Models
   /* models:start */
+  Sample  = require('../models/sample.js'),
   /* models:end */
This will automatically crete the following tests:
$ mocha test/unit/
  Database Test
    MongoDB
      ✓ Should be up and running

  Model Test Sample
    Sample
✓ add a sample $ grunt create:page:ContactWill create a public view file for the page:
# views/contact.jade
Will modify ./routes/main.js to append the model as dependency
    /* page:public:start */
+
+  // ### Contact Page
+  app.get('/contact', function (req, res) {
+    res.render('contact', { title: 'Contact', section: 'Contact' });
+  });
    /* page:public:end */
Will modify ./views/partials/site-menu.jade to append the new menu item to main menu
         // public:page:menu:start
+        li
+          a(href='/contact') Contact
// public:page:menu:end$ grunt create:rest:SampleCreates rest services for a particular model.
Will modify ./routes/main.js to append the model as dependency
/* rest:public:start */
+
+// GET /api/v1/samples
+restify.serve(app, Sample, {
+  lowercase: true,
+  lean: false,
+  prereq: function(req) {
+    console.log("pre req");
+    return true;
+  },
+  contextFilter: function(model, req, cb) {
+    console.log("context filter");
+    cb(model);
+  },
+  postProcess: function(req, res){
+    console.log("post process");
+  }
+});
/* rest:public:end */
Along with a test file:
# test/rest/models/samples-rest-tests.js
This uses superagent to test the new restful api:
$ mocha test/rest/
 Web Server
    Express
      ✓ Should be up and running (306ms)

  REST API Sample http://127.0.0.1:3000/api/v1/samples
    Samples REST
      ✓ GET /api/v1/samples
      ✓ GET /api/v1/samples/count
      ✓ POST /api/v1/samples
      ✓ PUT /api/v1/samples/:sampleId
      ✓ DELETE /api/v1/samples/:sampleId
      ✓ DELETE /api/v1/samples
This will enable the following urls:
GET      /api/v1/samples/count
GET      /api/v1/samples
PUT      /api/v1/samples
POST     /api/v1/samples
DELETE   /api/v1/samples

GET      /api/v1/samples/:id
PUT      /api/v1/samples/:id
POST     /api/v1/samples/:id
DELETE   /api/v1/samples/:id
Learn more about query, ordering, populate, and sorting with Express-Restify-Mongoose.
$ grunt create:crud:SampleCreates CRUD administration for a particular model. This uses zombiejs to test the new crud functionality.
Once you create the model and all the rest services you'll be able to generate a crud automatically. Let's imagine you need to create a CRUD for students.
$ grunt create:model:Student
$ grunt create:rest:Student
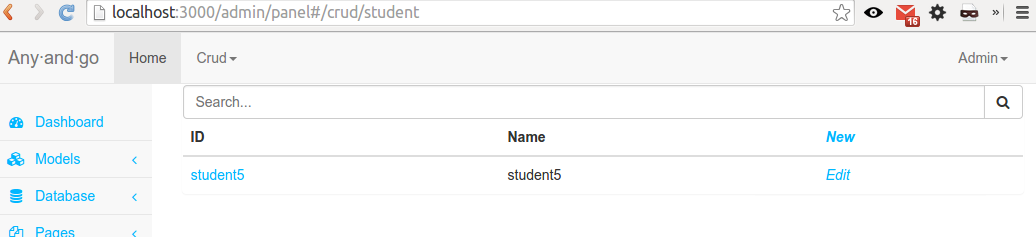
$ grunt create:crud:StudentIf you go to to http://localhost:3000/admin/panel login as administrator, and click on the Crud dropdown:

If you select Student, you'll be able to see the list where you can create, edit and delete:
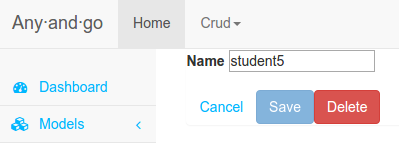
Just hit edit on one record
Now let's change our model models/student.js to add a new field called age:
// Student Model
// -----------------------------

// Modules Dependencies:
//  - Mongoose (http://mongoosejs.com/docs/guide.html)
//
var mongoose = require('mongoose'),
    Schema = mongoose.Schema;

var studentSchema = new Schema({
    name          : String,
    age          : Number,  /* <-- add this line to the model */
	created       : Date
});

// [...] More code here
After you save the file go to the administration panel again http://localhost:3000/admin/panel you'll need to login again (if you have not enabled autologin yet). If you go to edit or create you'll see the form changed a little bit:
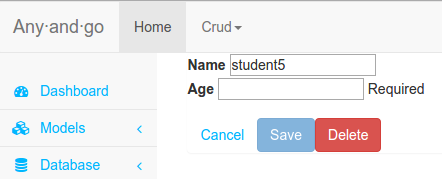
As you can see the form has been autogenerated, to be according to your little change in the model.
Is very annoying when you are developing that you need to login every time the server reloads, so we included a feature for autologin just go and modify config/config-local.json search for this property:
     "autologin": {
         "enabled" : true, <-- Set this to true, by default is false
         "username" : "[email protected]",
         "password" : "123456"
     },
Setting autologin.enabled to true will automatically put user and password on the login form and hit login for you to be redirected to the last url you were looking in the adminnistration panel.
You can easily implement, custom fields for your automatic generated forms. In example:
// Sample Model
// -----------------------------

// Modules Dependencies:
//  - Mongoose (http://mongoosejs.com/docs/guide.html)
//
var mongoose = require('mongoose'),
    Schema = mongoose.Schema;

var sampleSchema = new Schema({
    name          : String,
+    template      : { type: String, ngoform: { control: 'Textarea' } },
+    live          : { type: Boolean, default: true, ngoform: { control: 'Toggle' } },
	created       : Date
});

....
Will produce, the following:

For the Toggle control is as simple as adding a file called ./utils/formstemplates/Toggle.hbs with the following:
<div class="control-group {{#if error}}error{{/if}}">
    <label class="control-label">{{label}}</label>
    <div class="controls">
        <toggle-switch {{#if ngmodel}}ng-model="{{ngmodel}}.{{name}}"{{/if}} on-label="true" off-label="false"><toggle-switch>
    </div>
</div>
Download the package with bower and register the dependency into public/scripts/admin/app.js:
$ bower install --save angular-toggle-switchIn our app.js file just add this line:
/**
 * @ngdoc overview
 * @name anyandgoApp
 * @description
 * # anyandgoApp
 *
 * Main module of the application.
 */
angular
  .module('anyandgoApp', [
    'ngAnimate',
    'ngCookies',
    'ngResource',
    'ngRoute',
    'ngSanitize',
    'ngTouch',
+    'toggle-switch',
    'restangular'
  ])
  .config(function ($routeProvider, $locationProvider, RestangularProvider) {
.....$ grunt create:locale:es-esCreates a new file under translation folder called ./locales/es-es.json.
Adds translation flag to the menu, modifying ./views/partials/site-menu.jade:
            //public:translation:menu:start
            li
               a(href='#', langsupport="en-us") en-us
             li
               a(href='#', langsupport="es-ar") es-ar
+            li
+              a(href='#', langsupport='es-es') es-es
             //public:translation:menu:end
Also registers new language into app.js:
i18n.configure({
   // setup some locales: other locales default to en silently
   locales:[
       //global:translation:start
+      'es-es',
       //global:translation:end
       'en-us',
       'es-ar'],
See the result inmediately in your browser:

How to use translations just open a view file views/index.jade:
extends layout

block content
  .jumbotron
    h1=__("pick any·and·go")
    p ...
    p #{__("Welcome to anyandgo MEAN")}
Basically, everytime you call to function double underscore what you are passing as parameter is used as key for translation files. Translation files will auto populate it everytime you refresh the page calling the view.
$ grunt buildprodConcatanates, compress, minify and link all javascripts and stylesheets. It creates a ./dist folder inside the public part:
$ tree public/dist/
public/dist/
├── scripts
│   ├── panel-app.min.js
│   ├── panel-vendors.min.js
│   └── site-vendors.min.js
└── styles
    ├── panel-styles.min.css
    └── site-styles.min.css
We use: grunt-usemin grunt-contrib-clean grunt-contrib-concat grunt-contrib-uglify grunt-contrib-cssmin in order to do that.
And they get automatically linked just simply by setting a global flag, like in ./views/layout-admin.jade:
    - if(settings.envflag !== "production") {
    //-<!-- build:css(public) styles/panel-styles.min.css -->
    //bower:css
    link(rel='stylesheet', href='/components/bootstrap/dist/css/bootstrap.css')
    link(rel='stylesheet', href='/components/font-awesome/css/font-awesome.css')
    link(rel='stylesheet', href='/components/metisMenu/dist/metisMenu.css')
    //-<!-- endbuild -->
    //endbower
    - } else {
    link(rel='stylesheet', href='/dist/styles/panel-styles.min.css')
    - }
The flag setup is in ./app.js:
app.set("envflag", process.env.NODE_ENV);Internationalization support was added. To seee the translations source files you can inspect the ./locales folder:
$ tree locales/
locales/
├── en-us.json
└── es-ar.json
By default it loads es-ar translations, the configuration is inside app.js file:
// i18n setup
i18n.configure({
  // setup some locales: other locales default to en silently
  locales:['en-us', 'es-ar'],
  // sets a custom cookie name to parse locale settings from  - defaults to NULL
  cookie: 'lang',
  // where to store json files - defaults to './locales' relative to modules directory
  directory: __dirname + '/locales',
  defaultLocale: 'es-ar'
});
Language preference is stored in a cookie, to test this is working you can try modifying the cookie on client side and reload the page:
// Try running this in the js console
function setCookie(cname, cvalue, exdays) {
    var d = new Date();
    d.setTime(d.getTime() + (exdays*24*60*60*1000));
    var expires = "expires="+d.toUTCString();
    document.cookie = cname + "=" + cvalue + "; " + expires;
}

setCookie("lang","en-us", 2);
// and refresh the page, notice lang has changed to be en-us
Fixtures are fixed datasets that helps us to populate mongo collections. We use fixtures during test, to ensure we have data to operate with. And also anyandgo uses fixtures on server start, to ensure certain collections are filled in before web app is launched. Take a look at app.js:
// DB Fixtures
if (config.fixtures && config.fixtures === "enabled") {
 // Load Fixtures
 require('./fixtures');
}
For fixture loading we are using mongoose-fixtures. We basically load different datasets for each environment. You may want to take a look at ./fixtures folder:
$ tree fixtures
fixtures/
├── dev
│   └── admins.js
├── index.js
├── local
│   └── admins.js
├── prod
│   └── admins.js
├── shared
│   └── admins.js
└── travisci
    └── admins.js

5 directories, 6 files
Notice that if flag "fixtures" is "enabled" in our config: anyandgo will autoload datasets for each collection ( note loading fixtures will clear the existing contents of a collection). In the treeview example shown above, we only are going to override admins collection. We are also adding a shared folder that is shared for all environments.
Mail support was added, using nodemailer and nodemailer-smtp-transport. See the configs:
    "mail" : {
        "enabled" : true,
        "transport" : "smtp",
        "host" : "mail.your-email-host.io",
        "port" : 25,
        "contact" : "[email protected]",
        "auth" : {
            "user" : "user-email-here",
            "pass" : "secret-pass-here"
        }
},Using the Google reCAPTCHA Service and node-recaptcha package. You can enable this feature just by changing the config settings.
    "captcha" : {
        "enabled" : true,
        "publickey" : "insert-key-here",
        "privatekey" : "insert-key-here"
    },
By enabling config you can save the server log in a custom file, this is very useful for production environments. Just change your config file config/config-local.json to included the following:
{
    "app": {
        "domain" : "127.0.0.1",
+        "port": 3000,
+        "logs": {
+            "enabled": true,
+            "file": "access.log",
+            "format": "dev"
+         }
    },
"auth": {| Parameter | Description |
|---|---|
| app.logs.enabled | Enables / disables logs |
| app.logs.file | Path to log file (access.log by default) |
| app.logs.format | Morgan Predefined Formats |
Create the log file manually:
$ touch access.logStart the server, and then monitor the logs files by doing:
$ tail -f access.logSee CORS
Added support for metadata, see ./views/layout.jade.
    block meta
      // for Google
      meta(name='description', content='')
      meta(name='keywords', content='')
      meta(name='author', content='')
      meta(name='copyright', content='')
      meta(name='application-name', content='')
      // for Facebook
      meta(property='og:title', content='')
      meta(property='og:type', content='article')
      meta(property='og:image', content='')
      meta(property='og:url', content='')
      meta(property='og:description', content='')
      // for Twitter
      meta(name='twitter:card', content='summary')
      meta(name='twitter:title', content='')
      meta(name='twitter:description', content='')
      meta(name='twitter:image', content='')
Added Google Analytics tracking configuration. See the config file:
    "analytics": {
        "enabled" : true,
        "tracking": "UA-XXXXX-X"
},Facts about this implementation:
- Started from basic generation
- Jade template engine
Modules added:
Front end assets:
How to get started with anyandgo?
$ npm install -g grunt-cli bower yo mocha
$ git clone [email protected]:cortezcristian/anyandgo.git
$ cd anyandgo
$ npm install && bower install && grunt