-
Notifications
You must be signed in to change notification settings - Fork 17
Home
Please feel free to make any changes you want and put it out.
- About
- Requirements
- Recommended
- Installation
- Uninstall
- File structure
- Script Variables
- Alexa
Notification Center is a package for Home Assistant, which works together with the Notifier App in AppDaemon.
It is used to send, in one place, text messages (Telegram, Push...), TTS Google and Alexa, Voip notifications to you and/or your devices such as Pcs, smartphones, pads, etc.
In summary, you send notifications with the script service ( script.my_notify ) via variables.
The script creates an event in Home Assistant, with the name notifier and with all the data set in the variables.
Appdaemon’s Notifier application, which listens to the notifier event, distributes text, audio,
and persistent notifications on the various devices based on the received data.
The package must be configured with the blueprints file,
essential to get the right information and avoid continuous changes in case of future updates.
Some references in Italian:
- Since 2018/19 - Guida Centro Notifiche HassioHelp 1
- Guida Centro Notifiche HassioHelp 2
- Guida Centro Notifiche HassioHelp 3
- Forum
⚠ WARNING: Before installing this package, you must install the following requirements.
- Packages Folder
- AppDaemon - Addon or Container
- Notifier
- Alexa Media Player Custom Component. Only for Alexa device (wiki!)
- HACS - Home Assistant Community Store
- Home Assistant Community Add-ons
- Person Integration - Device tracker
- Sensor Workday
The complete installation, including the requirements, is described below. In some cases, you can choose whether to continue manually or use the various tools provided (simple and fast). (example My Home Assistant)
First of all you need to enable Packages Folder in Home Assistant.
homeassistant:
packages: !include_dir_named packages-
Click the Home Assistant My button below to open the add-on on your Home Assistant instance.
-
Click the "Install" button to install the add-on.
-
Start the "AppDaemon" add-on
-
Check the logs of the "AppDaemon" add-on to see if everything went well.
-
Please, if you don't find the AppDaemon add-on in the Home Assistant add-on store, follow these instructions to import Home Assistant Community Add-ons
-
Video Install Addon appDaemon
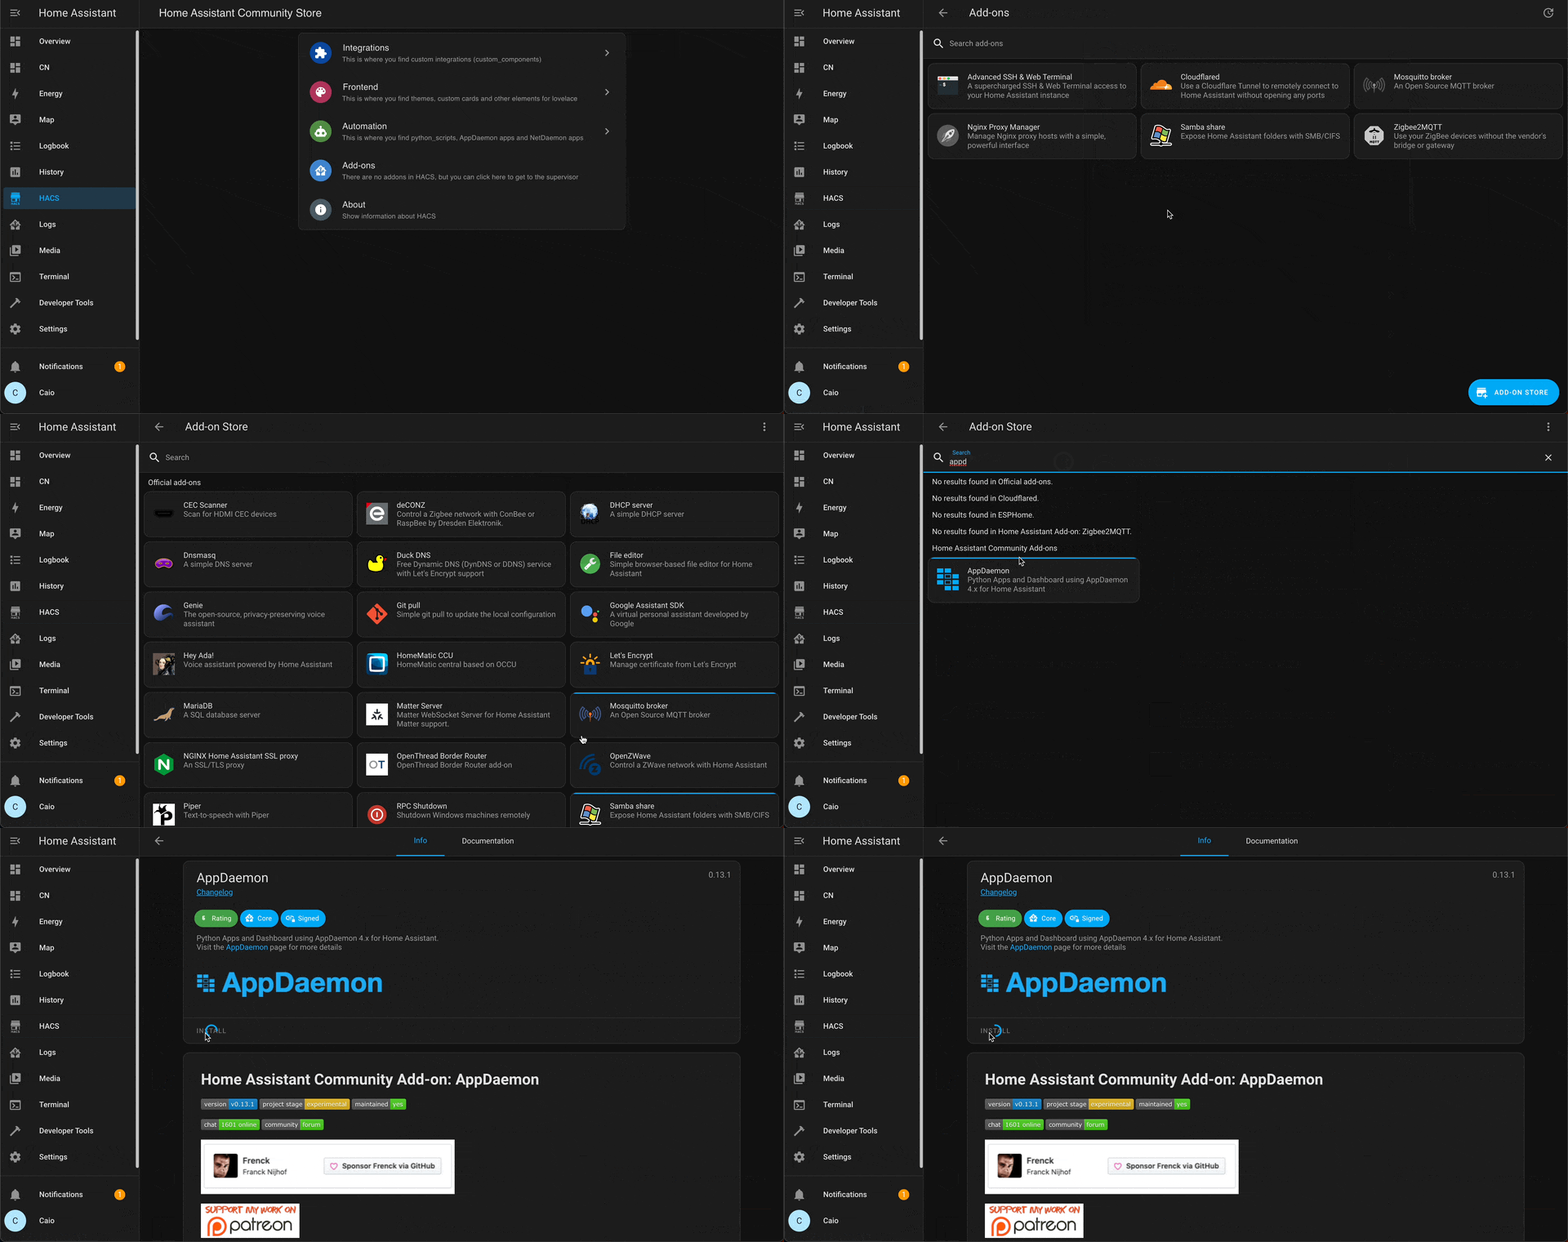
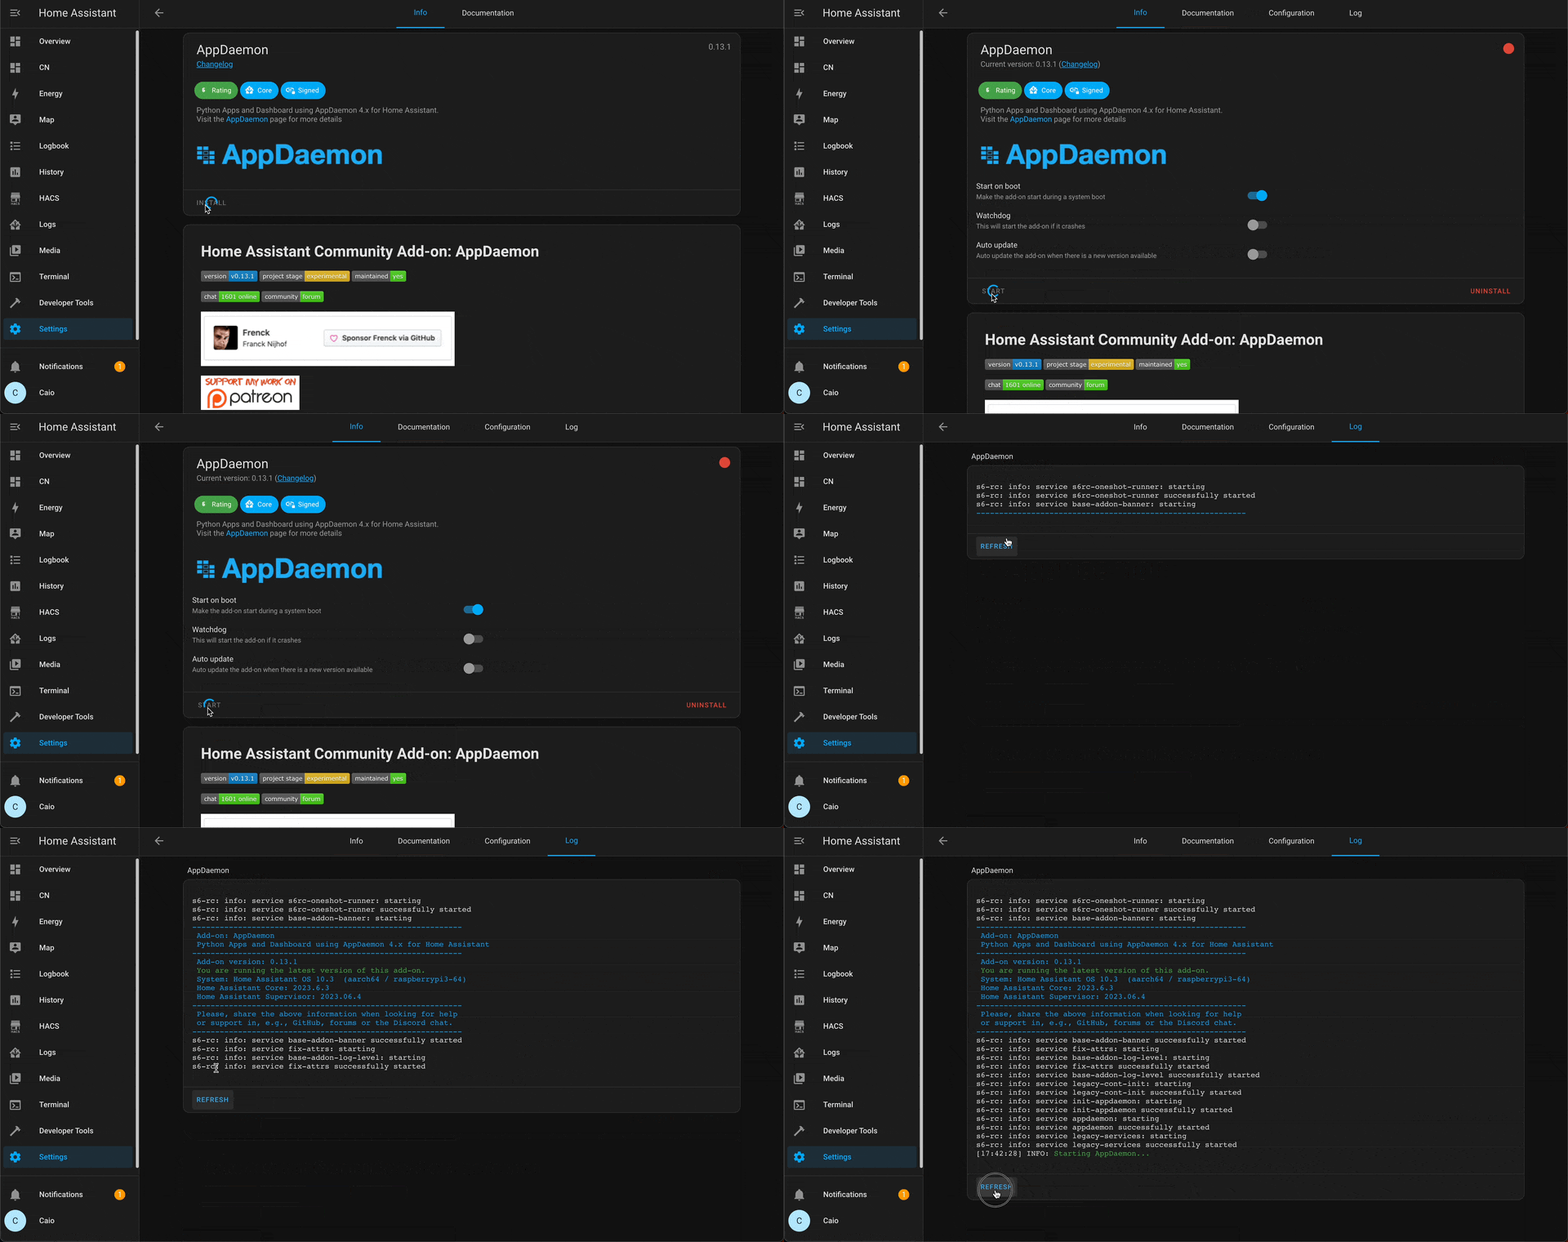
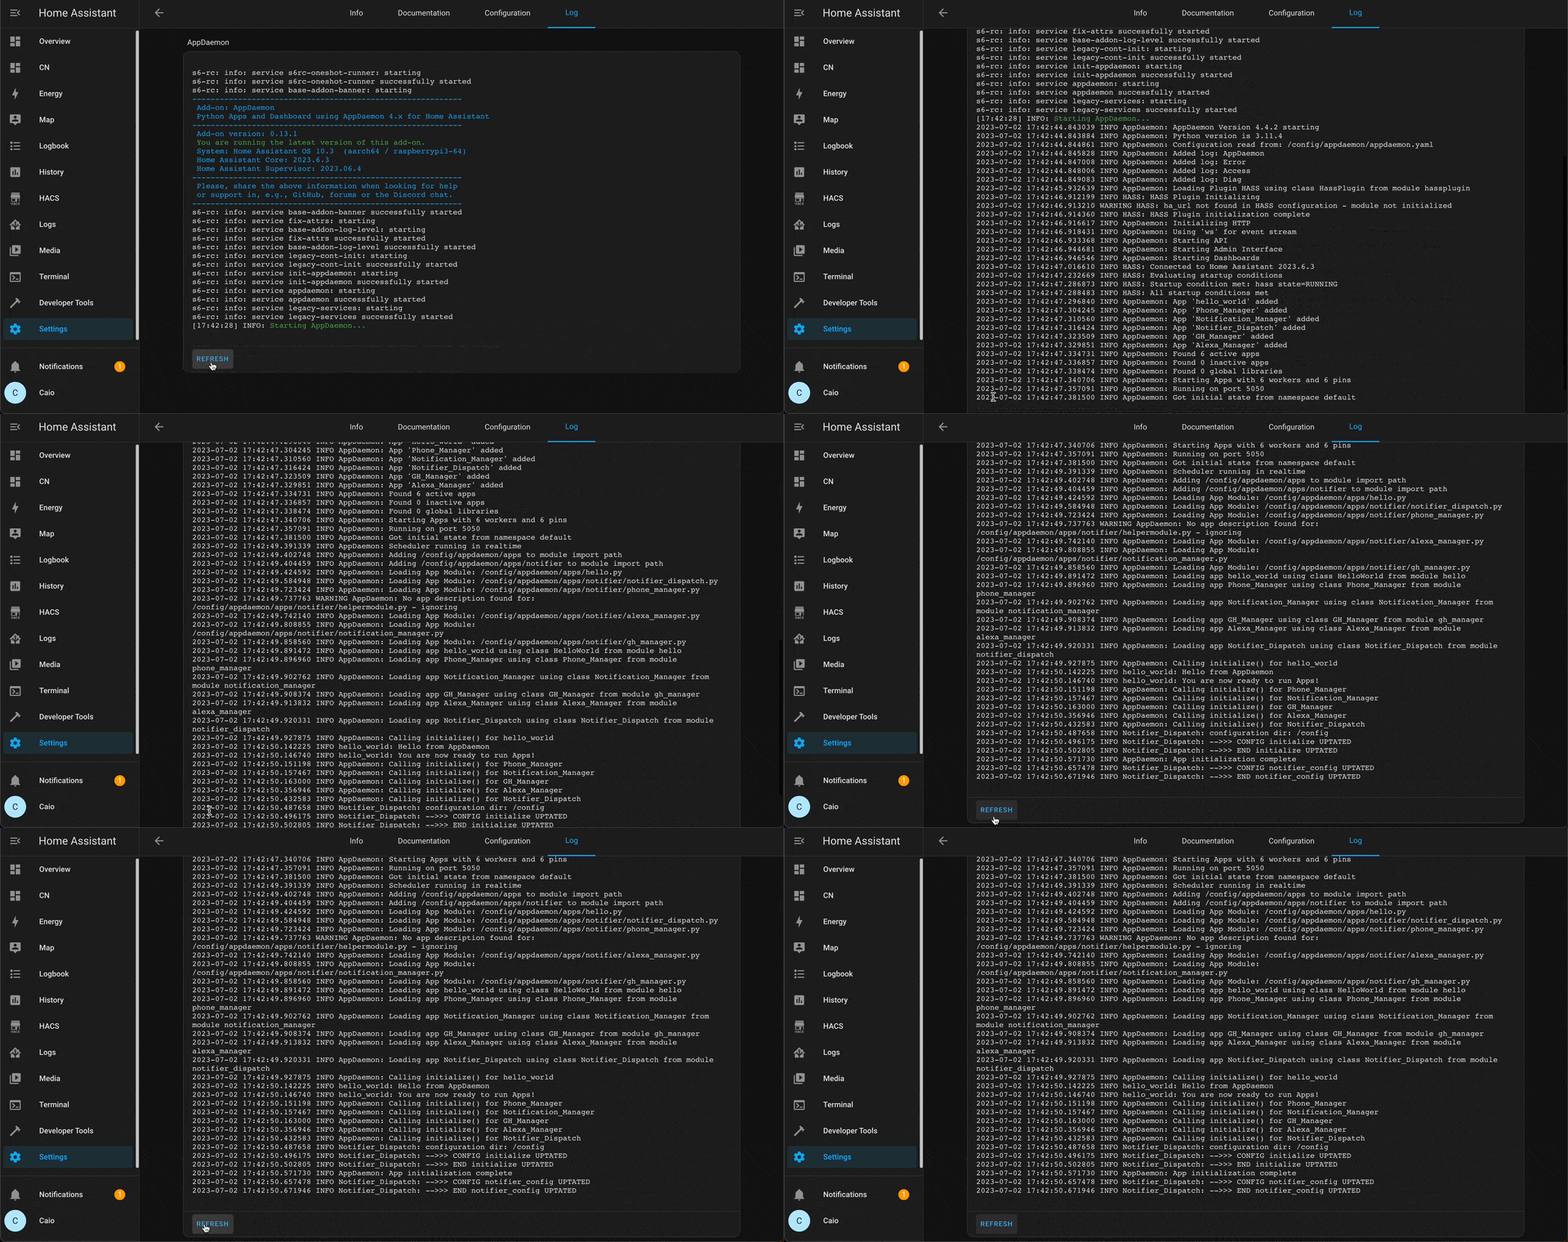
-
The Notifier app is best installed using HACS (Home Assistant Community Store), so that you can easily track and download updates. Please follow the installation instructions on the official page HACS download
-
Make sure you have the option Enable AppDaemon apps discovery & tracking. This is located in: Configuration -> Integrations -> HACS (CONFIGURE).
Video Option - Enable AppDaemon
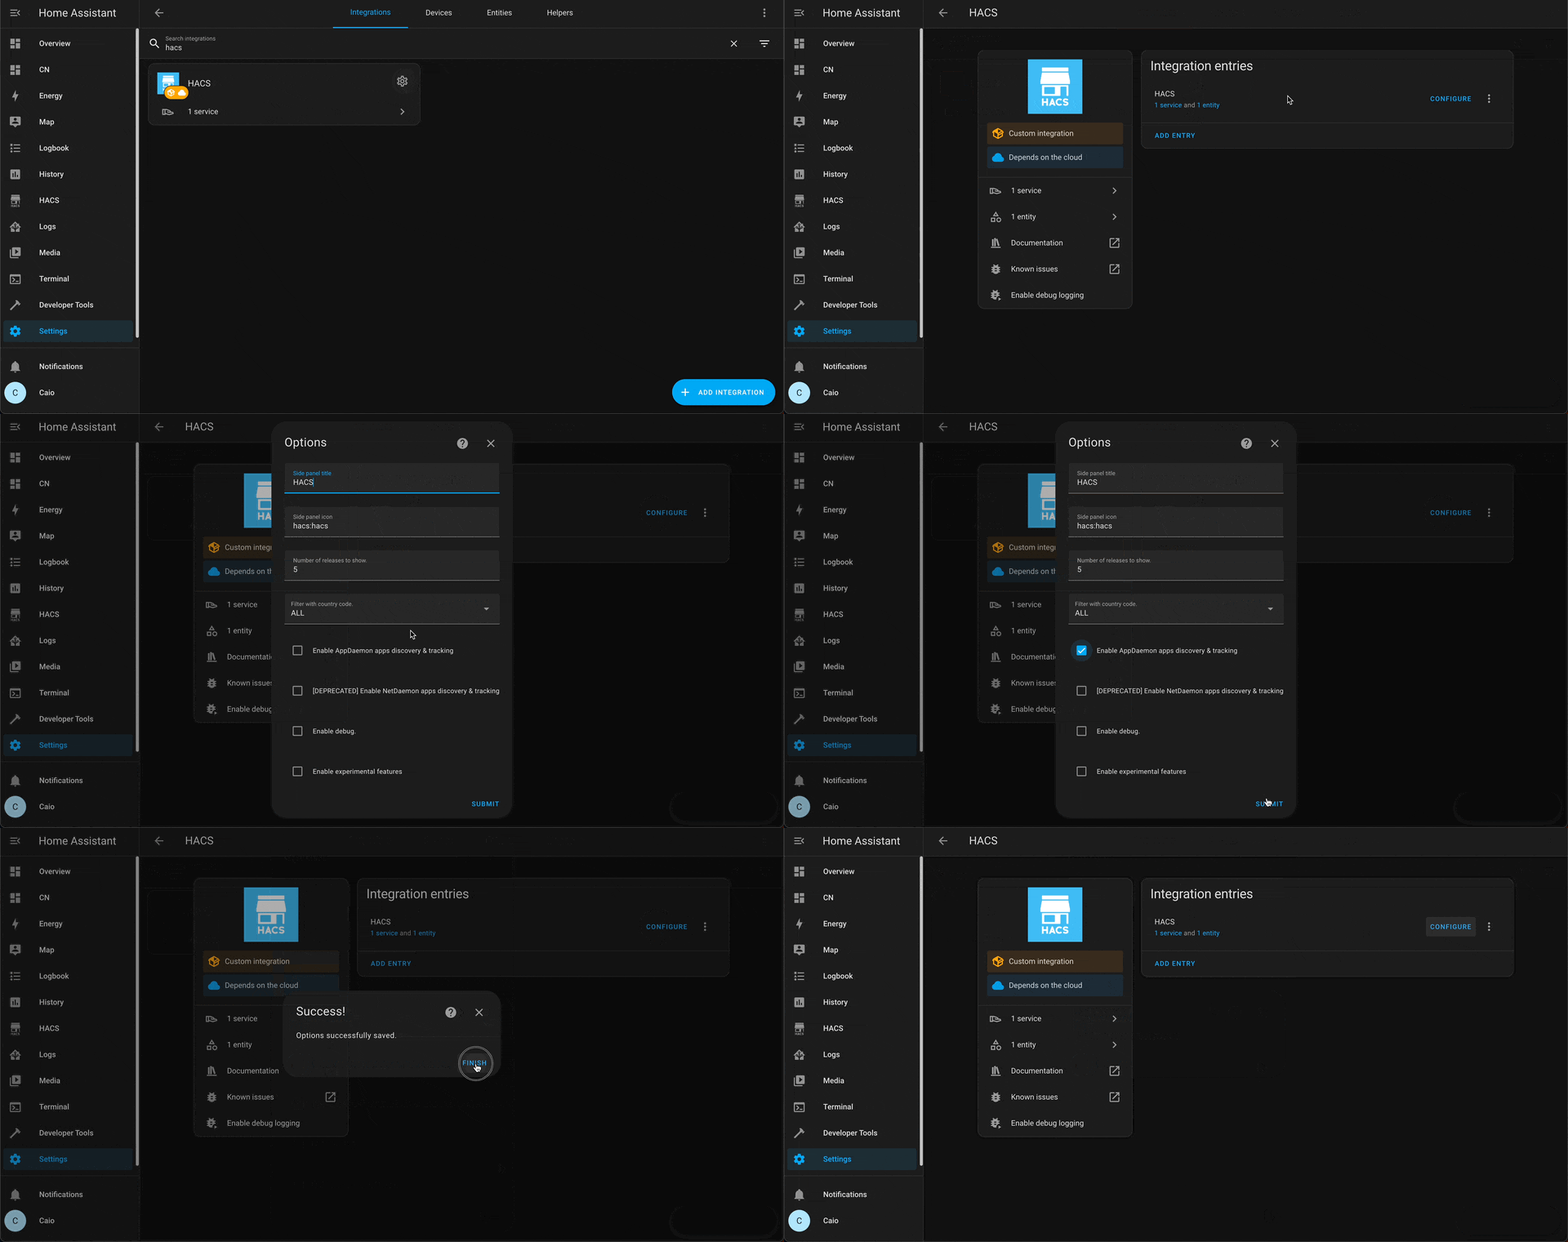
⚠ WARNING: Any AppDaemon app downloaded with HACS is stored in appdaemon/apps/ in your Home Assistant configuration directory.
🚨 Breaking changes for addon-appdaemon v0.15.0 Migrate AppDaemon config out of Home Assistant config folder
If you want to use HACS and keep your apps up to date, you need to edit the appdaemon configuration file, and point to a different directory for apps. To do this, you can use for example, Home Assistant Add-on File editor. See Home Assistant Advanced configuration
Why wont the file editor allow me to navigate out of config/? If you have a look at the app (configurator/file editor) there is an option that says enforce basepath, change that to false. Then restart the app.
Below, a complete example, for those who use the AppDaemon addon. /addon_configs/a0d7b954_appdaemon/appdaemon.yaml
---
secrets: /homeassistant/secrets.yaml
appdaemon:
  app_dir: /homeassistant/appdaemon/apps
  latitude: !secret latitude_home
  longitude: !secret longitude_home
  elevation: !secret elevation_home
  time_zone: Europe/Rome
  plugins:
    HASS:
      type: hass
http:
  url: http://127.0.0.1:5050
hadashboard:
admin:
api:

# Optional
logs:
  main_log:
    filename: /homeassistant/logs/appdaemon/appdaemon.log
  access_log:
    filename: /homeassistant/logs/appdaemon/access.log
  error_log:
    filename: /homeassistant/logs/appdaemon/error.log
  diag_log:
    filename: /homeassistant/logs/appdaemon/diag.log
    log_generations: 1
    log_size: 1024
-
Click the button below to add the custom repository into hacs and download it
-
Video Install Notifier App
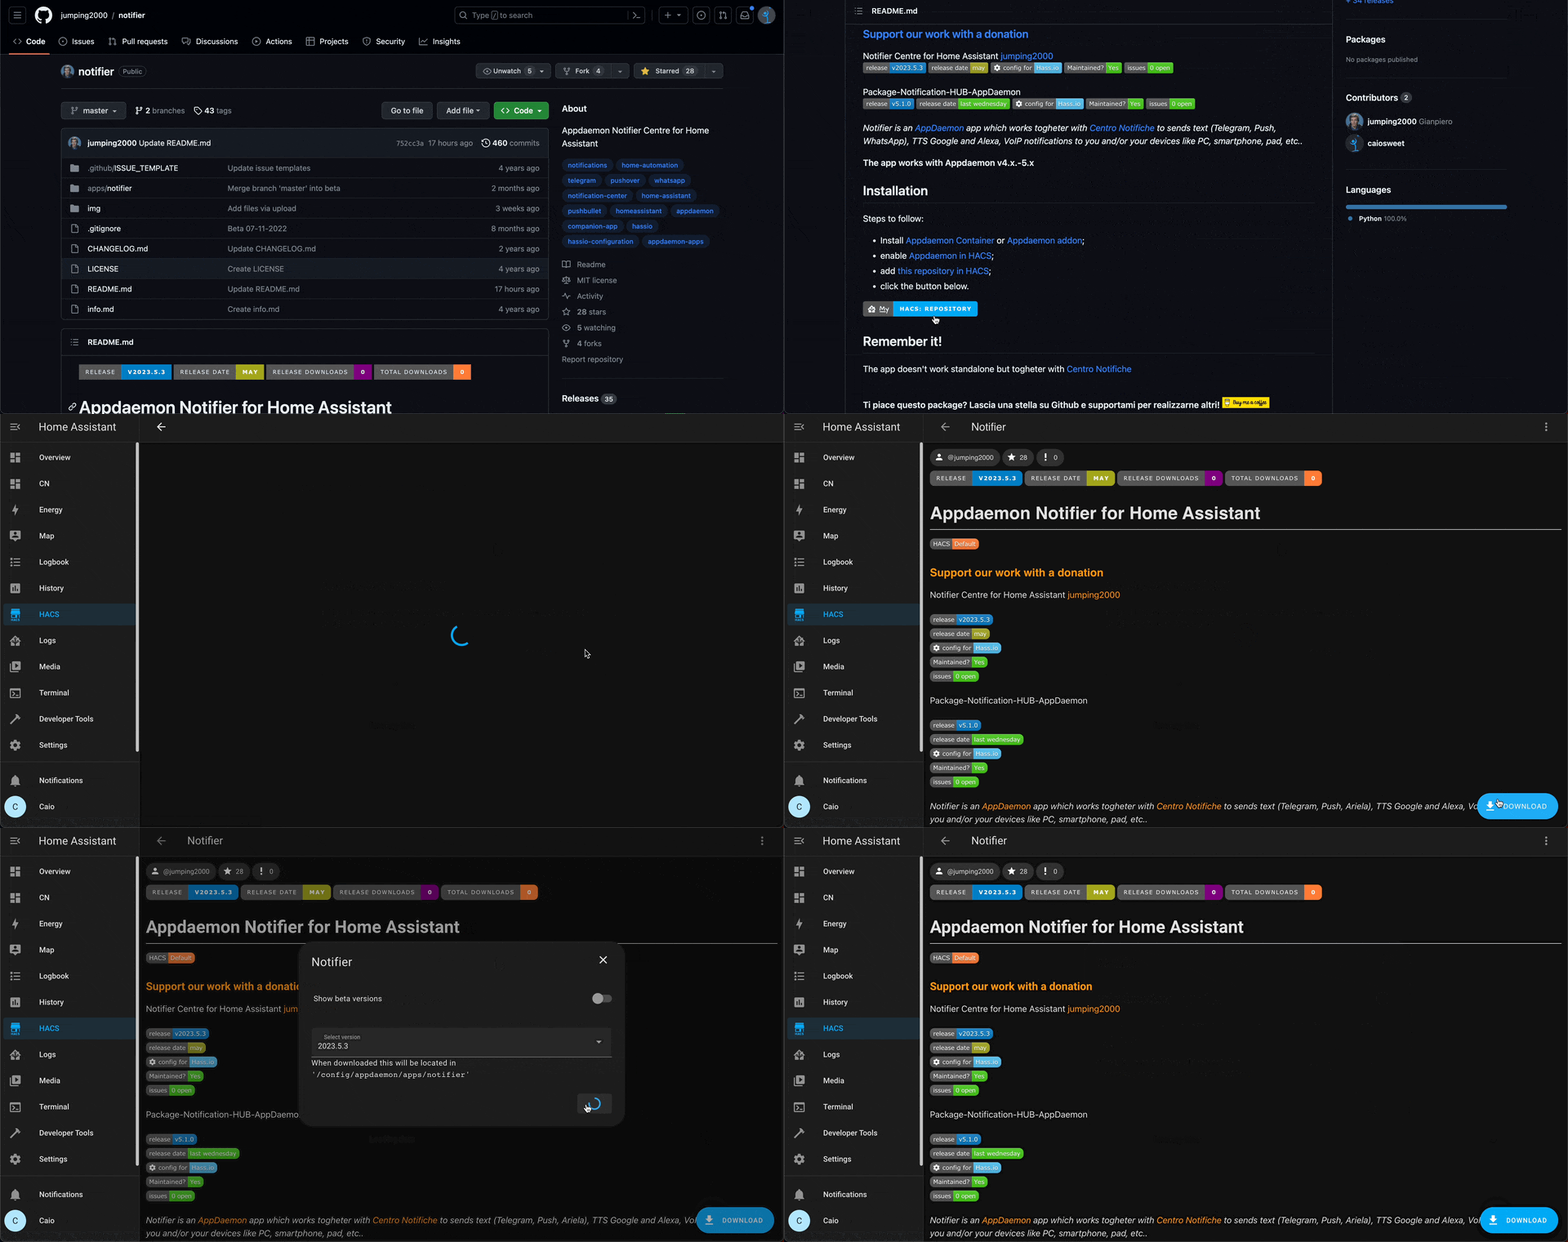
- Download the notifier directory from inside the apps directory here to your local apps directory. That's all.
📌 Please note, that usually blueprints are able to create multiple automations with different parameters. This is not the case for this project, you only need to create one automation from the blueprint.
-
Video. Manage your configuration with a simple interface.
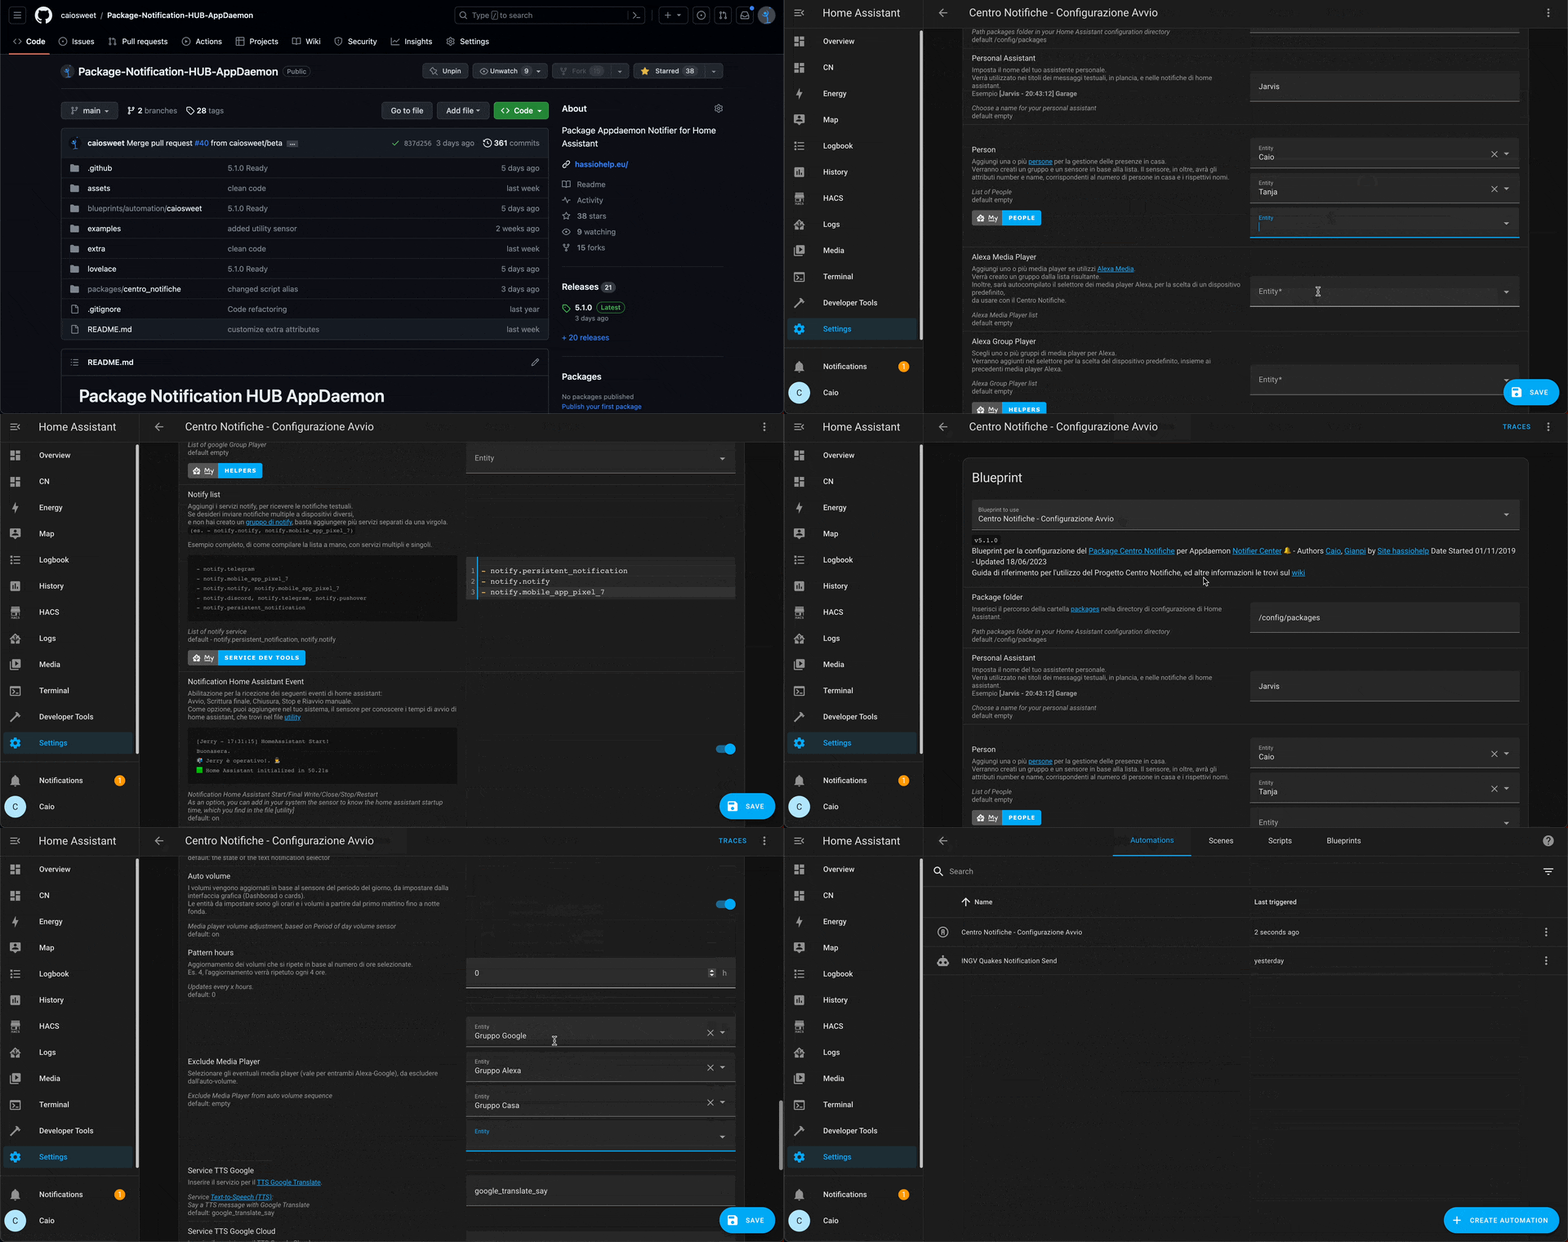
-
👇 Click the Home Assistant My button below to open the import blueprint on your Home Assistant instance.
- ⏬ Download the blueprint file to your local blueprints directory, under
/blueprints/automation/caiosweet/ - 🔄 Reload automation.
- 👉 Go to Settings > Automations & Scenes > Blueprints.
- ✍🏻 Create and configure the automation
Centro Notifiche - Configurazione Avvio. - 🛠 To review or change the configuration, simply edit the automation you just created. (please, not the blueprint)
- If you want the package to be downloaded automatically, don't forget to activate the download switch, at the end of the configuration, and press Save.
- Wait for a few seconds, if it doesn't work, restart AppDaemon.
✅ Note: don't worry, the hub_build_message and hub_customize files, if already present, will be renamed to .old and you won't lose your personal changes.
⚠ WARNING: If you have permission problems, or download errors, with other installation systems (e.g. ha-supervised, ha-container), alternatively, you can download the package manually (see Manual Download).
If you want to download manually, see below, but be careful. I assume packages is the name of the packages folder.
mkdir -p packages/centro_notifiche
cd packages/centro_notifiche
wget https://github.com/caiosweet/Package-Notification-HUB-AppDaemon/releases/latest/download/centro_notifiche.zip
unzip -j centro_notifiche.zip "packages/centro_notifiche/*"
rm centro_notifiche.zipTo do this Go to Settings > Add-ons > AppDaemon and wait a few seconds for it to start and try to send a text from Intercom
Video Restart AppDaemon

- Turn off the download switch.
- Delete the
centro_notifichefolder. - Reload all yaml configuration.
- You will see a persistent notification like this: Purge Notification Center PURGE DATABASE
- Now you can also delete the automation and blueprint.
- If you used hacs, don't forget to remove the repository
Notifier. - If you manually installed the app, don't forget to delete the
Notifierfolder.
In the config folder, you will find all the files you need.
- The Notifier app in the
appdaemon/appsdirectory - The blueprint in the
blueprints/automation/caiosweetdirectory - The package in the
packages/centro_notifichedirectory
.
└── addons/
└── backup/
├── config/
│   ├── appdaemon/
│   │   └── apps/
│   │       └── notifier/
│   │           ├── alexa_manager.py
│   │           ├── alexa_manager.yaml
│   │           ├── gh_manager.py
│   │           ├── gh_manager.yaml
│   │           ├── helpermoduler.py
│   │           ├── notification_manager.py
│   │           ├── notification_manager.yaml
│   │           ├── notifier_dispatch.py
│   │           ├── notifier_dispatch.yaml
│   │           ├── phone_manager.py
│   │           └── phone_manager.yaml
│   │
│   ├── blueprints/
│   │   └── automation/
│   │       └── caiosweet/
│   │           └── notifier_startup_configuration.yaml
│   │
│   ├── packages/
│   │   └── centro_notifiche/
│   │       ├── hub_main.yaml
│   │       ├── hub_alexa.yaml
│   │       ├── hub_google.yaml
│   │       ├── hub_customize.yaml
│   │       └── hub_build_message.yml # <-- DO NOT MODIFY THE .yml EXTENSION
│   │
│   └── home-assistant.log
│
└── share/
└── ssl/This is the main file needed to create the notifier event via the my_notify script ( script.my_notify ).
Contains numerous entities, from sensors to calculate the time of day,
to the sensor for DND (Do Not Disturb), to the various switches to control
priority of messages, text, tts, holidays and more. See: Entities, Pictures, Jinja helper and Full description
This file contains all the entities used for Alexa. If you don’t have any Amazon Alexa devices, you can delete it, saving useless entities in the system. See: Entities, Pictures, Jinja helper and Full description
This file contains all entities used for Google. If you don’t have any Google devices, you can delete it, saving useless entities in the system. See: Entities, Pictures, Jinja helper and Full description
Entities are not supported or you can't customize what you need through the UI, you can do it manually from the hub_customize.yaml file. This, to avoid as much as possible, to change the entity ID, which have reference in appdaemon, and to guarantee the functioning with the app notifier. See: Jinja helper and Full description
You could define macros or import them from custom templates
Some Examples - Click to expand
service: script.my_notify
data:
  <parameter>
Below the
data:we will enter all the parameters that relate to our notification, including the actual message, if we do not enter any parameter but only themessagethe notification center will use all the default settings that we have set in the frontend. I'll leave you a list Complete with the parameters and their operationAlways remember that these options override those set by default.
Note Valid boolean value can be 1, True, On, Yes or 0, False, Off, No, even in lowercase letters.
| Name | Type | Default | Description |
|---|---|---|---|
| title | string | None | Title for text notifications |
| message | string | Greeting | Message to be sent. Including build message template. |
| target | - | None | Not yet implemented :-/ |
| called_number | string | default | Telephone number for DssVoip or username/number for CallMeBot. |
| caption | string | Message | Comment accompanying an image. If missing, message is used. |
| html | bool | False | True, format text in HTML instead of markdown. |
| image | string | None | The local path of an image to attach to the notification or a url. |
| link | string | None | A web address to attach to the text notification. Will not be considered by TTS. |
| location | string | None | Send notification only if you are at home (home) or away (not_home). |
| no_show | bool | False | True, disables persistent notification. |
| notify | bool/string | default | The notify service to send the notification. Multiple notification service is allowed, comma-separated. False not to send. |
| priority | bool | False | True, by-pass DND (do not disturb). |
| alexa | bool/dict | None | True, enable Alexa and send the main message. Other parameters see below in dictionary mode. |
| bool/dict | None | True, enable Google and send the main message. Other parameters see below in dictionary mode. | |
| discord | dict | None | All data under Discord. |
| mobile | dict | None | All data under Mobile App. |
| pushover | dict | None | All data under Pushover. |
| telegram | dict | None | All data under Telegram. |
| dict | None | All data under Whatsapp addon (whatsapp.send_message). |
| Name | Type | Default | Description |
|---|---|---|---|
| message | string | Main message | You can also use message, overwrites the main message anyway and does not pass to the build message template. |
| media_player | string/list | group | entity_id, friendly_name or both, for media player, sensor or group. (comma separated list) |
| volume | float | 0.1 | Set the volume to a value between 0 and 1 (e.g. 0.3) |
| method | string | all | all, speak. |
| type | string | tts | tts, announce, push, dropin_notification or dropin, it's the same. |
| title | string | Main title | Title for the push service (not valid for dropin notification). |
| push | bool | False | Send a push notification in addition to the tts message. |
| wait_time | float | 3.0 | Estimated time to finish the message before moving on to the next. Value expressed in seconds (e.g. -2 or 8). |
| ssml | bool | off | By-pass switch SSML mode. (see Alexa SSML options) |
| notifier | string | alexa_media | Alexa services. |
| media_content_id | string | None | Ex. amzn_sfx_doorbell_chime_01, Alexa. GoodMorning. Play... |
| media_content_type | string | None | sound, sequence, image, TUNEIN, AMAZON_MUSIC, SPOTIFY, APPLE_MUSIC... |
| mode | bool | False | Useful to use as a switch with templates. |
| priority | bool | False | By-pass Alexa switch and dnd. |
| event_id | string | None | Alexa Actions custom skill. |
Alexa SSML options
| Options | Type | Default | Description |
|---|---|---|---|
| audio | string | None | Audio file to play. |
| language | string | it-IT | The format is xx-XX (e.g. en-GB) see supported language table. |
| pitch | float | 0.0 | Raise or lower the tone (pitch) of the speech. min value -33.3 max 50. |
| rate | float | 100 | Modify the rate of the speech. min value 20 max 200. |
| ssml_volume | float | 0.0 | Change the volume for the speech. min value -50 max 4.08. |
| voice | string | Alexa | Speak the text with the specified Amazon Polly voice. See supported voice-id table. |
| whisper | bool | False | If true, applies a whispering effect to the speech. |
Table - Click to expand
| Language | Code | Voice-id |
|---|---|---|
| Italian | it-IT |
Carla, Giorgio, Bianca |
| English US | en-US |
Ivy, Joanna, Joey, Justin, Kendra, Kimberly, Matthew, Salli, |
| English Canada | en-CA |
|
| English Australia | en-AU |
Nicole, Russell, |
| English UK | en-GB |
Amy, Brian, Emma, |
| English India | en-IN |
Aditi, Raveena, |
| French France | fr-CA |
Chantal, |
| French Canada | fr-FR |
Celine, Lea, Mathieu, |
| German | de-DE |
Hans, Marlene, Vicki, |
| Hindi | hi-IN |
Aditi, |
| Japanese | ja-JP |
Mizuki, Takumi, |
| Portuguese Brazilian | pt-BR |
Vitoria, Camila, Ricardo, |
| Spanish US | es-US |
Penelope, Lupe, Miguel, |
| Spanish Spain | es-ES |
Conchita, Enrique, Lucia, |
| Spanish Mexico | es-MX |
Mia |
| Name | Type | Default | Description |
|---|---|---|---|
| message | string | Main Message | Alternative message to the main one |
| media_player | string/list | selected | entity_id comma separated list. |
| volume | float | None | Volume with a value between 0 to 1 (e.g. 0.9) |
| media_content_id | float | None | xxxxxxx |
| media_content_type | string | None | xxxxxxx |
| mode | bool | Optional | Useful to use as a switch with templates. |
| priority | bool | False | By-pass Alexa switch and dnd. |
