- Submission is in pairs, but it's better for practice if you start alone.
- Coding: 70%, Questions: 30%.
- Your submitted git repo should be private, please make [email protected] a collaborator.
- Do not use external libraries that provide the pagination component for you. If in doubt, contact the course staff.
- Deadline: 06/05/2023, end of day.
- Additionally, solve the theoretical questions.
The task is to add pagination to the website:
- Populate your database with 1 million fake examples.(See example in 'prisma/seed.ts')
- Front end component: show 10 posts on each page.
- Updating the backend query to the database (see relevant reading material below)
- To test that your implementation works, you'll also have to populate your databases with fake posts.
This example shows how to implement a fullstack app in TypeScript with Next.js using React (frontend), Next.js API routes and Prisma Client (backend). It also demonstrates how to implement authentication using NextAuth.js. The example uses an SQLite database file with some initial dummy data which you can find at ./prisma/dev.database.
This example demonstrates a website, which shows posts for many users. Some examples of what a user can do:
- Authenticate with OAuth in front of Github.
- Get a list of posts from an external database (Called Prisma).
- Some posts are private drafts, and can only be seen by the author.
- Some posts are public and can be seen by all users.
To understand how to use the Prisma mySQL database, it is recommended to open a new directory and go through the Prisma database tutorial below, notice the Prisma Studio tool.
- What is a repository.
- How to clone it.
- Edit it.
- Push it to a new repository owned by you.
- Add a collaborator.
- Add files and patterns to .gitignore, so you won't submit bloated dirs.
Anything else, i.e. branches, is good to know but not a must. It's good to commit whenever you finish a small step and the project is working. The goal is to have a safe point to return to.
Hw1 will be submitted via Github. Please open a user with your BGU email address. To securely update files from your machine by ssh authentication: https://docs.github.com/en/authentication/connecting-to-github-with-ssh/checking-for-existing-ssh-keys
or using OAuth: https://docs.github.com/en/authentication/keeping-your-account-and-data-secure/creating-a-personal-access-token
This app contains material that we haven't seen yet in class, and that is not needed to complete this task: such as server-side rendering, static site generation, dynamic routing, and OAuth.
git clone [email protected]:bgu-frontend/hw1-blog.gitInstall npm dependencies:
cd hw1-blog
npm installRun the following command to create your SQLite database file. This also creates the User and Post tables that are defined in prisma/schema.prisma:
npx prisma migrate dev --name initWhen npx prisma migrate dev is executed against a newly created database, seeding is also triggered. The seed file in prisma/seed.ts will be executed and your database will be populated with the sample data.
To get this example to work, you need to configure the GitHub authentication providers from NextAuth.js.
Expand to learn how you can configure the GitHub authentication provider
First, log into your GitHub account.
Then, navigate to Settings, then open to Developer Settings, then switch to OAuth Apps.
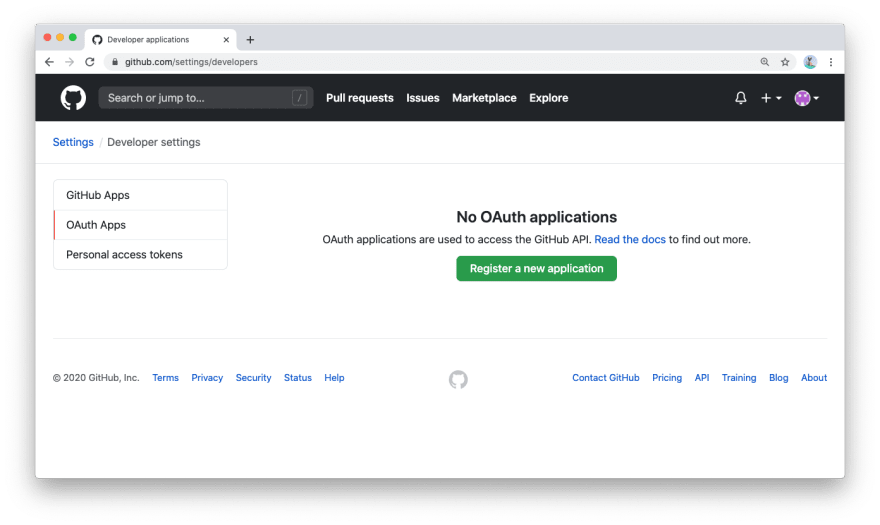
Clicking on the Register a new application button will redirect you to a registration form to fill out some information for your app. The Authorization callback URL should be the Next.js /api/auth route.
For Homepage URL use the localhost path on your machine.
An important thing to note here is that the Authorization callback URL field only supports a single URL, unlike e.g. Auth0, which allows you to add additional callback URLs separated with a comma. This means if you want to deploy your app later with a production URL, you will need to set up a new GitHub OAuth app.

Click on the Register application button, and then you will be able to find your newly generated Client ID and Client Secret. Copy and paste this info into the .env file in the root directory.
The resulting section in the .env file might look like this:
# GitHub OAuth
GITHUB_ID=6bafeb321963449bdf51
GITHUB_SECRET=509298c32faa283f28679ad6de6f86b2472e1bffnpm run devThe app is now running, navigate to http://localhost:3000/ in your browser to explore its UI.
The tester will:
- Clone your submitted repo.
- Run the starter scripts.
- The tester will fill the database with fake records: it could be empty, small, or large database.
- Manually test that the pages show correctly, by testing a few pages and see that they appear correctly.
There are going to be 5 pass/no pass tests for this part.