


This is a simple plugin to connect to your Qlik Sense server and create a mashup by getting the object with a shortcode inside a post or page within the admin panel
- Watch the Video below for Installation and simple Usage (Thnx to Giuseppe Panella).
It is strongly advised to install the plugin from the WordPress plugins manager to receive notifications of future updates. This can be done as follows:
- Login to your WordPress Admin Portal.
- On the left hand navigation panel, select "Plugins".
- Towards the top of the plugins list, click the "Add New" button.
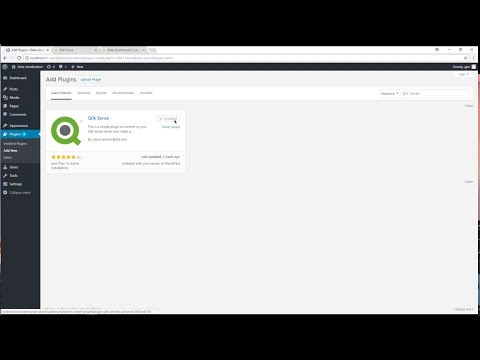
- In the search box towards the right hand side, type "Qlik" and hit enter to search.

- The Qlik Sense plugin is currently one of only two results returned. Click the "Install Now" button next to it.

- WordPress will then download and install the plugin for you. Once complete, "Install Now" button will change to "Activate". Click the "Activate" button to complete the installation.
- The plugin is now installed and ready to Configure.


Before the plugin can be used, it must be configured as follows:
- Login to your WordPress Admin Portal.
- On the left hand navigation panel, select "Qlik Sense".
- Enter the relevant Qlik Sense server URL, Virtual Proxy, Port and App ID(s) to connect to your Qlik Sense server:

- If you are using a local install of Qlik Sense Desktop instead, your settings should appear as follows:


The plugin utilizes a WordPress shortcode to insert Qlik Sense objects into a post or page. There are currently 3 shortcodes available to insert Qlik Sense objects, a clear selections button or the Qlik Sense selections toolbar. The shortcodes can be added manually as detailed below or alternatively, the shortcodes can be generated and inserted using the buttons provided within the WordPress text or visual post/page editor. In the text editor, place the cursor in the post/page where you wish to insert the object, then click the relevant Qlik Sense button on the editor menu. You You may be prompted to enter required parameters for the shortcode. Once complete, the shortcode will be added to the post or page.


This shortcode allows you to embed a chart, table or other Qlik Sense object. The shortcode syntax is as follows:
[qlik-sense-object id="page1-obj2" qvid="nvqpV" height="400"]
Parameters are as follows:
- id="": is the unique div id. This is needed especially when you want to display the same object in 2 different instances
- qvid="": Is the object id as found in the "dev-hub/single-configurator" or the Qlik Explorer for Developers
- height="": The height of the visualization in pixels.
- nointeraction="true" (optional): Add this if you want to disable interactions. If you want the objects to have interaction, you can just omit this.
- app2="true" (optional): Add this to get the objects from the app defined as app 2 in the plugin settings.
- appid="" (optional): The variable qs_appid is added to store the value from the custom field appid. The custom field is used to be able to use a separate app for each page rather than the apps defined in the plugin config.
This shortcode allows you to embed a Clear Selections button.
[qlik-sense-object-clear-selections title="Clear Selections"]
Parameters are as follows:
- title="": Defines the text to be displayed on the button
This shortcode allows you to add the Qlik Sense selections toolbar to the post or page.
[qlik-sense-selection-toolbar]
No parameters are possible.
If you save and view the page, it should look something like this. Notice that in the page with app 1 objects I have included an object from app2 and they both display when all pages are loaded on the same screen


- For those that are upgrading to 1.1.7, make sure you set the settings page again with the port and if its over https
- Make sure you or a Qlik Sys Admin whitelists the site's url in your Virtual Proxy
- If the virtual proxy is "yianni" make sure you add in the settings "/yianni/"
- There are known issues with wp's cache plugins.
- You may experience issues if any other plugin is using requirejs.
If you are using it, please send me an email to add your mashup here ([email protected])
- Add button to the WordPress visual editor to make adding shortcodes easier (Thnx to Matt Fryer)
- Made Qlik Sense scripts and style sheets only load on pages and posts containing one or more of the shortcodes (Thnx to Matt Fryer)
- Updated installation and configuration instructions
- Add buttons to WordPress text editor to make adding shortcodes easier (Thnx to Matt Fryer)
- Add Selection Toolbar for 2nd app (Thnx to @nixnut)
- Add Qlik Sense's Selection Toolbar.
- Add "Port" and "Secure" in the options so we can connect to Qlik Sense Desktop
- The variable qs_appid is added to store the value from the custom field appid. The custom field is used to be able to use a separate app for each page.
- Changed the order of loading css.
- Changed the order of loading requirejs.
- Hide the alert window on qlik error
- Changed the order of the loading for css and js. Put them to load first so they do not break any theme
- Added unique id instead of using the qvid so we can display multiple instances of the same object
- Added second app in the settings
- Add virtual proxy to the css and js resources.
- Fixin compatability issues with wordpress.org.
- Added Clear Selections Button.
- Changed the option names to start with qs_.