
This module is a Python wrapper of Android uiautomator testing framework. It works on Android 4.1+ simply with Android device attached via adb, no need to install anything on Android device.
from uiautomator import device as d

d.screen.on()
d(text="Clock").click()$ pip install uiautomator
- Install Android SDK, and set $ANDROID_HOME environment to the correct path.
- Enable ADB setting on device and connect your android device using usb with your PC.
- Set $ANDROID_SERIAL environment in case of multiple android devices connected.
from uiautomator import device as dIn below examples, we use d represent the android device object.
d.infoBelow is a possible result:
{ u'displayRotation': 0,
  u'displaySizeDpY': 640,
  u'displaySizeDpX': 360,
  u'currentPackageName': u'com.android.launcher',
  u'productName': u'takju',
  u'displayWidth': 720,
  u'sdkInt': 18,
  u'displayHeight': 1184,
  u'naturalOrientation': True
}
# Turn on screen
d.screen.on()
# Turn off screen
d.screen.off()
Alternative method is:
# wakeup the device
d.wakeup()
# sleep the device, same as turning off the screen.
d.sleep()# press home key
d.press.home()
# press back key
d.press.back()
# the normal way to press back key
d.press("back")
# press keycode 0x07('0') with META ALT(0x02) on
d.press(0x07, 0x02)Next keys are currently supported:
homebackleftrightupdowncentermenusearchenterdelete(ordel)recent(recent apps)volume_upvolume_downvolume_mutecamerapower
You can find all key code definitions at Android KeyEvent.
# click (x, y) on screen
d.click(x, y)# swipe from (sx, sy) to (ex, ey)
d.swipe(sx, sy, ex, ey)
# swipe from (sx, sy) to (ex, ey) with 10 steps
d.swipe(sx, sy, ex, ey, steps=10)# drag from (sx, sy) to (ex, ey)
d.drag(sx, sy, ex, ey)
# drag from (sx, sy) to (ex, ey) with 10 steps
d.drag(sx, sy, ex, ey, steps=10)The possible orientation is:
naturalornleftorlrightorrupsidedownoru(can not be set)
# retrieve orientation, it may be "natural" or "left" or "right" or "upsidedown"
orientation = d.orientation
# set orientation and freeze rotation.
# notes: "upsidedown" can not be set until Android 4.3.
d.orientation = "l" # or "left"
d.orientation = "r" # or "right"
d.orientation = "n" # or "natural"# freeze rotation
d.freeze_rotation()
# un-freeze rotation
d.freeze_rotation(False)# take screenshot and save to local file "home.png"
d.screenshot("home.png")# dump the widown hierarchy and save to local file "hierarchy.xml"
d.dump("hierarchy.xml")# open notification
d.open.notification()
# open quick settings
d.open.quick_settings()# wait for current window to idle
d.wait.idle()
# wait until window update event occurs
d.wait.update()You can register watcher to perform some actions when a selector can not find a match.
When a selector can not find a match, uiautomator will run all registered watchers.
- Click target when conditions match
d.watcher("AUTO_FC_WHEN_ANR").when(text="ANR").when(text="Wait") \
                             .click(text="Force Close")
# d.watcher(name) ## creates a new named watcher.
#  .when(condition)  ## the UiSelector condition of the watcher.
# .click(target) ## perform click action on the target UiSelector.- Press key when conditions match
d.watcher("AUTO_FC_WHEN_ANR").when(text="ANR").when(text="Wait") \
                             .press.back.home()
# Alternative way to define it as below
d.watcher("AUTO_FC_WHEN_ANR").when(text="ANR").when(text="Wait") \
                             .press("back", "home")
# d.watcher(name) ## creates a new named watcher.
#  .when(condition)  ## the UiSelector condition of the watcher.
#  .press.<keyname>.....<keyname>.()  ## press keys one by one in sequence.
# Alternavie way defining key sequence is press(<keybname>, ..., <keyname>)A watcher is triggered, which means the watcher was run and all its conditions matched.
d.watcher("watcher_name").triggered
# true in case of the specified watcher triggered, else false# remove the watcher
d.watcher("watcher_name").remove()d.watchers
# a list of all registered wachers' namesd.watchers.triggered
# true in case of any watcher triggered# reset all triggered watchers, after that, d.watchers.triggered will be false.
d.watchers.reset()# remove all registered watchers
d.watchers.remove()
# remove the named watcher, same as d.watcher("watcher_name").remove()
d.watchers.remove("watcher_name")# force to run all registered watchers
d.watchers.run()Selector is to identify specific ui object in current window.
d(text='Clock', className='android.widget.TextView')Selector supports below parameters. Refer to UiSelector java doc for detailed information.
texttextContainstextMatchestextStartsWithclassNameclassNameMatchesdescriptiondescriptionContainsdescriptionMatchesdescriptionStartsWithcheckablecheckedclickablelongClickablescrollableenabledfocusablefocusedselectedpackageNamepackageNameMatchesresourceIdresourceIdMatchesindexinstance
# get the child or grandchild
d(className="android.widget.ListView").child(text="Bluetooth")# get sibling or child of sibling
d(text="Google").sibling(className="android.widget.ImageView")# get the child match className="android.widget.LinearLayout"
# and also it or its child or grandchild contains text "Bluetooth"
d(className="android.widget.ListView", resourceId="android:id/list") \
.child_by_text("Bluetooth", className="android.widget.LinearLayout")
# allow scroll search to get the child
d(className="android.widget.ListView", resourceId="android:id/list") \
.child_by_text(
"Bluetooth",
allow_scroll_search=True,
className="android.widget.LinearLayout"
)-
child_by_descriptionis to find child which or which's grandchild contains the specified description, others are the same aschild_by_text. -
child_by_instanceis to find child which has a child UI element anywhere within its sub hierarchy that is at the instance specified. It is performed on visible views without scrolling.
See below links for detailed information:
- UiScrollable,
getChildByDescription,getChildByText,getChildByInstance - UiCollection,
getChildByDescription,getChildByText,getChildByInstance
Above methods support chained invoking, e.g. for below hierarchy
<node index="1" text="" resource-id="android:id/list" class="android.widget.ListView" ...>
  <node index="0" text="WIRELESS & NETWORKS" resource-id="" class="android.widget.TextView" .../>
  <node index="1" text="" resource-id="" class="android.widget.LinearLayout" ...">
    <node index="0" text="Wi‑Fi" resource-id="android:id/title" class="android.widget.TextView" .../>
    <node index="1" text="ON" resource-id="com.android.settings:id/switchWidget" class="android.widget.Switch" .../>
  </node>
  ...
</node>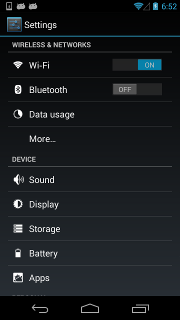
We want to click the switch at the right side of text 'Wi‑Fi' to turn on/of Wi‑Fi.
As there are several switches with almost the same properties, so we can not use like
d(className="android.widget.Switch") to select the ui object. Instead, we can use
code below to select it.
d(className="android.widget.ListView", resourceId="android:id/list") \
  .child_by_text("Wi‑Fi", className="android.widget.LinearLayout") \
  .child(className="android.widget.Switch") \
.click()Also we can use the relative position methods to get the view: left, right, top, bottom.
d(A).left(B), means selecting B on the left side of A.d(A).right(B), means selecting B on the right side of A.d(A).up(B), means selecting B above A.d(A).down(B), means selecting B under A.
So for above case, we can write code alternatively:
## select "switch" on the right side of "Wi‑Fi"
d(text="Wi‑Fi").right(className="android.widget.Switch").click()Sometimes the screen may contain multiple views with the same e.g. text, then you will have to use "instance" properties in selector like below:
d(text="Add new", instance=0) # which means the first instance with text "Add new"However, uiautomator provides list like methods to use it.
# get the count of views with text "Add new" on current screen
d(text="Add new").count

# same as count property
len(d(text="Add new"))

# get the instance via index
d(text="Add new")[0]
d(text="Add new")[1]
...

# iterator
for view in d(text="Add new"):
    view.info  # ...
Notes: when you are using selector like a list, you must make sure the screen keep unchanged, else you may get ui not found error.
d(text="Settings").exists # True if exists, else False
d.exists(text="Settings") # alias of above property.d(text="Settings").infoBelow is a possible result:
{ u'contentDescription': u'',
  u'checked': False,
  u'scrollable': False,
  u'text': u'Settings',
  u'packageName': u'com.android.launcher',
  u'selected': False,
  u'enabled': True,
  u'bounds': {u'top': 385,
              u'right': 360,
              u'bottom': 585,
              u'left': 200},
  u'className': u'android.widget.TextView',
  u'focused': False,
  u'focusable': True,
  u'clickable': True,
  u'chileCount': 0,
  u'longClickable': True,
  u'visibleBounds': {u'top': 385,
                     u'right': 360,
                     u'bottom': 585,
                     u'left': 200},
  u'checkable': False
}
# click on the center of the specific ui object
d(text="Settings").click()
# click on the bottomright corner of the specific ui object
d(text="Settings").click.bottomright()
# click on the topleft corner of the specific ui object
d(text="Settings").click.topleft()
# click and wait until the new window update
d(text="Settings").click.wait()# long click on the center of the specific ui object
d(text="Settings").long_click()
# long click on the bottomright corner of the specific ui object
d(text="Settings").long_click.bottomright()
# long click on the topleft corner of the specific ui object
d(text="Settings").long_click.topleft()d(text="Settings").clear_text() # clear the text
d(text="Settings").set_text("My text...") # set the text# drag the ui object to point (x, y)
d(text="Settings").drag.to(x, y, steps=100)
# drag the ui object to another ui object(center)
d(text="Settings").drag.to(text="Clock", steps=50)Swipe supports 4 directions:
leftrighttopbottom
d(text="Settings").swipe.right()
d(text="Settings").swipe.left(steps=10)
d(text="Settings").swipe.up(steps=10)
d(text="Settings").swipe.down()from uiautomator import point
d(text="Settings").gesture(point(sx1, sy1), point(sx2, sy2)) \
.to(point(ex1, ey1), point(ex2, ey2))Supports two gestures:
In, from edge to centerOut, from center to edge
# from edge to center. here is "In" not "in"
d(text="Settings").pinch.In(percent=100, steps=10)
# from center to edge
d(text="Settings").pinch.Out()# wait until the ui object appears
d(text="Settings").wait.exists(timeout=3000)
# wait until the ui object gone
d(text="Settings").wait.gone(timeout=1000)Possible properties:
horizorvertforwardorbackwardortoBeginningortoEnd
# fling forward(default) vertically(default)
d(scrollable=True).fling()
# fling forward horizentally
d(scrollable=True).fling.horiz.forward()
# fling backward vertically
d(scrollable=True).fling.vert.backward()
# fling to beginning horizentally
d(scrollable=True).fling.horiz.toBeginning(max_swipes=1000)
# fling to end vertically
d(scrollable=True).fling.toEnd()Possible properties:
horizorvertforwardorbackwardortoBeginningortoEnd, orto
# scroll forward(default) vertically(default)
d(scrollable=True).scroll(stpes=10)
# scroll forward horizentally
d(scrollable=True).scroll.horiz.forward(steps=100)
# scroll backward vertically
d(scrollable=True).scroll.vert.backward()
# scroll to beginning horizentally
d(scrollable=True).scroll.horiz.toBeginning(steps=100, max_swipes=1000)
# scroll to end vertically
d(scrollable=True).scroll.toEnd()
# scroll forward vertically until specific ui object appears
d(scrollable=True).scroll.to(text="Security")- Fork the repo, and clone to your computer.
- Checkout a new branch from
developbranch - Install requirements:
pip install -r requirements.txt - Make your changes, and update tests. Don't forget adding your name at the end of 'Contributors' section
- Pass all tests and your code must be covered:
tox. - Commit your changes and submit pull request to
developbranch.
- Xiaocong He(@xiaocong)
If you have any suggestions, bug reports or annoyances please report them to our issue tracker at github issues.
- Android uiautomator works on Android 4.1+, so before using it, make sure your device is Android4.1+.
- Some methods are only working on Android 4.2/4.3, so you'd better read detailed java documentation of uiautomator before using it.
- The module uses uiautomator-jsonrpc-server as its daemon to communicate with devices.